
There are multiple reasons why your external drive is not showing up on macOS Sonoma, so expect troubleshooting to take a while. I actually spent days testing my Mac and hard drive when I faced this issue. If you need to access your files fast, check out the solutions that worked for me—I ranked them from most to least likely to work.
How to Fix External Drive Not Showing up on macOS Sonoma
Try these quick fixes before diving into the more complex solutions:
- Check for physical damage: Try out all the ports on your Mac, use different cables to connect your hard drive, and inspect your devices for visible damage. Note that software troubleshooting can’t fix physical defects.
- Try connecting your drive to another Mac: See if your hard drive will appear on another Mac or Windows laptop. Likewise, try connecting another hard drive to your affected Mac.
- Update your Mac: If your external drive is not showing up on an older version of macOS Sonoma, try updating your Mac. Apple might have addressed this bug in their last macOS release.
1. Check Your Finder Preferences
Time needed: 10 minutes
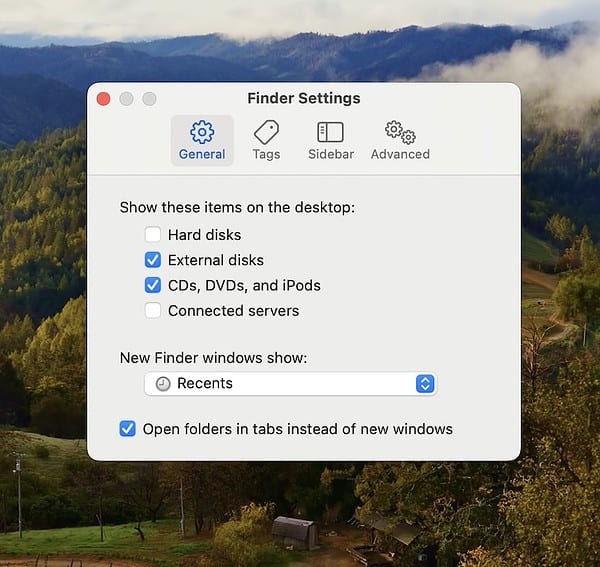
You can set Finder to hide external disks from your desktop. While this feature definitely has several uses, you should disable it if you need to access files on your hard drive. Here’s how to turn it on and off on Finder:
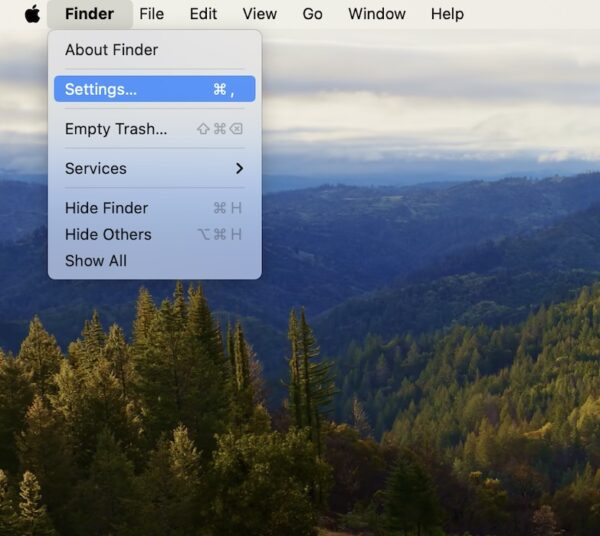
- Open Finder and click the Finder icon in the top menu bar.
- Click Settings and wait for Finder Settings to appear on your screen.
- Under General, tick the boxes beside hard disks, external disks, and CDs, DVDs, and iPods so that they’ll appear on your desktop.


2. Stop Apps From Running in Your Background and Opening at Login
Close the third-party programs that open at login and run in your background while troubleshooting. They could interfere with your Mac’s ability to read hard drives.
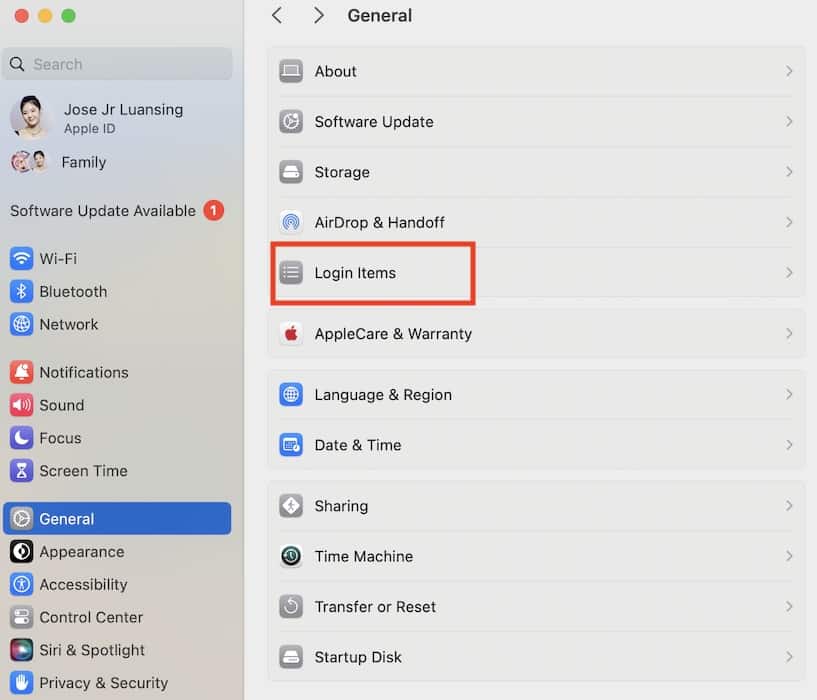
- Open Settings > General > Login Items.
- Under Open at Login, select any program and then click the minus symbol (-) at the bottom-left corner of the section—repeat with the other programs.
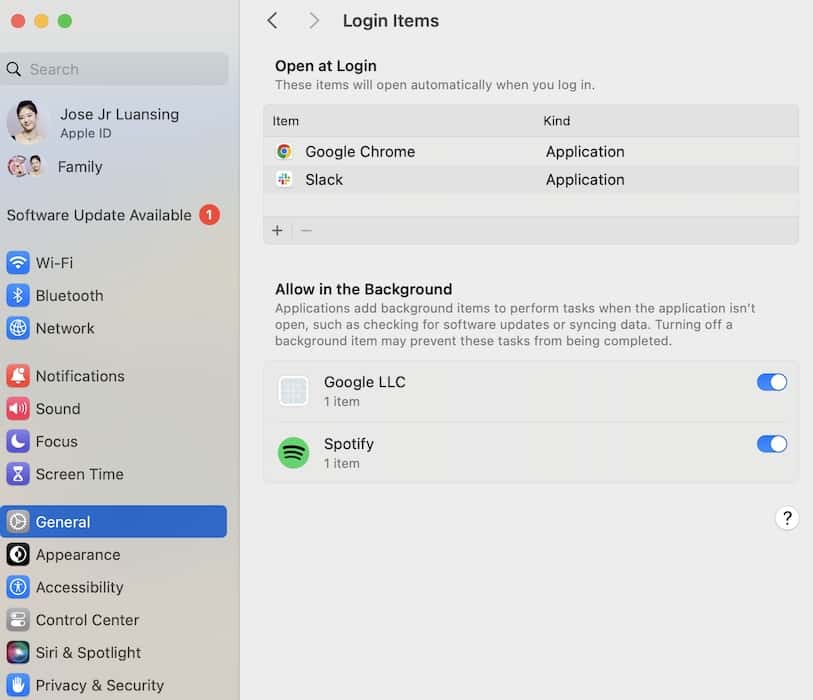
- Under Allow in the Background, toggle off the buttons for the programs listed.


3. Mount Your External Hard Drive
Your Mac automatically mounts external hard drives by default. However, if your disk was physically damaged or previously ejected, it won’t mount even if Disk Utility recognizes it. You’ll have to mount it manually.
- Open Launchpad > Disk Utility, which you’ll likely find in the Other folder.
- Click View in the menu bar and select Show All Devices.
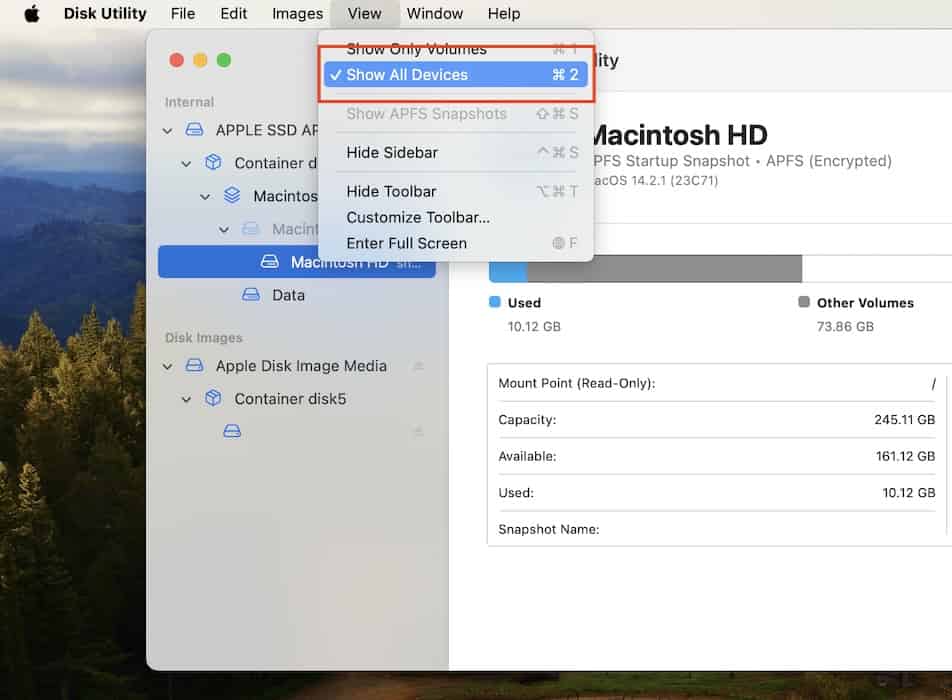
- Highlight your external hard drive in the side navigation pane—you’ll see it under the External list.
- Click Mount in the toolbar at the top of the Disk Utility window.
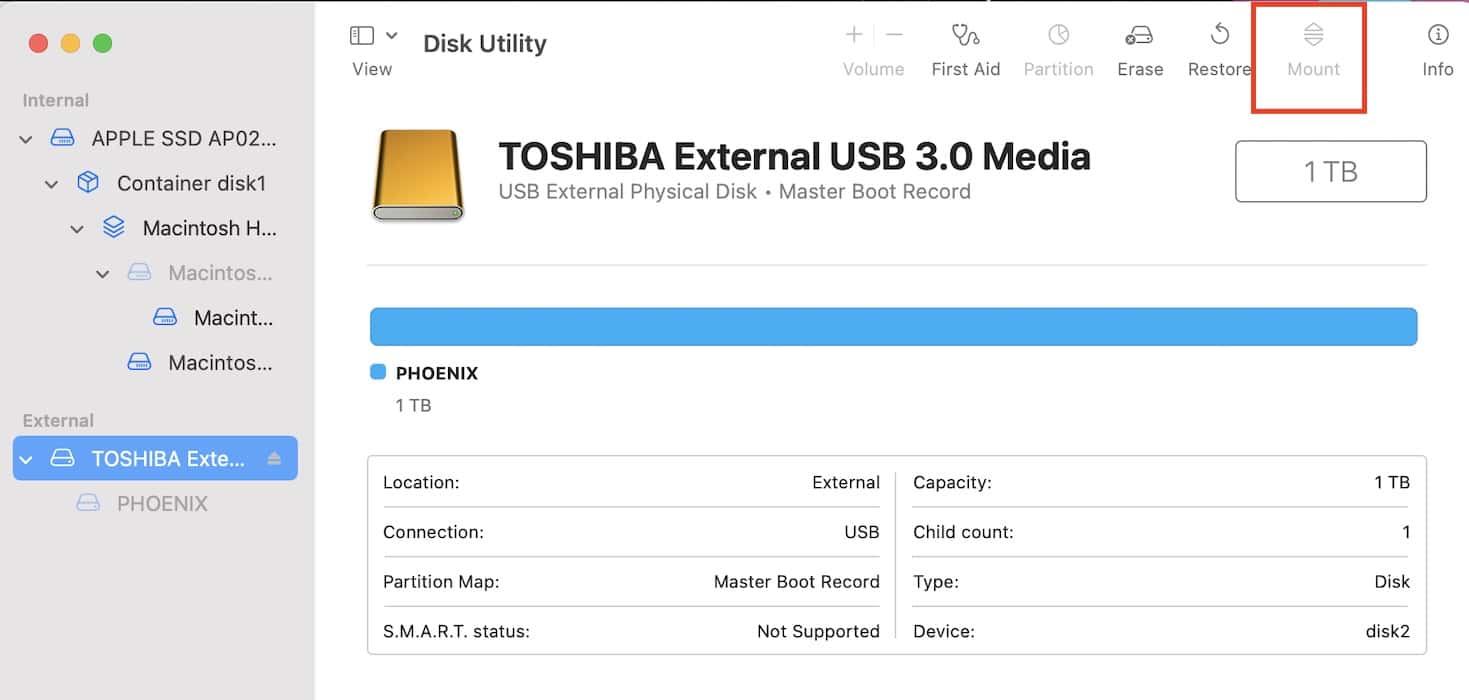
Image Credits: Apple


4. Run First Aid on Disk Utility
If you keep getting an error saying, “Disk could be mounted,” proceed to run First Aid on your hard drive. It’s a built-in tool to spot and repair disk errors on your Mac.
- Open Launchpad > Disk Utility.
- Click View in the menu bar > Show All Devices.
- Highlight your external hard drive in the side navigation pane.
- Click First Aid in the toolbar at the top of the Disk Utility window. Its icon should look like a little stethoscope.
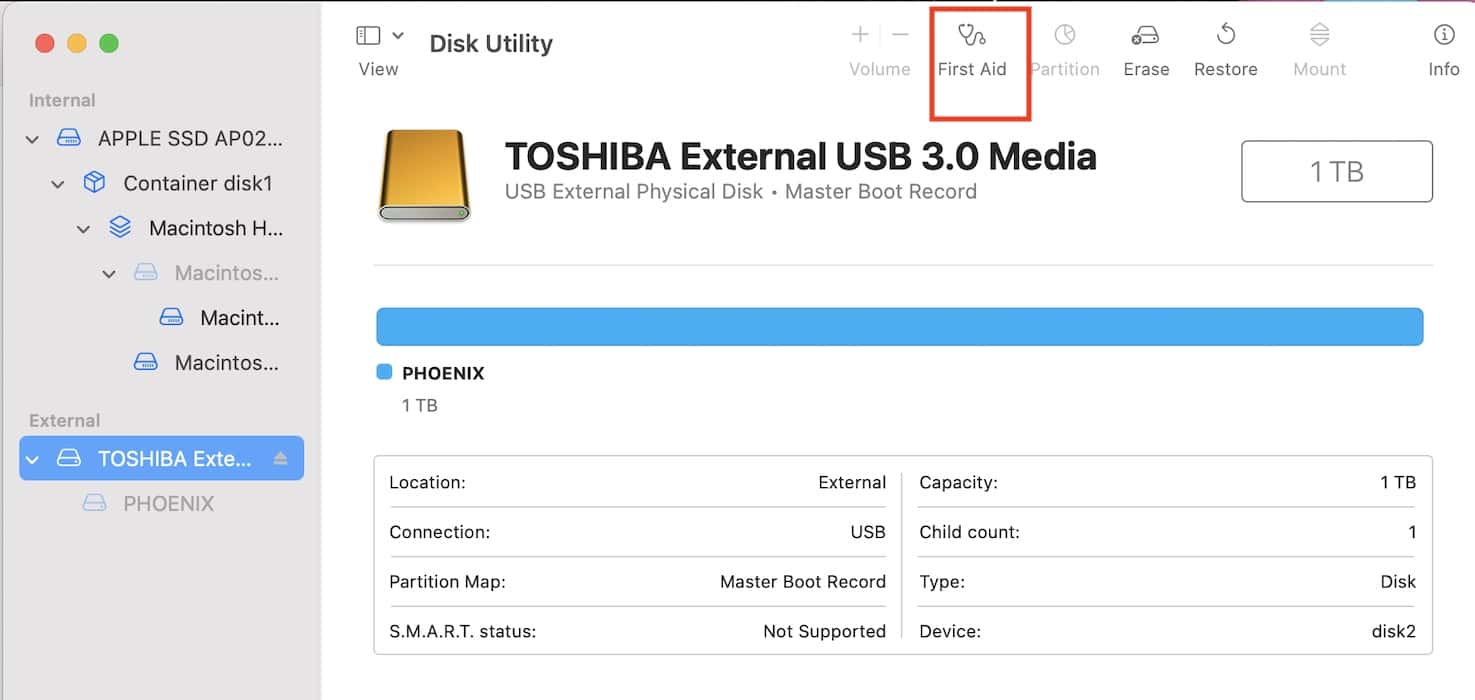
Image Credits: Apple - Select Run in the pop-up window that appears and wait for your Mac to finish running First Aid.

5. Boot Into Safe Mode
Launch Safe Mode if your external drive is still not showing up on your macOS Sonoma device. It halts non-essential system extensions and functions that unintentionally interfere with troubleshooting. Once you enter Safe Mode, run First Aid on Disk Utility, and mount your disk manually—you might yield better results.
Here’s how to launch Apple Silicon Macs (MacBooks with an M1, M2, or M3 chip) in Safe Mode:
- Shut down your Mac and let it rest for a few minutes.
- Press and hold the power button until the Loading Startup Options page appears.
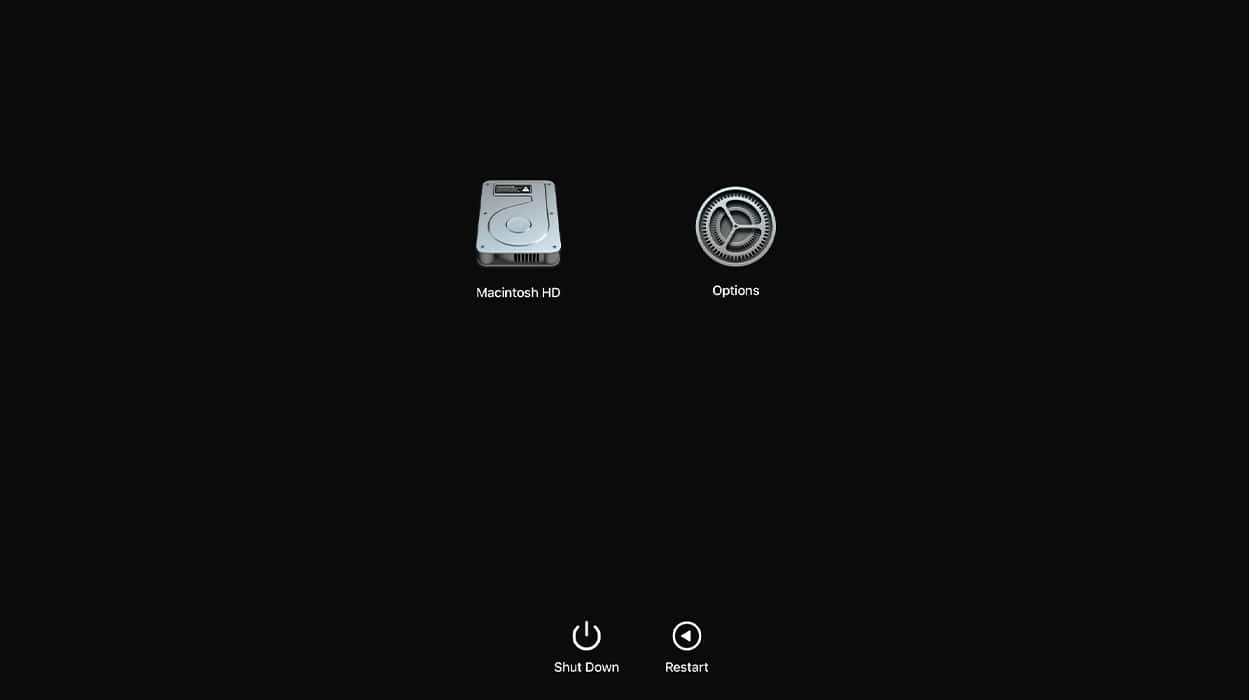
Image Credits: Apple - Select your startup disk volume, press Shift, and wait for the Continue in Safe Mode prompt to load.

 NOTE
NOTE
6. Downgrade to an Older macOS Version
As a last resort, you can consider downgrading to macOS Ventura. It’s a decent option if you’re experiencing other issues on macOS Sonoma, like frequent crashes, internet disconnections, and performance slowdowns. That said, the process is relatively risky. Even minor errors in recovery mode could cause permanent damage to your Mac’s logic board. Only attempt downgrading if you have experience with macOS programming.
Contact Apple Support for repairs if your external drive is still not showing up on macOS Sonoma even after troubleshooting. Likewise, call the manufacturer of your hard drive. Just ensure you use Time Machine or a reliable Mac backup software tool because they might wipe your files while checking for hardware damage.


