
Malwarebytes is an antivirus software that also offers VPN and Browser security features. Unfortunately, many users are complaining about Malwarebytes not working on their Macs. A similar issue surfaced back in October 2022 and was due to a bug in macOS Ventura. Regardless of the issue, we’ll help you fix Malwarebytes not working on Mac in this article.
Why is Malwarebytes Not Working on Mac
The most common reason for Malwarebytes not working on your Mac might be that you’ve recently updated to macOS Ventura. Apart from this, if you don’t grant certain system-level permissions, Malwarebytes won’t be able to run smoothly. It is also possible that the Malwarebytes app files are corrupt leading to the app crashing or not working on Mac.
No matter what is causing the issue, we’ve listed a few steps below that will help you fix Malwarebytes not working on Mac.
Quick Tip:
If the Malwarebytes error keeps occurring, you can opt for other reliable antivirus apps and we think Intego ONE would be the best to go for. It offers a wide set of features to enhance your Mac security and online safety while increasing its performance as well.
How to Fix Malwarebytes Not Working on Mac
1. Grant Full Disk Access to Fix Malwarebytes Not Working on Mac
Malwarebytes requires Full Disk Access on your Mac to detect viruses, malware, etc., within your files and function smoothly overall. Most of you, who’ve been using Malwarebytes for a long time, must’ve already granted Full Disk Access in the past. Unfortunately, updating to macOS Ventura revokes this access and you need to change these settings manually. Read along to learn how to grant Full Disc Access to Malwarebytes on Mac.
Time needed: 2 minutes
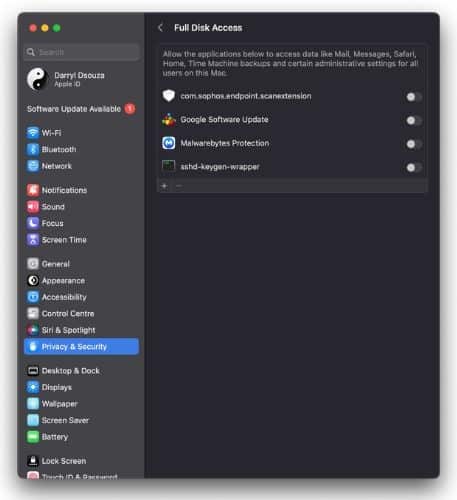
Steps to grant Full Disc Access to Sophos.
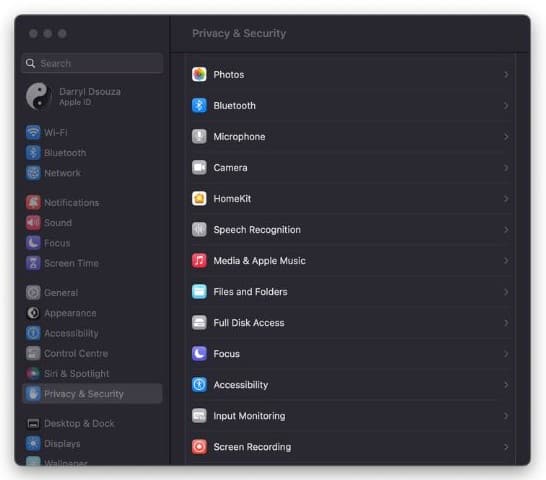
- Open System Settings on your Mac.
- Click the Privacy & Security option in the sidebar and scroll down and click the Full Disk Access option.
- Here, enable the toggle next to the Malwarebytes Protection option in the list.
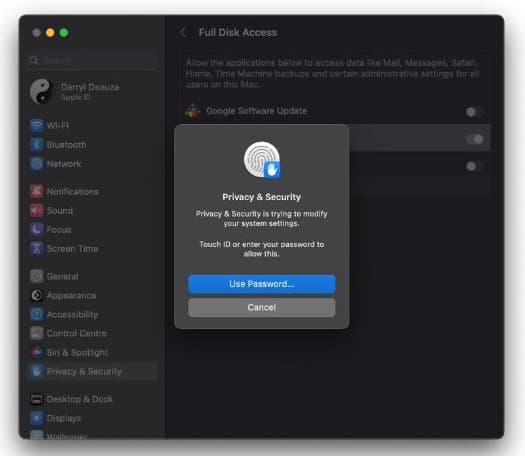
- Enter your Touch ID or Passcode to allow the changes.


You’ve successfully granted Full Disc Access to the Malwarebytes app on your Mac. Now, relaunch the Malwarebytes app and check if it works as intended. In most cases, this should fix the issue.
2. Force Quit and Restart Malwarebytes
Temporary bugs are a common occurrence. You’ll encounter such bugs on most platforms. The easiest solution to counter these bugs is to restart the app. In this case, a software conflict or a temporary bug might be the reason Malwarebytes is not working on your Mac.
To solve this issue, we recommend force quitting all active antivirus and malware apps and relaunching Malwarebytes. There won’t be a software conflict if only one app (Malwarebytes) is active. And, a restart also fixes temporary bugs within apps.
1. Open Malwarebytes on your Mac.
2. Click the Apple logo at the top left corner of the menu bar.
3. Here, click the Force Quit Malwarebytes option.
4. In the small Force Quit Applications window, select Malwarebytes and click the Force Quit button.

5. Confirm your selection by clicking the Force Quit button on the next pop-up window.

6. Wait a few minutes, open the Malwarebytes app again, and check if it’s functioning properly.
3. Restart Your Mac to Fix Malwarebytes Not Working on your Mac
At times, force quitting and relaunching an app might not fix the temporary bug. Why? Because the bug might not be in the app but rather in the operating system software. So, the next step to fix Malwarebytes not working on Mac is to restart your Mac.
Moreover, many of us don’t shut down or restart our MacBooks at all (ever since the incredible battery backup of M1 and M2). However, it is a good practice to restart your devices occasionally. With that said, follow these steps to restart your Mac.
Click on the Apple logo at the top left corner > select the Restart option > and click Restart to confirm your selection. Alternatively, you can also press and hold the Power button until your Mac shuts off and then press the Power button again after a couple of minutes to restart your Mac.

4. Reinstall Malwarebytes
One of the final steps to try and fix the Malwarebytes app not working on your Mac is to reinstall it. Often, apps begin to malfunction because they’re incompatible with the software version running on your device. The best course of action, in this case, is to uninstall the app and then install a fresh file with the latest version of the app. This has worked wonders for me in the past and will hopefully fix the Malwarebytes app on your Mac.
1. Open the Malwarebytes app on your Mac.
2. Click the Help option in the menu bar at the top.
3. Select the Uninstall Malwarebytes option.

4. Click Yes on the “This will completely remove the Malwarebytes software” pop-up.

5. Enter your Mac’s password and click OK to confirm your selection.

6. Now, go ahead and install Malwarebytes from the official website.
5. Update macOS to the Latest Version to Fix Malwarebytes Not Working on Mac
Yes, a recent software update might be the issue Malwarebytes is not working on your Mac. However, if you haven’t updated macOS in a long time, it might be why the Malwarebytes app is not functioning properly.
Since we can fix the issue where updating to macOS Ventura changes the permissions, we recommend you update macOS to the latest version and check if Malwarebytes starts working normally on your Mac. Follow the steps mentioned below to update macOS to the latest version.
1. Click on the Apple logo at the top left corner in the menu bar and open System Settings (or System Preferences) on your Mac.

2. Now, click the General option from the sidebar and select the Software Update option.

3. Here, click the Update Now button to download and install a software update and enter your system password to proceed. Your device displays the Update Now button only when a software update is available.
Protect Your Mac With Malwarebytes
We hope this article helped you fix the Malwarebytes app on your Mac. Do let us know which step resolved the issue for you in the comments below. Also, if you’re aware of any other method that helps fix Malwarebytes not working on Mac, please let us know in the comments.


