
Updating your Mac to the latest software version protects it from security vulnerabilities. Unfortunately, many people are not able to update their Macs as they’re encountering a “Storage system verify or repair failed” error message when trying to install a macOS update. You can get rid of this error message and update your Mac to the latest version of macOS by following the troubleshooting methods mentioned in this article.
How To Fix Storage System Verify or Repair Failed on Mac
Restarting a device helps resolve temporary bugs and glitches. While it works in resolving many issues, we’re not certain if it will be of any help here. Regardless, restarting your Mac won’t take a lot of time and is worth trying. Especially, if it helps get rid of the “Storage system verify or repair failed” on Mac. If it doesn’t, you should move to the steps mentioned below.
Don’t miss the best of The Mac Observer
Set us as a preferred source and our Apple reporting ranks higher in your Google Search results and Discover feed — one tap, no account changes.
1. Update macOS in an Orderly Manner
The “Storage system verify or repair failed” issue often occurs when you’re trying to skip major macOS upgrades and directly jump to the latest version. For example, if someone is trying to upgrade from macOS Catalina to macOS Ventura, they’re skipping two major macOS versions. So, if you do not want to run into errors, consider updating in an orderly fashion.
Yes, updating in an orderly manner will take way longer than directly updating to the latest version. Also, the Software Update option in System Preferences or Settings might not have the option to update to the next macOS version but rather to the latest one. So, follow the steps mentioned below to update macOS in an orderly fashion manually.
Time needed: 5 minutes
Manually update macOS in orderly manner.
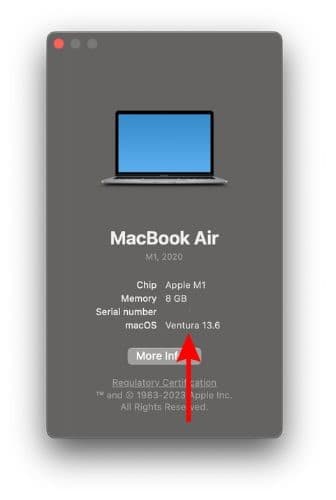
- Check the software version of your Mac. Click the Apple logo at the top right corner > About This Mac > macOS version.
- Now that you know what version of software your Mac is currently on, you need to install the successor to that version. For example, if your Mac is on macOS Monterey, you need to update to macOS Big Sur.
- But, before we head to the next step, ensure that you backup your Mac using Time Machine or other backup software.
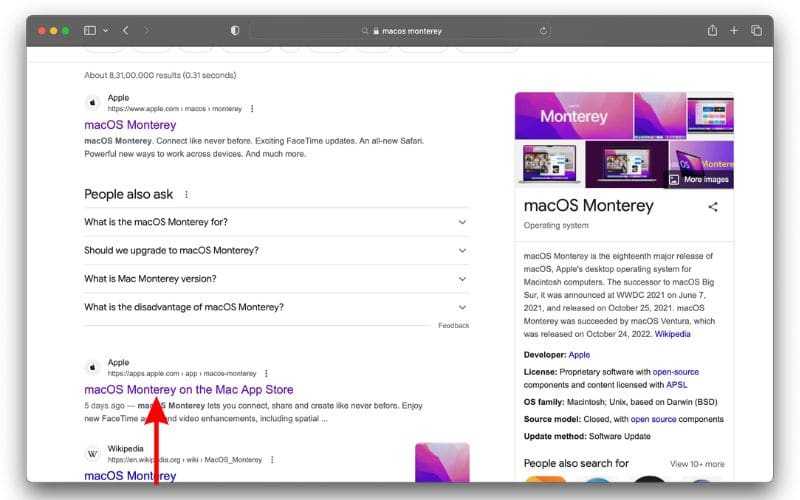
- Now, search for the macOS version you intend to update to, on Safari. The results will direct you to the App Store.
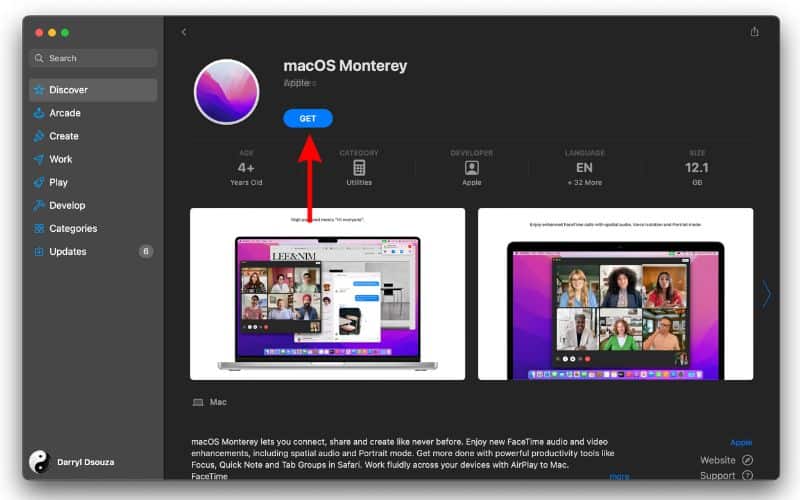
- Click the Get button to download the macOS app and then follow the on-screen instructions to update to that version.


For the sake of convenience, we’ve listed some macOS version apps from the App Store below.
This entire section won’t apply to you if you’re not trying to skip macOS versions and update directly to the latest one. In this case, we suggest you follow the next steps to fix the “Storage system verify or repair failed” error on your Mac.
2. Repair Your Mac Disk to Fix Storage System Verify or Repair Failed
The “Storage system verify or repair failed” message might be due to errors in your Mac’s disk. The First Aid feature in the Disk Utility app on your Mac helps diagnose and repair these disk errors. It can find and fix errors related to the formatting and directory structure of your Mac storage disk.
You can access the Disk Utility app and run the First Aid feature right from the Applications folder. However, if you want to repair the disk your Mac starts up from (applies to most of us who do not have multiple storage disks) we recommend you boot into macOS Recovery and then access Disk Utility and First Aid. Follow the steps below to boot into macOS Recovery.
If you use an Intel-Based Mac,
- Restart your Mac.
- Press and hold Command + R until you see the Apple logo.
- Here, you can head to the Disk Utility option.
If you use an Apple Silicon Mac,
- Click the Apple logo and select the Shutdown option.
- Press and hold the power button until you see the “Loading startup options” message after which you will see the internal and external drives and the Options button on the screen.
- Select Options and click Continue.
- Here, enter your password and then you can access Disk Utility.
Once you’re in macOS recovery mode and have entered Disk Utility, follow these steps to run the First Aid feature.
1. Click the Disk Utility button on the macOS Recovery screen.

2. Here, select the First Aid option at the top of the window.
3. Select the Run option to check and fix disk errors.
The First Aid process can take anywhere between a few minutes to a few hours. You won’t be able to use your Mac during this period, so plan accordingly. Also, you can refer to our detailed guide on Mac Disk Utility for more information. Once you’ve repaired errors in your Mac disk, you should check if you can update macOS without facing any issues.
3. Update Your Mac in Safe Mode to Fix Storage System Verify or Repair Failed
If you’re having trouble booting your Mac into recovery mode, you can try using Safe Mode. When you boot the Mac in Safe Mode, it disables third-party and background processes and only boots your Mac with essential services. Once you boot into Safe Mode, you can run First Aid without worrying about other services interfering with it.
The steps to boot into Safe Mode vary for Intel and Apple Silicon Mac and they’re listed below.
If you use an Intel-Based Mac,
- Restart your Mac and press and hold the Shift key until you see the login window.
- Now, log in to your Mac.
- If you’re asked to log in again, please do so.
- You will see the “Safe Boot” text in the menu bar.
If you use an Apple Silicon Mac,
- Click the Apple logo and select the Shutdown option.
- Press and hold the power button until you see the “Loading startup options” message.
- Next, click on Volume (Storage Disk).
- Press and hold the Shift key and then click the Continue in Safe Mode option.
- Your Mac will restart and you will see the “Safe Boot” text in the menu bar.
Now that you’ve booted your Mac in Safe Mode, here’s how to run First Aid to fix the “Storage system verify or repair failed” error.
1. Press the Command + Space key to open Spotlight search.

2. Type in Disk Utility and open the Disk Utility application.

3. Now, click the First Aid option at the top of the window.

4. Click the Run option to check and fix disk errors.

Hopefully, this should help fix the “Storage system verify or repair failed” error and you will be able to update macOS without any issues.
Conclusion
You should always update your Mac to the latest version of macOS it supports. If you do not want to do it right away, at least update after you check the reviews. Apple has been accused of planned obsolescence several times and it has paid fines too. It is another aspect that deters many users from updating. However, do keep in mind that older software versions are prone to security breaches which is a huge tradeoff.
We hope this article helps you fix the “Storage system verify or repair failed” error and you can finally update macOS. If you have any other doubts or are aware of other methods that might help resolve this issue, please let us know in the comments below.


Discussion