
Need to know how to select and move multiple iPhone apps simultaneously? Fortunately, Apple makes it pretty easy. Since the inception of the iPhone, one of the largest selling points has always been third-party apps and the Apple App Store. Being able to download various apps to perform different and unique tasks is not only a godsend, it can often be a downright necessity. However, having a lot of different apps can fill up your Home screens quickly, which often means it’s time to get organizing.
Taking a look at different approaches, I’m going to show you how you can move multiple apps on your iPhone at the same time. Not only that, I’ll also explain some of the different features Apple has developed to aid in this process, and I’ll also share a few organizational tips as well. I also show how you can further the customization of your iPhone beyond simple organizational strategies. There’s a lot to talk about, so let’s dive right in.
History and Evolution of Jiggle Mode
Originally arriving on the iPhone in 2008 thanks to iPhone OS 1.1.3, Jiggle Mode was the first way users were able to move apps around on their Home screen. Interestingly, it would take Apple over two years after the release to patent Jiggle Mode, which the company received in 2013. However, since its release way back in 2008, Jiggle Mode has been ingrained into iOS, iPadOS, and watchOS. In 2018, these features expanded thanks to the release of iOS 11.
Note that whenever I talk about jiggle mode in this article, I am referring specifically to this. It is when you get the apps to jiggle on your Home screen, making them editable, by long-pressing on an app or by bringing up the pop-up menu and selecting Edit Home Screen.
Haptic Touch VS. 3D Touch: Knowing the Difference
Looking at how to move multiple apps at the same time, you may need to know the difference between 3D Touch and Haptic Touch. While they are quite similar, there’s one important distinction in that Haptic Touch is essentially the bigger brother of 3D touch. In terms of 3D touch, the feature was originally released in 2015, and you are capable of interacting with your iPhone via various levels of pressure when tapping and holding. For example, you could apply a soft tap to do one thing or apply a harder tap to do a different thing.
Haptic Touch, on the other hand, replaces 3D Touch and saw release in 2018 starting with the iPhone XR. Using Haptic Touch, you will feel a small haptic vibration while interacting with something, presenting you with a different way of interacting with an object. Essentially, Haptic Touch behaves a bit differently than 3D Touch. Be aware of this, as how you operate your device may greatly depend on what model you’re using. If you’re using an iPhone XR or newer, you’re going to be using Haptic Touch.
How to Move Multiple Apps on Your iPhone Home Screen
Time needed: 1 minute
If you want to move multiple apps at the same time, the key is first entering jiggle mode.
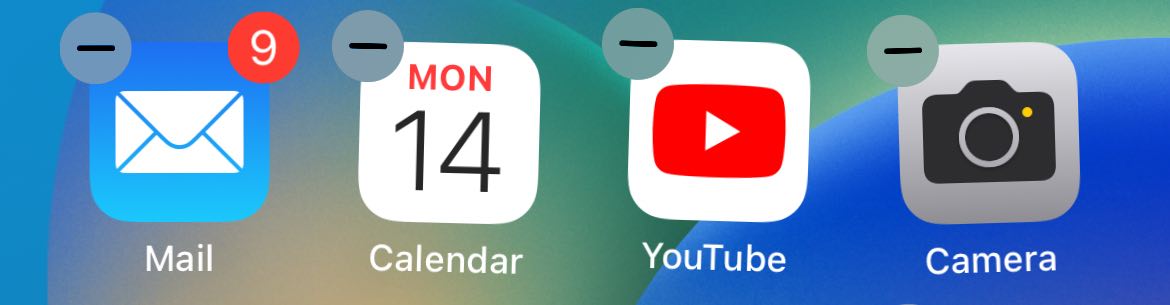
- First, press and hold one of your apps to engage Jiggle Mode. You’ll get a nice visual cue that you’re in the proper mode when you see a minus sign next to each of your apps. You can also long press on one of your apps to get a pop-up window where you can select Edit Home Screen.
- Now, using one of your fingers, drag the app away from its starting position, moving it somewhere else on the screen.
- You can now use another finger to tap on additional apps that you would like to move. These apps will “stack” on top of one another, creating an app bundle. Don’t let go of the apps you are holding with your first finger.

- You can now move the app bundle to another screen, or you can place them all into a folder. I talk more about creating folders in the next how-to.
- When you’re done moving apps, select the Done button in the top-right corner, or tap somewhere on your Home screen.


Organizing Your Apps With Ease
Really, that’s all there is to it! You can now move several apps at a time, allowing you to move them into folders, or place them on a different screen. Remember that if you want to place your apps on a different screen, you simply drag them to the edge of the screen where you want them to go.
If you’re anything like me, the real trick will be getting to the edit home screen feature in the first place. Remember that if you are using newer versions of iOS, you can always long-press an app to bring up the pop-up menu. From there, you can select Edit Home Screen.
Advanced Features: Creating and Managing Folders
For those that like an extra bit of organization, you should consider using folders on your iPhone. Seeing its release in iOS 4, folders can help you organize and categorize your apps beyond simply rearranging them on the Home screen. For example, if you like to use a lot of photography apps, you can have them coalesce into a single folder that’s easy to navigate.
If you need to create a Folder, simply enter jiggle mode by touching and holding an app and then dragging one app on top of another. This will create a folder. You can rename a folder by tapping and holding a folder until you see the quick action menu. Select Rename and enter your choice. Then select Done. Remember that if you want to move an app bundle to a folder, I would recommend creating the folder first and then using the app bundle feature to move them all to the new folder.
If you want a quick way to delete a folder, simply move all of the apps out of the folder. Simply enter jiggle mode and then drag and drop the apps back onto your Home screen. You can also tap and hold a folder that you want to delete and then select Remove Folder from the pop-up menu. Note that any apps in this folder will then move to your App Library.
Pro Tips and Tricks for Efficient App Organization
One thing to remember, especially with a stack of apps, is that you can cancel what you are doing at virtually any time. For example, when building an app bundle, there’s no real way to remove a single app from the stack. So if you select an app you don’t want to be included, you’ll have to let go of the entire stack and start over. This isn’t really a concern if you are only moving a couple of apps, but it can be something of a nuisance if you are trying to move a lot of apps. If you are moving apps, especially in jiggle mode or editing mode, remember that you can usually cancel what you’re doing by tapping your wallpaper.
Concerning app folders, the largest thing to remember is what happens to your apps when you remove a folder from your Home screen. Remember that these apps will move to your App Library, and you will need to place them back on your Home screen. Again, not a big deal when only moving a couple of apps, but it can be a headache if you have multiple apps. It can be annoying to the extent that I would move apps from a folder rather than delete them from the folder entirely.
Understanding Home Screen Pages
Now that you’ve got the app jiggle down cold, you can begin organizing your apps by what page they appear on as well. Each ‘screen’ on your iPhone is a different page, and you typically start with just one whenever you get a fresh iPhone. It’s important to remember that you are able to create and delete pages through various methods and steps.
For starters, whenever you have more than one page on your iPhone, you will see a series of dots just above your iPhone Dock. This can not only help you determine what page you are on, but you can tap the dots to move quickly between pages. It may also act as a search bar if you are using iOS 16 or later. If this is the case, you will need to start scrolling to make the dots appear.
Creating and Hiding Pages On Your Home Screen
You are able to create a new page by moving an app to the right edge of the screen. It may take a moment to get the new page to appear. To delete a page, you will need to remove all of the apps from it. Thanks to what you just learned above, this should be relatively easy to perform.
Thanks to iOS 14, users are also able to hide pages and apps that appear on pages. This can be great if there are a variety of apps that you don’t use that often and only want to see when you need them. To hide a page, all you need to do is enter jiggle mode (or edit mode) on your Home screen and then select the dots just above the dock. You will then get a preview of all your pages, with a checkmark under each page. Deselect the checkmarks to hide a page. You can click on the circle again to unhide the pages. Tap Done when finished.
Using the App Library
Ever since iOS 14, there’s also a cool feature known as the App Library. A technically hidden feature, you can easily access the App Library by swiping left on your Home screen until you see this feature. Your iPhone will automatically categorize your apps based on type (social, entertainment, etc.), and the apps you use most frequently will organize themselves based on use.
Using the App Library, you can use the search field to find apps, or you can delete apps by touching and holding the app icon and then selecting Delete App. You will need to confirm your decision. There is also a way to move apps to the App Library from your Home screen by touching and holding an app, tapping Remove, and then selecting Remove from Home Screen. It is also worth noting that if you delete a folder without removing the apps first, your apps will appear in this App Library.
How to Prioritize App Downloads on Your iPhone
While this may only briefly help with keeping apps organized on your device, this little trick not only helps prioritize what you download, but you can also take what you just learned concerning 3D Touch or Haptic Touch and apply it to this nifty feature. Not all iPhone users may know this, but you can prioritize what apps you download. This can be especially helpful if you are trying to download numerous apps at once, or it can even be helpful if you are trying to install various updates at the same time.
Fortunately, the steps are pretty simple. While an app is downloading or updating, it is typically greyed out. While it is grey, touch and hold the app to make a pop-up menu appear. You can then select Prioritize Download. You also have the option to Pause Download and Cancel Download as well. Try it for yourself.
Quickly Offloading Unused Apps
If you’re reading this because you are looking to better organize you’re Home screen, remember that the iPhone includes one particularly useful feature. Within the App Store settings, you can find the Offload Unused Apps feature, which automatically removes unused apps. This can be incredibly useful if you have a lot of apps on your iPhone, but you’re not entirely sure which ones to get rid of. This feature makes the process easy, meaning you don’t really need to think about it.
From your iPhone, simply go to Settings > App Store and ensure that Offload Unused Apps is enabled. I’d highly recommend keeping this feature enabled. Even better, your device will keep any documents and data from the app, so if you need to access anything again, all you need to do is redownload the app.
Creating Custom App Icons Using Shortcuts
It’s also worth noting that you can create your own custom app icons thanks to the Shortcuts feature. While this does require iOS 12, you can customize your device even further by giving the app its own special icon. Now, this will require finding your own icons on the internet, which Flaticon may be able to help with.
Here’s how to do it:
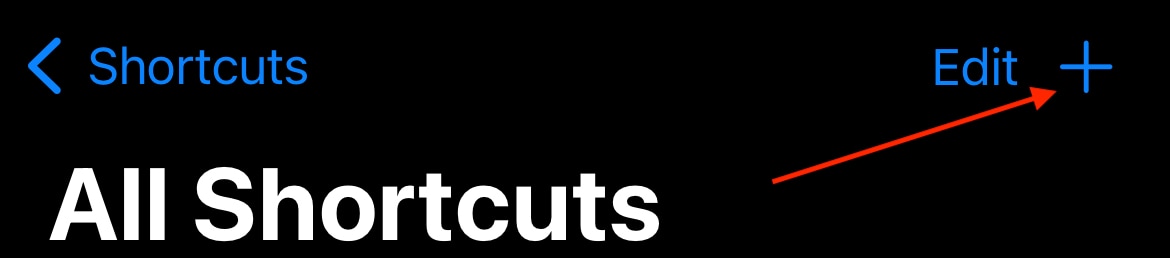
- First, open the Shortcuts app.
- In Shortcuts, tap the + icon in the top-right corner.
- You will get a new Shortcut, likely called New Shortcut 1. You can change the name of the Shortcut by clicking the arrow next to the title and selecting Rename from the pop-up menu.
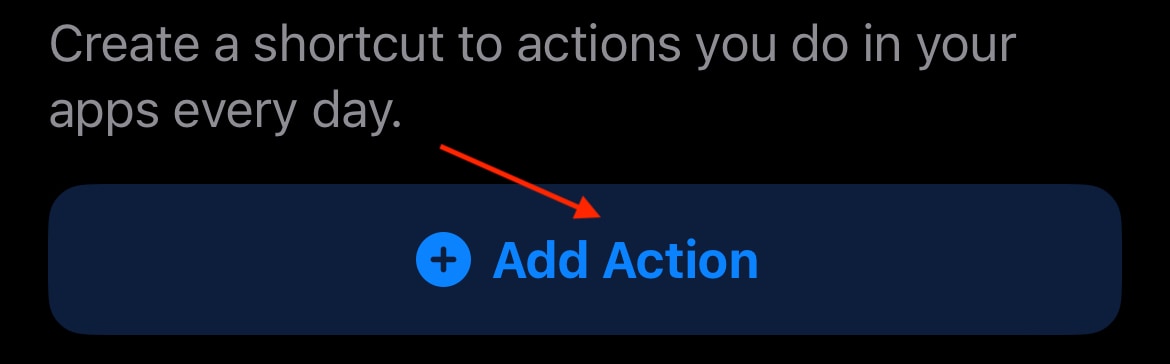
- Next, select Add Action below the name of the Shortcut.
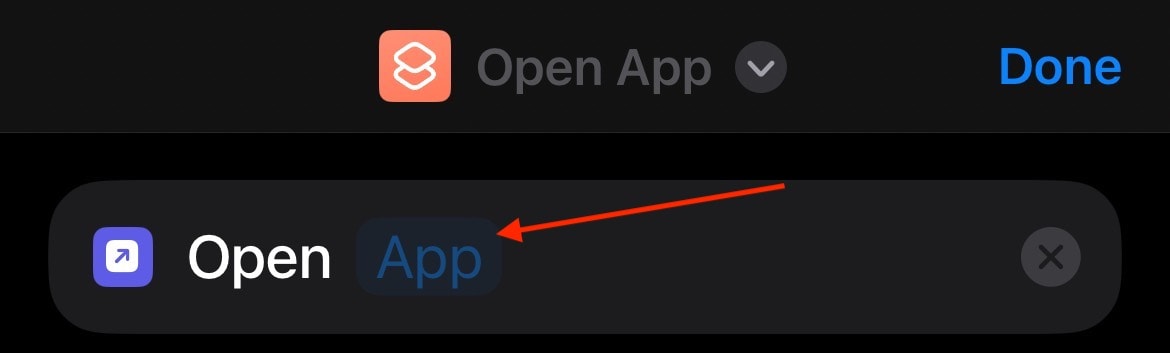
- Choose what you want your Shortcut to do. The options may look intimidating, but go to the search bar and type Open App. Then, select this option when it appears.
- Next, click the word App that appears in a faint blue after the word Open. Next, pick the app you want to open.
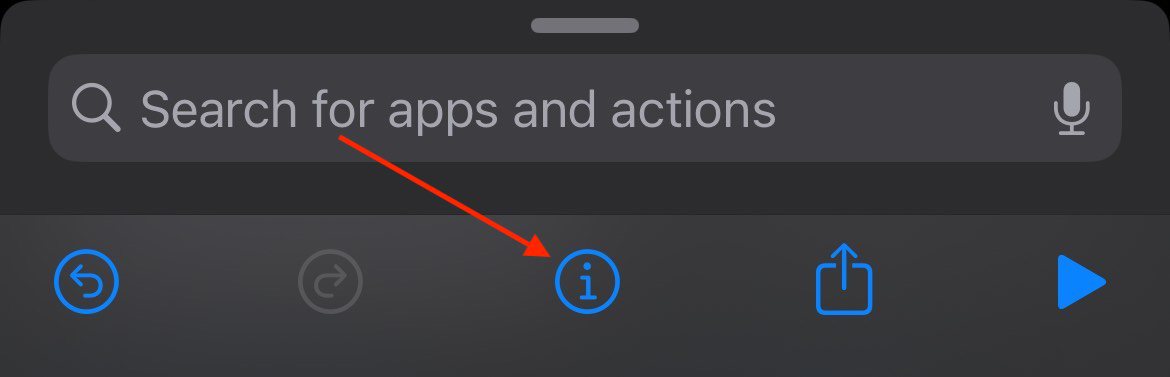
- Then, select the information icon at the bottom of the screen, an ‘i‘ in a circle. Select Add to Home Screen.
- Change this icon and name by clicking either option in the Home Screen Name and Icon section. Concerning the photo, you can either Take Photo, Choose Photo, or choose a file.
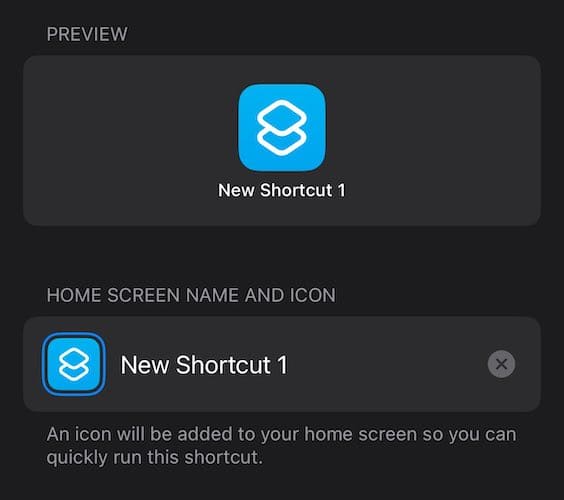
- When you’re done, select Add. The Shortcut will now be on your Home screen. You can treat it like any other app.


That’s all there is to it! Not only are you able to create your own app icons, but this can also help give you an understanding of the Shortcuts app in general. After making your new custom app icon, try experimenting with the Shortcuts app to see what else you can create.
Conclusion
Now that you understand how to move multiple apps at the same time, this should also give you a better understanding of how 3D Touch or Haptic Touch operates. Remember that these features extend beyond simply editing your Home screen, so remember that experimentation is an important part of learning how to use your iPhone. The major thing to remember is getting the appropriate level of touch. Of course, if you have any tips or suggestions, feel free to let us know in the comments.


