
Technology has revolutionized the way we do many things today. We can access information on the most sensitive issues with just a click. While I appreciate technology, my love for my children surpasses it. It would be a personal failure if my child were to be exposed to adult content and other self-destructive addictions while under my supervision. Which is why the parental control setup on Mac is so important.
Unfortunately, millions of children worldwide have unrestricted access to adult content, questionable associates, and corrupting influences on the internet. The rise of cyberbullying and sexting further compounds these concerns. On the flip side, computers have become integral to modern learning.
Parental control is an effective means of monitoring and regulating your children’s computer activities. But what if you’re unsure about setting up parental controls on your Macbook? Continue reading to discover how parents can safeguard their children by implementing restrictions on app usage and blocking access to certain apps.
Why Parental Control Won’t Work on Mac?
Note that if you are trying to set up parental control as it was done in earlier macOS versions, it won’t work. More recent versions of macOS have a different method of setting up parental control. In previous versions of macOS, the Parental Control option could be found in System Settings. However, with the introduction of macOS Monterey, this feature has been replaced by the new Screen Time feature.
Setting up Parental Control on Mac
Apart from tracking the duration of app usage, Screen Time offers additional functionalities. These include setting time limits for your child’s Mac usage and restricting their access to certain applications and websites. To utilize Screen Time for parental control purposes, you need to follow these steps:
- Create a dedicated account for your child on your Mac.
- Activate the Screen Time feature within the System Settings.
- Proceed by logging into your child’s account and establishing specific limits and a passcode.
Ok, so let’s start with the first step.
1. How To Set up a Child Account on Mac
To ensure proper usage of your Mac by your child, I’ll recommend that you set up a separate account for them if you share the device. Likewise, if your child has their own Mac, it is advisable for you to have an account on that device as well. In both cases, you should have an admin account while your child utilizes a standard account. Follow the steps below to set up a child account in macOS:
Time needed: 2 minutes
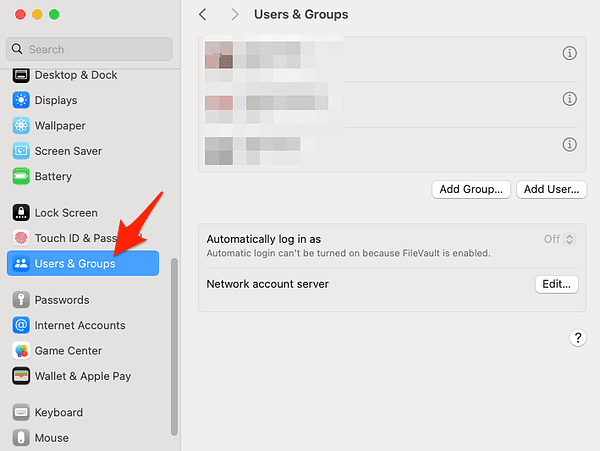
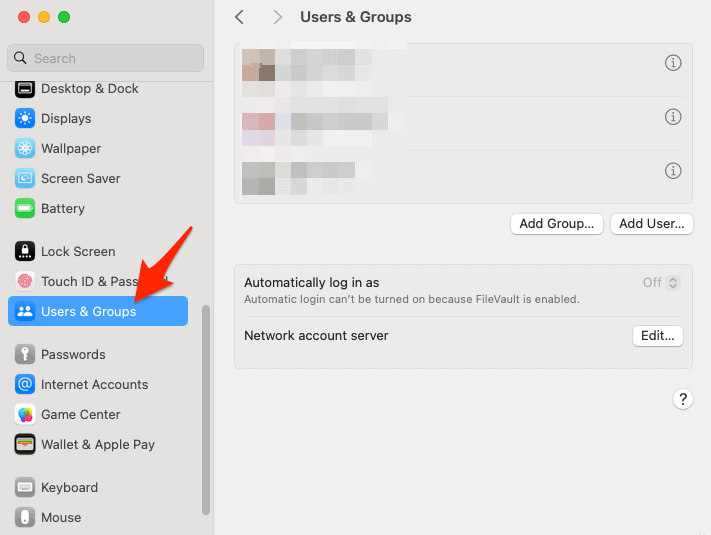
- Log into your admin account and navigate to System Settings, then select Users & Groups.
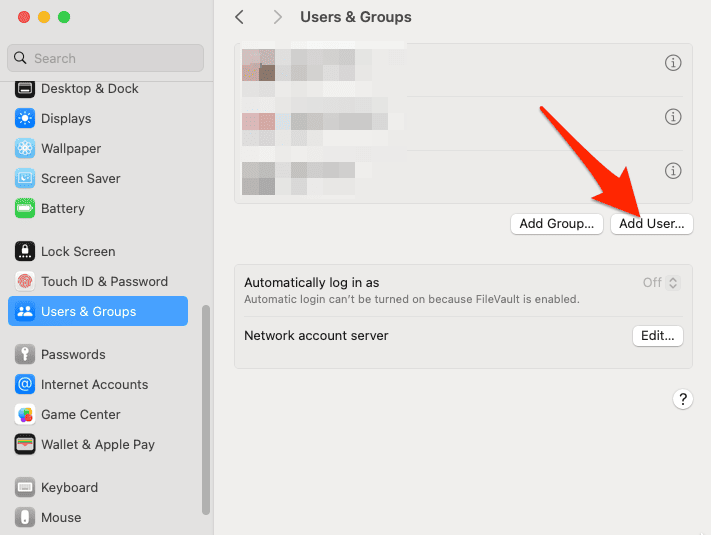
- Next, click on Add User.
- From the New Account drop-down menu, choose Standard.
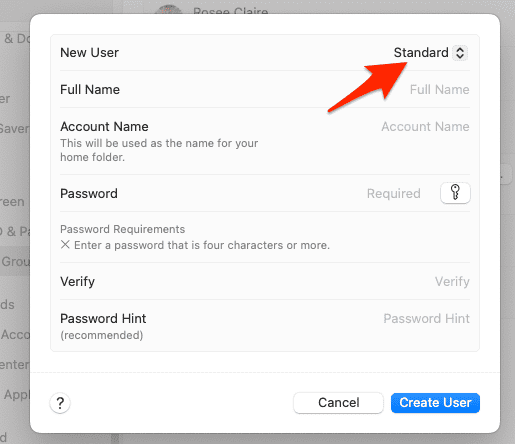
- Enter the account name, full name, and password for your child. You may also opt to add a password hint.
- Finally, click on Create User.
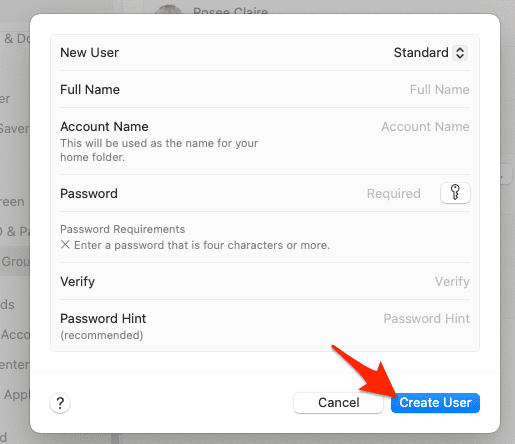
Once you have successfully created the child account, the next step is to enable Screen Time on your Mac.
2. How To Turn On Screen Time in macOS
To begin utilizing the parental control tool, it is necessary to enable Screen Time. Follow the steps below to accomplish this:
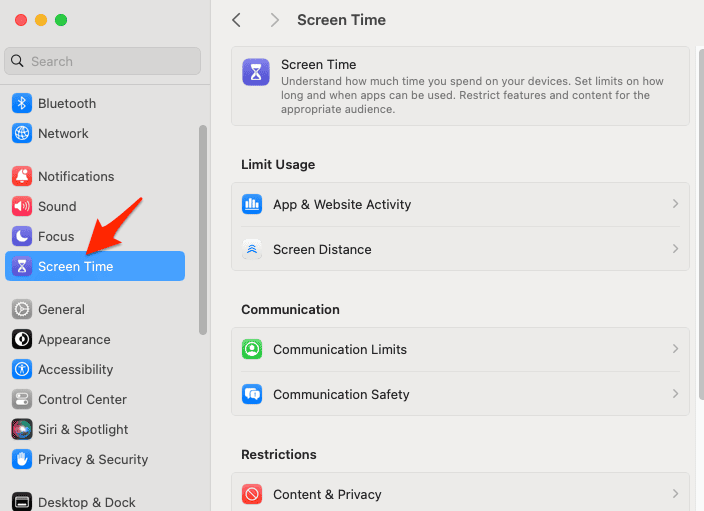
- Go to System Settings and choose Screen Time.
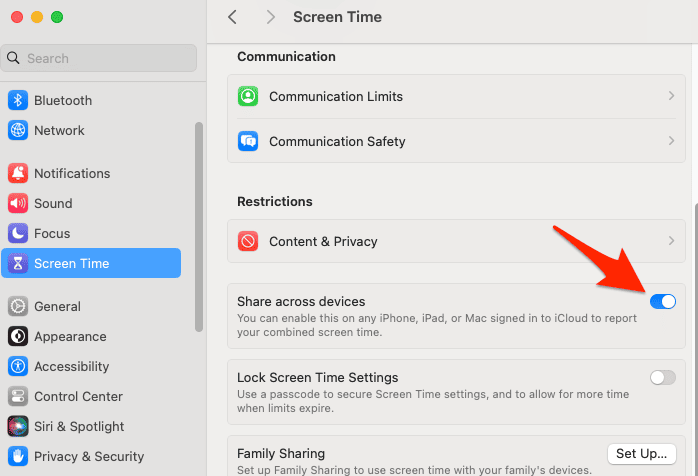
- Next, toggle on the Screen Time option as shown below. You can also enable the Share Across Devices feature.
Additionally, check out how to get parental controls in Chrome on Mac and other devices.
Setting up Screen Time in Your Child’s Account
Once you have successfully created an account for your child on Mac and activated Screen Time, you can proceed with the parental control setup on Mac.
1. Setting a Passcode for Screen Time
It is crucial to protect Screen Time limits by setting up a passcode, as it would be counterproductive if your child could easily modify or disable the restrictions. Follow these steps to establish a passcode for Screen Time:
- Log into your child’s account using the previously set up details.
- Access Screen Time through System Settings.
- Click on Options and choose Use Screen Time Passcode.
- Enter a four-digit passcode.
- Confirm the passcode by re-entering it when prompted.
- Optionally, you can set up passcode recovery by entering your Apple ID and password, then clicking Next. If you prefer not to set up password recovery, simply click Skip.
With the passcode in place, your child will need to enter the current passcode to modify Screen Time settings or disable it.
2. Setting Downtime on a Mac
In simple terms, downtime refers to the period when your child is unable to use their Mac or specific apps on their Mac. The decision regarding downtime is entirely up to you, as you are best equipped to determine the appropriate level of exposure to certain apps or the amount of time your child should spend on the Mac. To set up downtime, follow these steps:
- Log into your child’s account and access Screen Time, then select Downtime.
- Go to Scheduled and enable it by clicking on Turn On.
- If you want the same downtime schedule for every day, choose Every Day and set the desired time. Alternatively, select Custom to set different times for each day.
3. Letting Apps Run In Downtime
If you wish to grant your child unrestricted access to certain apps, such as those needed for homework or communication with you, you can add them to the Always Allowed list. This ensures that your child can use these specific apps even during scheduled downtime. Follow these steps to set it up:
- In your child’s Screen Time settings, locate and click on Always Allowed.
- Select the desired apps that you want to allow your child to access during downtime. Please note that you may be prompted to enter your passcode for the first app.
- Once you have finished selecting the apps, exit the Screen Time settings.
By following these steps, you can enable your child to use designated apps without restrictions, even during downtime periods.
4. Setting up App Limits in macOS
As mentioned earlier, there may be instances where you wish to restrict your child’s access to specific apps. For example, you might want to prevent them from using social networking sites after 10 PM. In such cases, you can set up app limits as part of the parental control feature. Follow these steps to establish app limits:
- Access your child’s Mac account and navigate to the Screen Time settings. Click on App Limits and enable it by selecting Turn On.
- Choose the apps for which you want to set a time limit. Decide whether the limit should apply every day or follow a custom schedule.
- Select the option Block at End of Limit and click Done.
- You can now proceed to choose additional apps that require limited access. You have the flexibility to remove or modify their time limits as needed.
By following these steps, you can effectively set up app limits as part of your parental control measures.
5. Blocking Websites on a Mac
With Screen Time, you can now leverage macOS to automatically block your child’s access to adult websites. This feature enables you to specify which websites to allow or block, as well as restrict access to certain websites altogether. To set up content restrictions on your Mac, follow these steps:
- Go to your child’s Screen Time settings and click on Content & Privacy in the sidebar.
- Select the Content tab and click on Limit Adult Websites.
- If you desire even greater control, click on Customize. This will allow you to manually allow or block specific sites.
- Another approach is to click on Allowed Websites under Content & Privacy, then select Customize to add the sites your child is permitted to access. All other sites will be blocked.
By following these steps, you can effectively configure the parental control setup on Mac, granting you control over your child’s access to adult websites and other specific web content.
Another Way to Protect Your Kid: Intego ONE
Intego ONE is an excellent parental control solution for Mac owners, providing reliable boundaries to ensure the safety of your child while exploring the internet. Here are some key features of Intego ONE:

- Advanced web protection: Helps protect children from malicious websites, phishing attempts, unsafe downloads, and online scams while browsing the internet.
- Real-time antivirus protection: Scans files, apps, email attachments, and downloads in real time to prevent malware, spyware, ransomware, and other Mac threats that could compromise your child’s device.
- Smart firewall ,onitoring: Monitors incoming and outgoing network connections to help block unauthorized access and suspicious internet activity.
- Privacy protection tools: Helps prevent tracking, data collection, and unauthorized access to personal information stored on your child’s Mac.
- Multi-device security management: Allows families to protect multiple Mac devices under a single subscription, making it easier to manage household security.
- System performance & Cleanup tools: Includes optimization and cleanup utilities that help keep your child’s Mac running smoothly and securely.
- Safe digital environment for kids: Combines malware protection, secure browsing, firewall controls, and privacy features to help parents create a safer online experience for children.
Intego ONE
Monitor and protect your kids’ activity with the most powerful AV tool.Conclusion
Configuring the parental control setup on Mac is essential for ensuring a safe and secure digital environment for children. By following the steps outlined in this guide, you can effectively monitor and restrict your child’s access to age-inappropriate content, manage screen time, and promote responsible online behavior.
The built-in parental control features offered by macOS provide a convenient and user-friendly solution, allowing parents to customize settings according to their child’s needs. By implementing these measures, you can strike a balance between embracing technology and safeguarding your child’s well-being in the digital realm. For further reading, check out Tom Victor’s additional tips on how to protect your child from online predators on a Mac.


