When you are trying to install a version of macOS, you may see “Select the disk where you want to install macOS” and find that your options are blank. Thankfully, there’s a rather easy solution. Checking around on the internet, several users seem to be reporting this issue while attempting to install macOS onto their device. Typically, this issue may arrive from accidentally formatting the disk while attempting the installation, causing your device not to recognize the disk.
Keeping this in mind, I’m going to show you what to do if you receive this error while attempting an install of macOS. It is also great to know that this fix will work with Virtual Machines as well. For those that are having this issue, it seems to be most prominent when users are installing an older version of macOS, such as Catalina or Mountain Lion.
Don’t miss the best of The Mac Observer
Set us as a preferred source and our Apple reporting ranks higher in your Google Search results and Discover feed — one tap, no account changes.
How to Fix the Select Disk Where You Want to Install macOS Error
If you find yourself booting up your Mac while attempting to install a new version of macOS, there may come a time when a user gets stuck at the “Select the Disk where you want to install macOS” screen. When on this screen, a user may find themselves with little, or even no options. This may be due to accidentally erasing a hard-drive or partition. Whatever the case, there is fortunately a way to solve it.
Time needed: 5 minutes
How to fix Select the disk you want to install macOS error.
- To begin, restart your Mac, and while it is rebooting, hold the Command and R keys together. Note that if you are using Apple Silicon, you will need to hold down the Power button to enter Recovery Mode. The rest of the steps will then be the same.
- You should now see a screen that features the Disk Utility icon. Select this.
- You will then be able to select a disk or HDD from the left side.
- If you do not see any available disks, from the top left, choose the button to reveal the Show All Disks option.
- From here, choose the Erase tab. It will be available on the right side.
- Now, choose Format: Mac OS Extended (Journaled). Within the column Name, enter a name.
- From here, click Erase. This will then give you a new partition on your disk drive.
- From here you can then Quit Disk Utility, and you will be able to continue with the installation of macOS.
Ensure the Health of Your Hard Drive
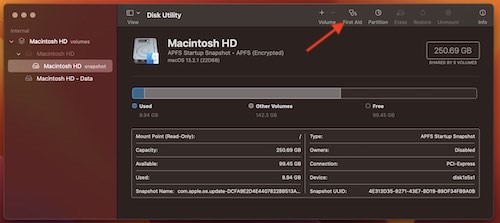
When it comes to installing macOS, regardless of the version, you should always ensure that the drive you’re installing it to is healthy. Fortunately, Apple includes a program with macOS specifically for this. Disk Utility can be incredibly helpful for checking the health of a disk, and you can find this program in the Applications > Utilities folder in Finder.
- Open Disk Utility.
- Select the HD you are attempting to install macOS onto.
- At the top of the app, select the First Aid icon.
- You will then receive a prompt stating your machine is going to check for any errors. It will then repair any errors. Choose Run.
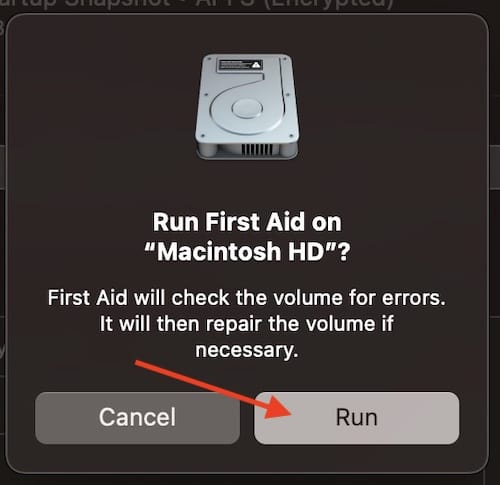
- Wait for the program to finish.
Disk Utility will then check the drive for any errors, and then fix these errors. From here, your disk should be healthy. You can also repeat these steps to check and fix additional volumes on your machine.
While this may seem obvious, users can also check that there is a proper connection on their physical drives, should one be connected.
While this is a rather peculiar error, fixing it can be rather simple. The largest problem a user may face is getting their Mac into recovery mode. Fortunately, this is just a matter of remember whether or not you are using an Intel or Apple-based processor. If you need to double-check, simply go to Apple > About This Device in the Menu Bar. This will bring up a prompt showing you what type of processor you are using.
Fixing the Select Disk Error
If you’re having issues with receiving a Select the disk where to install macOS message do to a disk being blank while installing a version of macOS, this guide should be just the thing to get it running again. It’s also worth reminding that this fix can work while using a Virtual Machine as well.
Naturally, there’s a lot of reasons a user may want to install a new version of macOS. In addition to getting new upgrades and features, you can also receive additional security patches and exploit fixes from Apple. Obviously, my best advice is going to be to ensure that you keep your machine as up to date as you can. Even if you are having issues, there’s typically a solution.


Thank you so much. I fired up an old MacBook I hadn’t used in years. Worked perfect edit fine out I setup Wi-Fi. After using it 1 day I decided to updated the os and the main couple apps I still liked on it.. nothing worked. So many false attempts.. finally this. ?
Thank you also from me. I do not understand how people understand these things!
I am having the problem of no disk to select on my Mac but what I’m worried about is if I erase the hd will I lose my LogicPro application? Is it possible to fix this no disk issue without losing my software application?
You’ll have to download Logic Pro again, yes, but the license is tied to your Apple ID. You will lose any projects you’d been working on, though, unless they’re stored in iCloud or some other location than the main drive.
Thank you for your insight and suggestion.
I did have another question, I bought the
Mac from a computer repair place that sells Macs with LogicPro loaded on them already.
Do you think I can still download it as it is?
I mean I didn’t buy a personal licensed copy?
Thanks