
Aside from the usual Time Machine backup that goes onto an external hard drive, your Mac can also create Time Machine local snapshots. Similar to the Time Machine backup on an external drive, you can also restore files from Time Machine snapshots. Hence, it’s a quick and easy way of restoring files, especially if your external hard drive is not available. Continue reading for the full guide on how to restore from a Time Machine local snapshot on your Mac’s hard drive.
What Are Time Machine Local Snapshots?
As mentioned, Time Machine local snapshots are backups of your Mac files. Compared with the usual Time Machine backups, local snapshots are stored on your Mac’s hard drive. Hence, Time Machine local snapshots help restore files whenever your external hard drive is not available. That sounds comforting, right? But if you’re asking if it’s going to deplete your hard drive storage space, the answer is not really.
For those who are worried about tying up too much of their Mac’s storage space, here’s an important thing to know about Time Machine local snapshots. Time Machine saves one snapshot of your startup disk every hour. That snapshot remains on the hard drive for 24 hours. The thing about local snapshots is that Time Machine saves them only if there is ample remaining storage space available on your Mac.
Additionally, Time Machine local snapshots don’t use storage space that is usually meant for regular Mac tasks such as downloading files, copying files, or installing new software. Time Machine also deletes local snapshots whenever you need the storage space from your Mac and automatically deletes snapshots as they age.
Can You Retrieve Photos from a Time Machine Backup
If you’d like to know whether you can retrieve photos from a Time Machine backup, the straight answer is yes, you can. But in doing so, Time Machine restores the Photo Library, not individual photos. When you restore your Mac from a Time Machine backup, the entire photo library goes back to its state when the last Time Machine backup was completed. So, any new photos that you store after the date of the backup will not be included.
See below steps to restore Photo Library from a Time Machine backup.
- Close the Photos app on your Mac if it’s open by clicking Photos > Quit Photos.
- Click the Time Machine icon in the Menu Bar, and click Enter Time Machine (alternatively, click Apple Menu > System Settings > General > Time Machine.
- Click the date of your last backup, navigate to the last backup of your photo library, then click to select it.
- Click Restore.
Can You Restore a Mac from Time Machine Backup
Another question that you might be asking right now is whether you can restore your Mac from a Time Machine backup. If you mean to restore all files on your Mac, well you can certainly do so. You can use Migration Assistant to transfer files from your Time Machine backup and restores all your files including apps that are under your User Account. Additionally, you can also restore selected files only also through the help of the Migration Assistant.
Now here’s something that you need to remember. Before you restore your Mac files and data from a Time Machine backup, you may also need to reinstall macOS first. This would only apply if you’re experiencing a problem with macOS. If it’s working properly, then there’s no need to reinstall it. You may proceed with the steps below to restore your files from a Time Machine backup.
- Connect your Time Machine backup disk to your Mac.
- Open Migration Assistant (Utilities > Applications).
- Select From a Mac, Time Machine backup, or Startup disk when asked how you want to transfer your information.
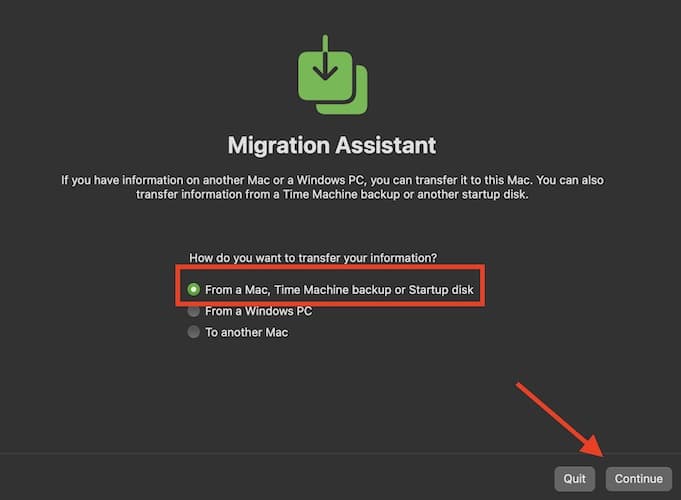
- Click Continue.
- Select your Time Machine backup, then click Continue.
- Choose a backup and then Continue.
- Select the information to transfer.
- Click Continue to start the transfer of files.

Can You Restore Your Mac from a Backup Without Deleting Everything
A common misconception about restoring your Mac files from a Time Machine backup is that it will delete everything on your Mac and replace it with whatever is stored in the backup. While it may be true, however, you can control what’s going to be restored on your Mac.
For one thing, you may or may not reinstall macOS especially if it is working just fine. For files, you may also choose them so that Time Machine will not automatically replaces files that need not be replaced or deleted.
How to Use Local Snapshots
Going back no to Time Machine local snapshots. As previously mentioned, local snapshots allow you to restore your files from a backup in the absence of the physical external hard drive where you store your Time Machine backup. You’ll use macOS Recovery to restore from your local snapshot.
Follow the steps below to restore your Mac from a Time Machine local snapshot.
- Shut down your Mac completely.
For an Intel-based Mac, press the power button and hold Command + R until the Apple logo appears. The macOS Recovery Mode menu should appear shortly.
On Apple Silicon Macs, hold the power button until the startup options screen appears, then choose Options > Continue. - In Recovery Mode, choose Time Machine System Restore.
- Click Restore from Time Machine Backup, and follow the on-screen instructions.
- For the backup location, make sure you choose Macintosh HD or your Mac internal hard drive.
- Type your admin password.
- Select a local snapshot from the list.
- Click Continue after getting the warning prompt about what you’re going to do.
Please note that if you want to have more backups available, you may need to reconnect the backup disk. Simply Click Apple Menu > System Settings > General > Time Machine > Setup Disk.
Managing Local Snapshots
If you’re using Time Machine to back up your Mac, by default it will automatically create local snapshots. The only way you can stop this from happening is if you completely turn off Time Machine. And as mentioned, Time Machine local snapshots take into account the currently available storage on your Mac. If you are continuously creating and editing large files, Time Machine will also continuously create hourly local snapshots. If this is annoying for you but you don’t want to completely shut down Time Machine backup, what you can do is delete some local snapshots on your Mac.
Follow the steps below to delete local snapshots manually.
- Open the Time Machine preferences, System Settings > Time Machine.
- Uncheck the option to backup automatically.
- Re-enable the back-up automatically option.
Another way of deleting local snapshot files is via the Terminal.
- Open Terminal on your Mac.
- Enter the command tmutil listlocalsnapshots /
- Press Enter.
- To delete a snapshot, type the following command: sudo tmutil deletelocalsnapshots [date of the local snapshot].
- Enter your admin password.
- Once you see Delete local snapshot followed by the time stamp, it means that the snapshot was already deleted.
Here’s What to Do If You Can’t Restore Your Mac From Time Machine Backup
There may be an instance when you’ll encounter the Time Machine backup option greyed out. This means that you can’t restore your Mac files. Generally, there are three reasons why this could happen.
- The Time Machine Backup Disk was formatted accidentally
- The Time Machine Backup was incomplete.
- The Time Machine Backup was corrupted.
According to an Apple Support document, you can follow the troubleshooting steps below to resolve the issue.
- Make sure that you set up Time Machine correctly and are using a backup disk supported by Time Machine.
- Make sure that your backup disk is connected directly to your Mac unless you’re using a network backup disk. Don’t connect it through a USB hub or other device.
- Use Disk Utility to repair your backup disk.
Understanding APFS System Snapshots
When Apple released macOS Sierra, it came with a new feature wherein AFPS, or the Apple File System creates a snapshot. This snapshot captures the state of Mac’s start-up disk at a certain point and keeps all the captured files on the drive. One use of this snapshot is when you want to revert your Mac to the state when the snapshot was taken.
The AFPS system snapshot is automatically created during a macOS update. This will allow you to restore your macOS in case there is an upgrade failure. Compared with Time Machine local snapshots are automatically created once you started using Time Machine to back up your files.
To use the AFPS system snapshot to restore your Mac from its previous state, you need to do so via the Mac Recovery Mode.
How to Create AFPS System Snapshots Manually
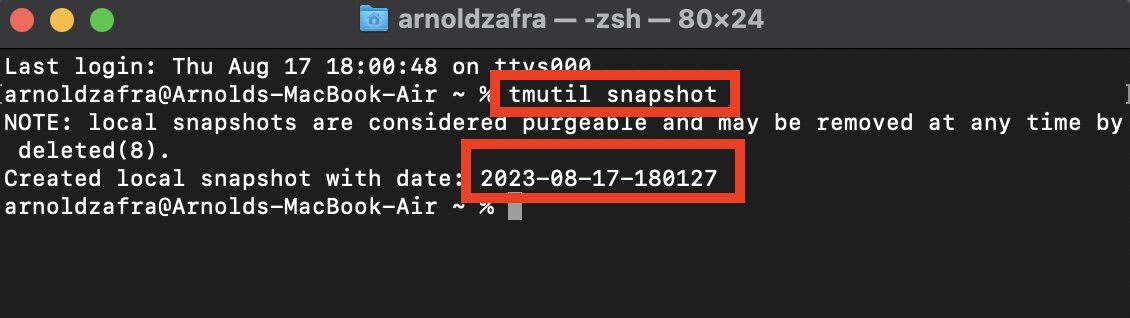
If you want to create AFPS System Snapshot, you can do so manually via the Terminal.
- Open the Finder app on your Mac.
- Click Applications > Utilities > Terminal.
- Type the following commnad tmutil snapshot
- Press Return.

Restoring from an AFPS System Snapshot
As previously mentioned, you can use AFPS System Snapshot to restore your Mac from a previous working state. But you can also use it to recover lost files such as documents, photos, and videos, just like the Time Machine local snapshots.
- Click the Time Machine icon at the upper right corner of the screen.
- Click Back up Now.
- Search for the snapshot point where the files you want to recover can be found.
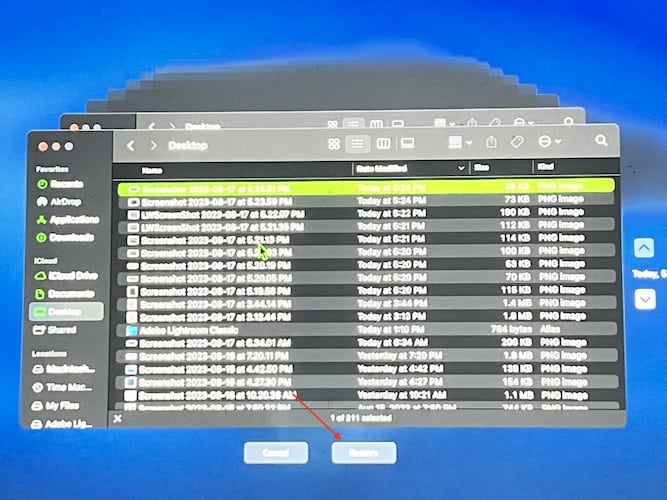
- Select the data and click Restore.

Now, if you want to restore your Mac to a previous state or you want to downgrade macOS, you can use an AFPS System Snapshot through Recovery Mode.
- Follow the directions above to enter macOS Recovery Mode.
- Select Restore from Time Machine Backup from the macOS Utilities, then click Continue.
- Select the disk that contains the APFS snapshot, then click Continue.
- Click Continue if asked whether to restore from the selected snapshot or not.
Wait for your Mac to finish the restoration.
Comparing Time Machine Backups and APFS Snapshots
In general, you can use both Time Machine backups and APFS snapshots to restore your Mac or specific files. However, Time Machine backup creates a duplicate of your Mac’s data and is commonly stored in a different destination than the original data and this is usually on an external hard drive. APFS Snapshot, on the other hand, is a point-in-time replica of the APFS on your Mac’s hard disk. It is only saved for a shorter period as compared to Time Machine backups that are stored for a longer time. And most importantly, APFS is stored at the same location as the original content, which is your Mac’s internal hard drive.
Troubleshooting Time Machine Errors
When using Time Machine to restore your Mac, you might encounter various errors. Many folks experienced various errors such as the Time Machine can’t find the backup disk even if it’s mounted, an incomplete, interrupted, or failed backup occurred, and even when the Time Machine seemed to have been stuck or too slow to proceed.
The good news is that these errors are easily fixable. Follow the troubleshooting outlined below to fix the Time Machine errors on your Mac.
Check the External Hard Drive’s File System
Time Machine requires that the external hard disk to be used is formatted in either APFS or APFS Encrypted. It won’t work with FAT or NTFS files. To check the external hard drive’s file format, simply connect it to your Mac, then launch the Finder app. Control-click on the hard drive, then click Get Info. Check the file format under General Information.
To format the external hard drive, follow the steps below.
- Launch Application > Utilities.
- Select the external hard drive.
- Click the APFS or APFS Encrypted format.
- Click Erase.
Make Sure That the External Hard Drive Has Sufficient Storage Space
For Time Machine to work properly, the external hard drive must have enough space to store your files. Delete unnecessary files if needed then proceed with the backup.
Clear Up Time Machine
As Time Machine continues to build backup files, it also creates some files that enhance its performance. However, some redundant files accumulating in the external hard drive may cause errors in the Time Machine backup process. So, clean up these files by following the steps below.
- Turn off Time Machine by clicking the Apple logo > System Settings (or Preferences).
- Look for the Time Machine tab.
- Uncheck Back Up Automatically.
- Open Finder, then click the external hard drive.
- Look for the folder named
Backups.backupdb. - Open the folder and look for files with the extension
.inProgress, then delete it.
Restart Your Mac
If you encounter Time Machine errors during backup, another way of solving it is by restarting your Mac. This will flush out obsolete system-related data and effectively fix bugs and glitches, including Time Machine errors.
Conclusion
Now that you know how to restore your Mac or files from Time Machine backup, local snapshot, and APFS system snapshots, it would be worth remembering how they differ from one another. That way, you can easily know when and how to use them if even the time comes. If you need to restore specific files and documents, you may use either the usual Time Machine backup or the APFS system snapshot. Likewise, if you need to restore your Mac from a previous state including macOS, you can use APFS System Snapshot.


I have a 2017 iMac with the fusion drive.
Here is what I see with regards to snapshots:
Last login: Tue May 22 10:39:28 on ttys000
new-host-4:~ joepitt$ tmutil localsnapshot
Failed to create local snapshot
new-host-4:~ joepitt$
new-host-4:~ joepitt$ tmutil listlocalsnapshots /
new-host-4:~ joepitt$
new-host-4:~ joepitt$
No snapshots for me.
May be something to do with the lack of APFS on fusion drives. But sounds like APFS may be coming soon. I’ll check when that happens.
Would I be correct in assuming that this is only relevant to portable macs…not desktops?
As seems to be indicated in this article: https://support.apple.com/kb/PH25723?viewlocale=en_US&locale=en_US
Would make sense since portables are not always connected to their time machine backup drives.
Hey cjpitt!
It’s my understanding that these system-restore snapshots work on any APFS SSD drive, so if the iMac in question had one, I would think it would be creating snapshots (I believe that support article you linked was referring specifically to Sierra, not High Sierra). But I could be wrong, certainly, and I don’t have an SSD iMac to test it on! Perhaps another reader can clarify?
And I’m sorry for not including that in the original article, so good question! 🙂
So I contacted a friend of mine who has an iMac with an SSD in it because your question made me curious, and he did indeed get the same options within macOS Recovery for restoring from snapshots. So it looks like that Apple support article should be edited, at least!
But I hope that’s helpful, and thanks for piquing my curiosity!