
I recently praised Apple’s Mail for making it so easy to use email encryption. This is more important than ever, since electronic privacy is front and center in our attention. Let’s look at what you need to do to get started with encrypted email using Apple’s Mail app.
Step 1: Get Your Certificate from Actalis, a Free Email Encryption Authority
The first thing you need to do is get your encryption certificate. There are several Certificate Authorities (CAs), but many have stopped providing free options. On the other hand, Actalis recently began offering free S/MIME certificates for email. To get started, click over to the Actalis website and verify your email. Then, prove you aren’t a robot. Check all the appropriate boxes and click Submit Request. In moments, your certificate will arrive in your email.
Don’t miss the best of The Mac Observer
Set us as a preferred source and our Apple reporting ranks higher in your Google Search results and Discover feed — one tap, no account changes.

Step 2: Download and Install Your Certificate
After a few moments, you’ll get an email from Actalis with your certificate and the link and password to manage it. Drag the link from your email to your Downloads folder, then click on it to unzip the archive. Once unzipped, double-click the certificate file (ending in file extension .pfx) from the download location to open it and begin importing it into your Keychain. I store my encryption certificates in login, and you should too. Yes, the image below shows System, but I learned that placing it there resulted in having to enter my login credentials many, many times to send and decrypt emails. When I reinstalled the certificate, the window below never returned, and the certificate went to login.

After you click Add, Keychain Access will ask you to authenticate as a system administrator. Do so, and your certificate will be added to your Keychain.

Next, you’ll be prompted to enter the password for your certificate. This was displayed on the final page, notifying you that your certificate had been generated and emailed to you. After that, macOS will prompt you one more time for your administrator password, and then you’ll be done.

Step 3: Exchange Digital Signatures
If Mail is already running, quit the application and relaunch it. At this point, Mail will automatically sign your emails with your public key. You can tell that it’s done so by the new icons next to the subject line. The lock, grayed out, is to encrypt your email. The checkmark, blue, shows that the email will be digitally signed.
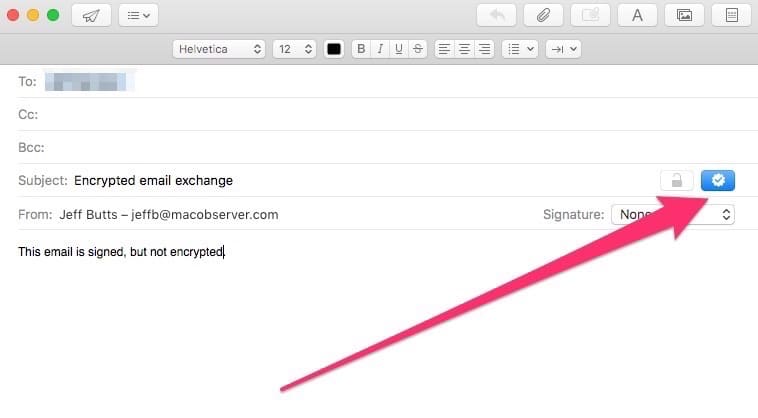
When you send a signed email for the first time, you’ll be asked to grant Mail permission to use the keychain the certificate is stored within. Provide your user name and password, then click Allow.

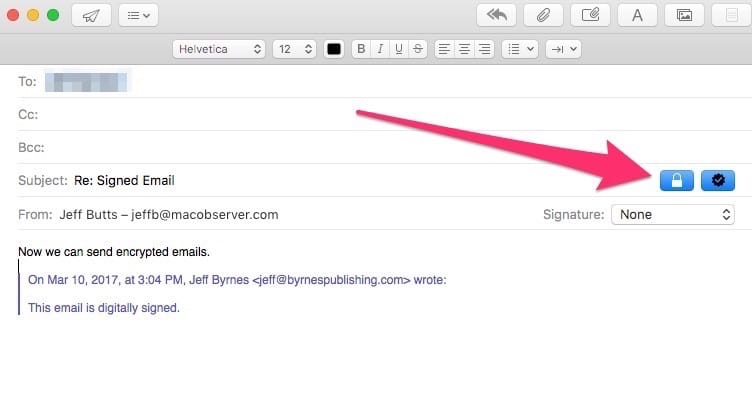
Step 4: Send Your Encrypted Email
Once you’ve exchanged digitally-signed emails with your recipient, you’ll be all set to send encrypted messages. To do this, simply make sure the Lock next to the subject line is blue, and Mail will encrypt the email using your certificate.
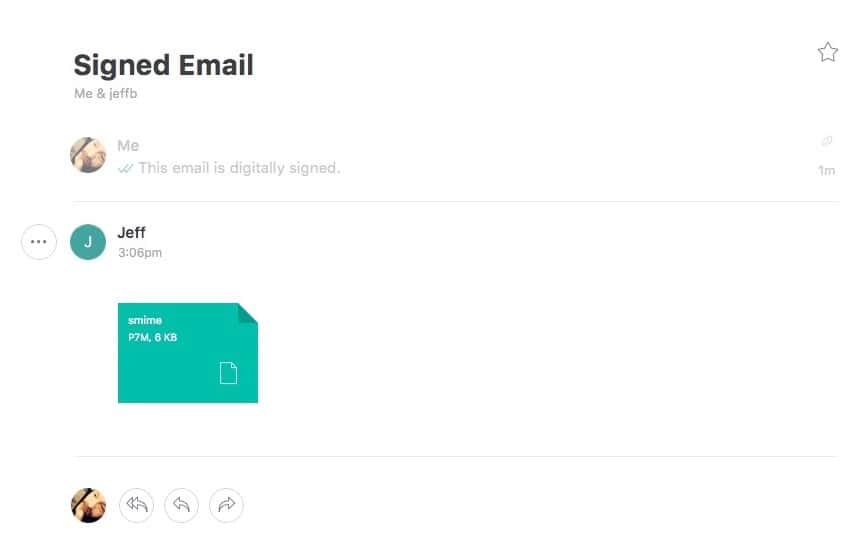
Step 5: Verifying Your Emails Are Encrypted
If you want proof that the email encryption is working, try opening your message in another mail client. You’ll see that the body of your email is in an S/MIME attachment. You can open that attachment with Keychain Access (in fact, that’s the default), but that’s the only way you can read the content.
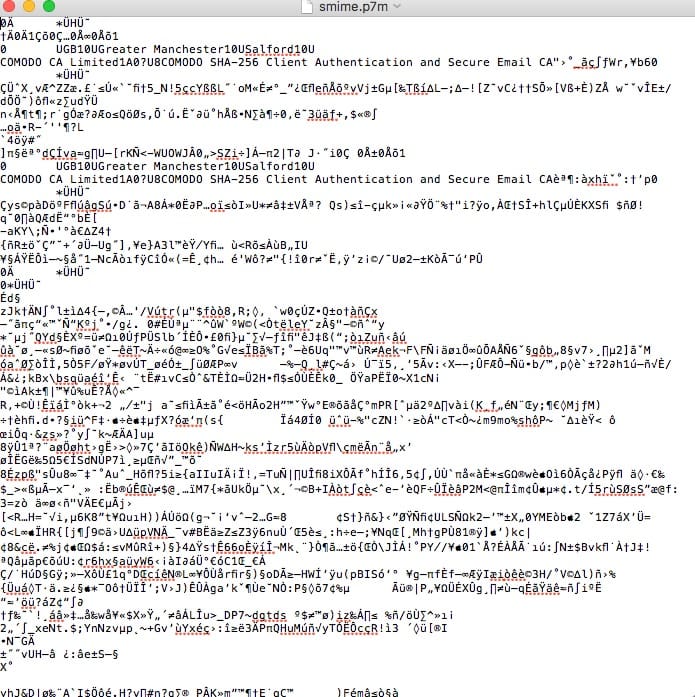
But Is It Really Encrypted?
Okay, you have your doubts. Try opening the S/MIME attachment using TextEditor, for example. You’ll see that it’s completely encrypted and unreadable.
Be Careful With Those Keys
Once you’ve exchanged signed emails with someone, all of your future messages to that person will be encrypted. Of course, you can always turn that off by clicking the Lock to disable encryption. Just be very careful with your keys and certificates; if you lose them, you won’t be able to read those emails again.
What Happens When a Certificate Expires?
Almost all S/MIME certificates have expiration dates, and you can’t just renew them. You have to obtain a new certificate. However, you should not delete your public and private keys from your Keychain. You will still need them to open and decrypt older encrypted emails. You just won’t continue using them to encrypt new email messages.
This article has been updated to use a new S/MIME certificate provider, and reflect changes in Apple Mail on macOS Catalina.


According to the up to 3 years old comments, this seems to be a recycled article.
I tried a month ago the Actalis certificate and there is a problem. Not sure on perpetrator, but installing the certificate on Mac, iPhone and iPad it works (signature) for a while but after 2-3 days the messages sent from device 1 is showing as correctly signed on the same device, but on devices 2 and 3 are marked red as untrusted signature and marry-go-round…
It’s an updated article. When I first penned it 3 years ago, I used Comodo. I’ve changed to Actalis, which we’ve tested for about 2 weeks now with excellent results.
Installed the same certificate on multiple devices?
Aww dude this is fantastic. You rock Jeff! Thanks so much for the great writeup!
Thanks, John! I love explaining how to do stuff like this, and I’m glad it’s appreciated!
The Comodo service is not free in Europe: they charge €27.16 for an S/MIME certificate. Better to use MacGPG.
I used these instructions a year ago to get S/MIME working and then the certificate expired – this is how I got a new one. I’m on a Mac.
Turns out you can’t renew a certificate, you have to create a new one. So I followed the steps above again, using Safari (same as last time) because it didn’t work for me on Firefox originally. When I downloaded the cert from Comodo using Safari there was a problem with it – the private key was not included. So I tried Firefox and although the message said that the certificate had been installed it was not in Keychain.
I spoke to Ben at Comodo Support and he kindly pointed me in the direction of an article that helped fix it:
The steps to follow are:
1. Download the cert in Firefox
2. Follow the instructions in this article: https://support.comodoca.com/Com_KnowledgeDetailPage?Id=kA01N000000zFJv#firefox_verify_install
3. Export to a location on your computer (you may need to specify “.p12” in the file extension)
4. Open that file in Keychain
5. This should now include private key
That’s how I got it working again. However, I also deleted and re-installed various versions of the certificate at various times so you might need to try that (be careful).
Hope it helps someone.
Is there any way of getting the certificate on an iPhone without a Mac?
@Laurie, I found a way to get past this… I am still getting the error, but it now loads the certificate ok (the entry with the email name has a sub key now when I click on the expander arrow).
What I had done wrong was that I started the certificate request with firefox, and when that didn’t result in a proper certificate I tried that same link with Safari. That got me the certificate, but it was clearly busted.
So make sure you request the certificate in Safari and also download it in Safari. You will have to revoke the certificate first though following the revoke link in the original mail you got from instantssl (using the revoking password you sepcified).
Hope that this was your issue as well, and this resolves it.
Sven
@Laurie (or anyone), any luck figuring out what that “Error: -26276” can be overcome? I am encountering that myself and had no luck with a number of attempts. I create a new empty keychain, still the same issue (which was my attempt at brute forcing this). Not sure what else to do… I downloaded the certificate using safari, which rendered the expected file in my download folder, so I would think that that’s not the problem. I am on the latest Sierra with a updates installed.
Geoduck –
Certainly if the VPN showed the Kleptocrostanian in the US, the stronger key would work. So i tested the system from the US using a VPN registering my IP as being in the UK and was able to get 2048 bit key. So I suppose the theory you suggested might work…for the Kleptocrostanian to portray being in the US or the UK. Just saying…though I’m not advocating it, just testing a hypothetical.
I must be holding my mouth the wrong way, but when I try to add the certificate, I get a dialogue box:
However it does create certificate records for my email address, COMODO SHA-256 Client Authentication and Secure Email CA and AddTrust External CA Root.
I’m puzzled.
@ Jeff Butts. I’m signed in under an Admin account. (I know not the safest from a security perspective) The really strange thing is the lack of the always accept button. Not sure if there is a way to get it to appear. It is also a different box than you show up above, though I followed your steps exactly and stored the certificate in the system part of my keychain
@whisper, are you signed in with a Standard user account or an Administrator account? If Standard, you may have to authenticate with an administrator account for it to work.
@ Jeff Butts. No. It is a different dialog box. It says “macOS wants to make changes. Enter an administrator’s name and password to allow this. macOS wants to use the “System” keychain” then I only have an Allow or Deny box. There is no always allow option.
@whisper, I’m not sure. You don’t ever see a dialog like the one at the end of Step 5?
@Jeff Butts I enjoyed the article and now have mail set up, but when ever I send an email to a new address the dialogue box I get doesn’t have a always allow option, and instead of Mail asking form permission to use my keychain, it is the system asking. What went wrong?
@Jeff Butts – Excellent! Thank you so much for that. I was just about the pull the trigger on uninstalling GPG and go with the native S/MIME functionality but figured I’d check here first. So glad I did. I’ll wait for the article before making my decision.
@scott721: Good question! Stay tuned, because I’m going to write an article just for you on the pros and cons of both protocols!
@Jeff Butts – Thanks for your comment. I’m aware of the native support for S/MIME. What I’m trying to determine is why I should consider OpenPGP (via GPG Mail Suite) if there is a built-in solution that serves the same purpose. is there some advantage to the OpenPGP protocol that is so appreciably better that I should use that solution instead of the native one (which works with Sierra as well). I appreciate your time and expertise.
@scott721: Apple Mail includes native support for S/MIME encryption. OpenPGP, which is what the GPG Mail Suite uses, follows a different protocol. Also, the GPG Mail Suite isn’t yet supported under macOS Sierra.
Thank you to everyone for clarifying the process. Very helpful!
Brian
What is the advantage – or the difference – between using the method versus installing the GPG Mail Suite? They appear to both do the same thing and my preference would be to simplify things by using Apple’s internal functionality rather than additional bolt-ons. Is there something that I’m missing here or does Mail’s functionality obviate the need for GPG?
Just got mine and it’s good for one year. The instructions in the email from Comodo also says:
Tip: “Encrypt contents” will only work if you have added a digitally signed email to your address book from the person you want to encrypt the email with.
I’m not sure this is accurate for Mac Mail users. Mail will search the sender’s keychain for the recipient’s email address and if it finds a certificate with that matching email, it will allow you to click and highlight the signing and encrypting button. One of the key issues can be making sure you use the same email address. I have multiple alias domains since I started with mac.com, then me.com, and finally icloud.com. I still use my mac.com domain but it gets tricky with the others. The encryption certificate usually only works for the main address.
The instructions miss a vital step after step 5. The recipient must also create their own digital certificate, then respond to the original sender’s email. This way, both email users have signing and encryption certificates. Each sender then sends a signed email to other friends who also get their own certificates. Over time, this builds up a certificate library in everyone’s keychain making it easy to send encrypted emails to recipients in their keychain. Where I used to work, our email system had an encryption client that contacted a key library that included current certificates/keys for everyone at work. These keys were updated regularly. I don’t know how long Comodo’s certificate is signed for but they do expire, requiring them to be updated.
@brilor: The latest responses are correct. To answer your question as I understand it, though, exchanging signed emails means the other person has to send you a signed email, too. In other words, assuming they are using Apple Mail, they need to send you an email with the check mark turned blue. On your end, you’ll see next to the sender’s email address “signed” in parentheses.
@brilor, notice there are separate buttons to check for sending it digitally signed and encrypted, so the first one you send with just the digital signature (see the screenshot in step 5). And then subsequent messages can be sent with both options checked so it is encrypted.
@brilor
I tried this a number of years ago but haven’t done it recently, so here’s my understanding. The first message you send “digitally signed” (but must not be encrypted) to the person will contain your public key which then gets stored in their keychain. So then you can send them subsequent messages that are encrypted and they have your public key to decrypt them from the first message.
@Jeff Butts: what does “exchange signed emails” mean? If I send an encrypted email to my buddy, they won’t be able to read it and vice-versa, so I don’t see how that enables my buddy to read my email and me his. Don’t we have to exchange certificates or keys or something? Anyway, the process isn’t clear for me although your setup instructions for the sender are crystal clear. Thank you.. Brian
@TitanTiger: that’s odd. Do all of the emails show being digitally signed? Apple has stopped recognizing a couple of CAs, including StartSSL.
@Brilor: yes, you have to exchange signed emails with the recipient first.
Maybe my old eyes just missed it but does the email’s recipient also have to setup encryption in order to be able to read the encrypted email I send?
Brian
I sent an email to one of my other email accounts digitally signed, and replied from that email back. But I still don’t have the encrypt option available. Still greyed out.
Geoduck,
Not sure about Kleptocrostan, but in the Peoples Republic of Delusional Egomaniacs with Laughable Combovers … or in Comeystan … I’d recommend trying…
Interesting thought. Not that I’m suggesting anything. But suppose someone lived in, let’s call it Kleptocrostan, where they do not allow high level encryption. If you used a VPN routed through a server in the US I wonder if you could then get the 2048 High Grade key and use it outside the US? Not that I’d ever suggest circumventing the laws of Kleptocrostan, but it might make an interesting experiment. Purely for research purposes mind you. I would not advise or counsel anyone to break local laws. (nudge nudge, wink wink).