

The iPhone captures high-quality video. It also includes a complete editing suite. This suite lives right in the native Photos application. You don’t need to download third-party applications. The built-in editor handles basic and intermediate video adjustments. Learning to use it helps you refine footage quickly. You can adjust lighting and prepare clips for sharing. This makes video creation seamless and efficient.
Table of contents
Mastering the Native iPhone Video Editor
The core functionality for editing videos is found by tapping the Edit button after opening any video in your Photos library. This opens a comprehensive array of tools for adjusting timing, aesthetics, and orientation. They offer precision controls over every part of your moving image.
1. Trimming and Cutting Unwanted Footage
Trimming is the most fundamental editing action. You remove unnecessary content from the clip’s start or end. This step is essential for focusing on the main action. It also creates a clean, professional-looking video. Video files often take up significant storage space. Therefore, trimming minimizes file sizes before you compress video on iPhone.
Don’t miss the best of The Mac Observer
Set us as a preferred source and our Apple reporting ranks higher in your Google Search results and Discover feed — one tap, no account changes.
- Open the video in the Photos app and tap Edit icon. This is the last icon in the bottom menu.
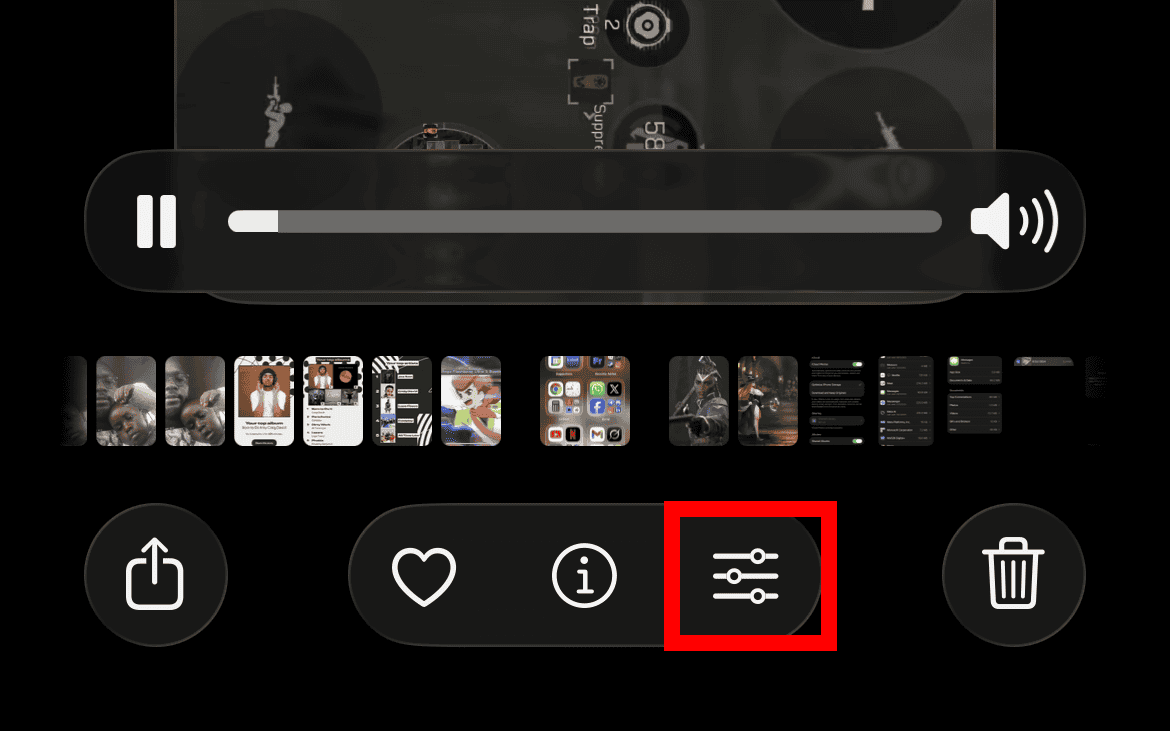
- Use the yellow handles on the timeline scrubber. They mark the beginning and end.
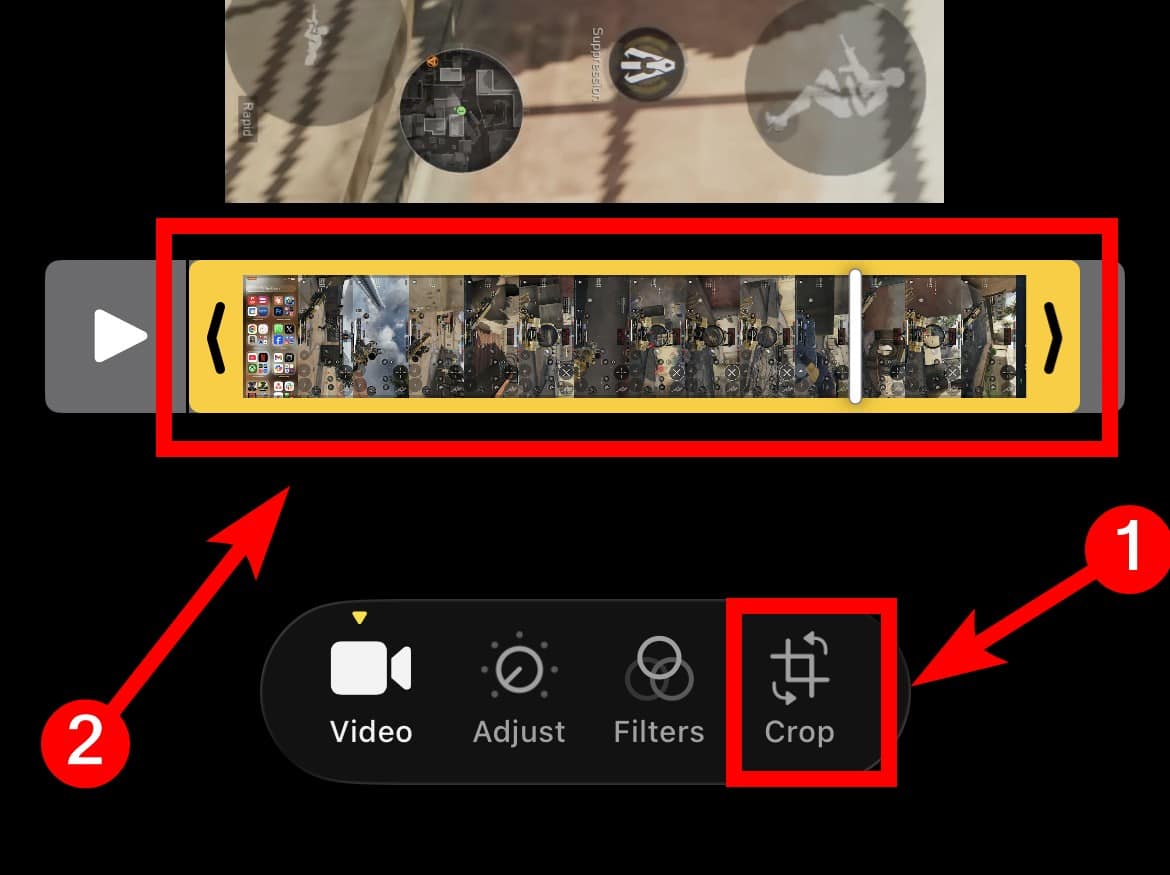
- Drag the left handle inward to set the new start point. Similarly, drag the right handle inward to set the new end point.
- Tap Done.
- Select Save Video to overwrite the original.
- Alternatively, select Save Video Clip as New Clip to keep both versions.


2. Adjusting Aspect Ratio and Cropping
Beyond trimming, you can alter the physical framing of your video. This changes its look or helps it fit social media platforms. The crop tool also allows straightening a slightly tilted horizon. Furthermore, you can zoom in on a subject. You access this function via the crop icon. It looks like a square with rotating arrows.
- After tapping the Edit icon, select the Crop. This icon is usually the third from the left.
- Tap the aspect ration icon in the top-right corner.
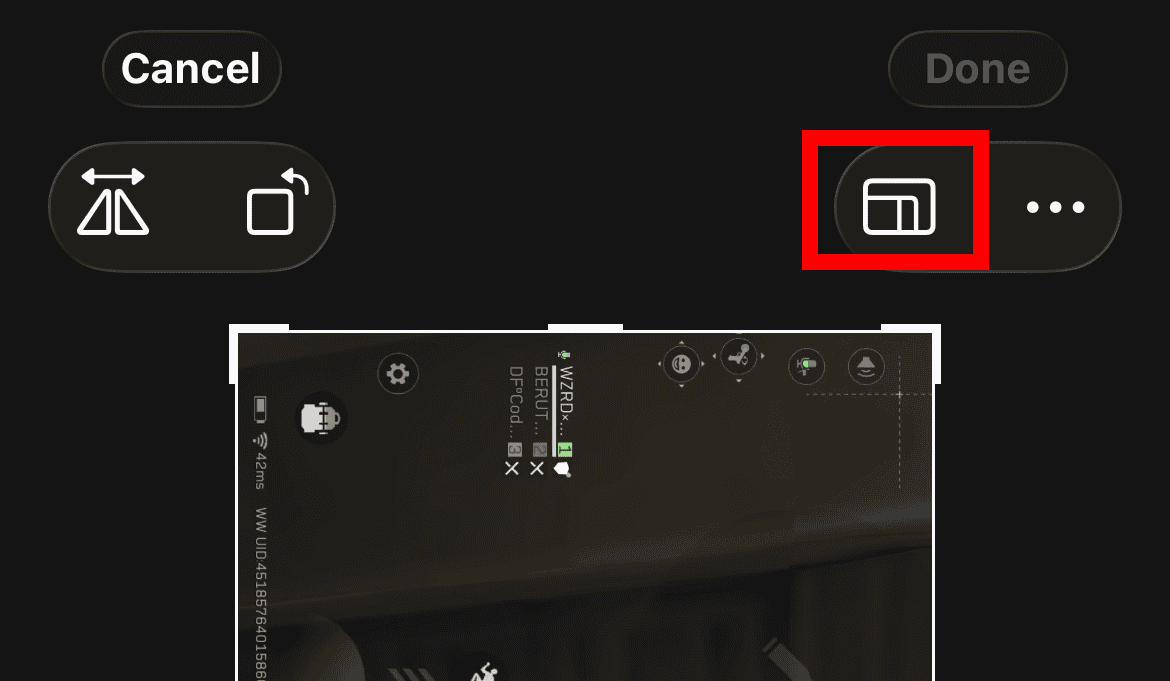
- Use the preset aspect ratios at the top, like 16:9 or Square. Alternatively, drag the corners of the grid overlay to crop manually.
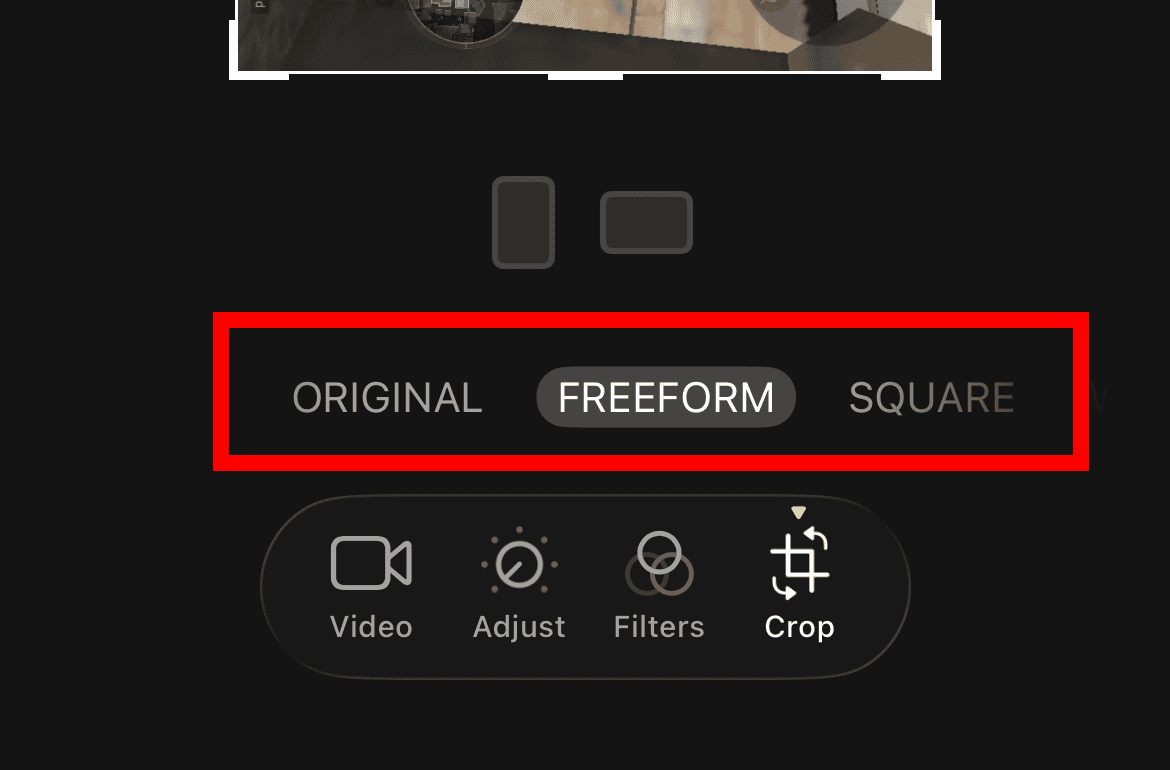
- Utilize the wheel beneath the video player. This helps rotate or straighten the clip for a level horizon.
- Once satisfied, tap Done to apply the changes to your footage.


3. Applying Filters for Visual Style
Filters offer a quick way to establish a consistent style or mood. They add a cinematic touch without complex color grading. The iPhone editor includes many preset filters. These range from vivid colors to black and white options. Consequently, you access them all with just a single tap.
- From the the Edit icon screen, tap the Filters. It appears as three interlocking circles.
- Scroll through the available options, such as Vivid, Dramatic, or Mono. You will see a live preview of the effect.
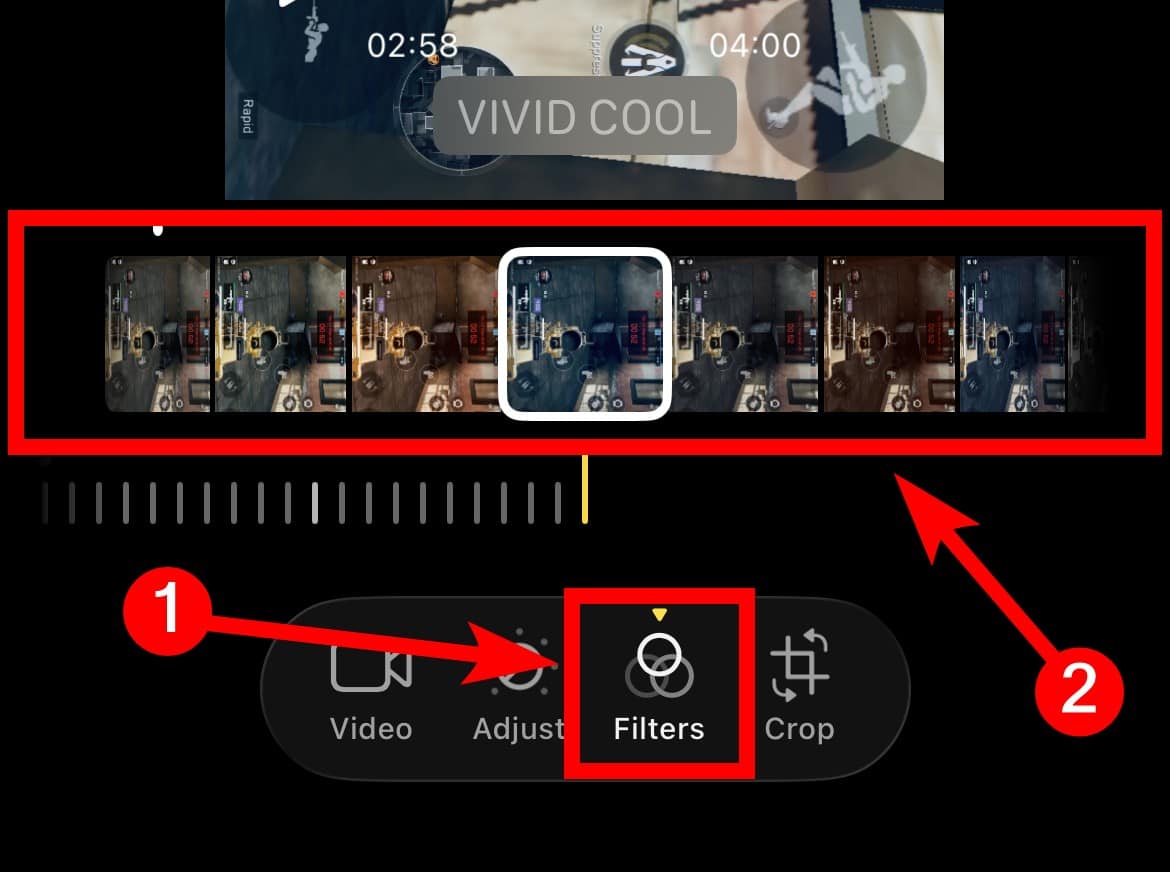
- Use the intensity slider above the filter options. This lets you fine tune the selected filter’s strength.
- Finally, tap Done to commit the filter and save your edited video.

4. Fine Tuning Light and Color
The adjustment tools give you granular control over the video’s appearance. They let you manipulate properties like exposure, brightness, and saturation. Using these tools fixes clips that look too dark. They also bring out richer colors in outdoor scenes. Moreover, this section lets you explore creative adjustments. For instance, you can learn how to speed up video on iPhone for dramatic effect.
- Tap the Adjust, the second icon from the left in the Edit interface.
- Scroll through the list of adjustments. This includes Exposure, Brilliance, Highlights, Shadows, and Saturation.
- Select an adjustment. Use the slider to increase or decrease its effect. Watch the video preview for changes.
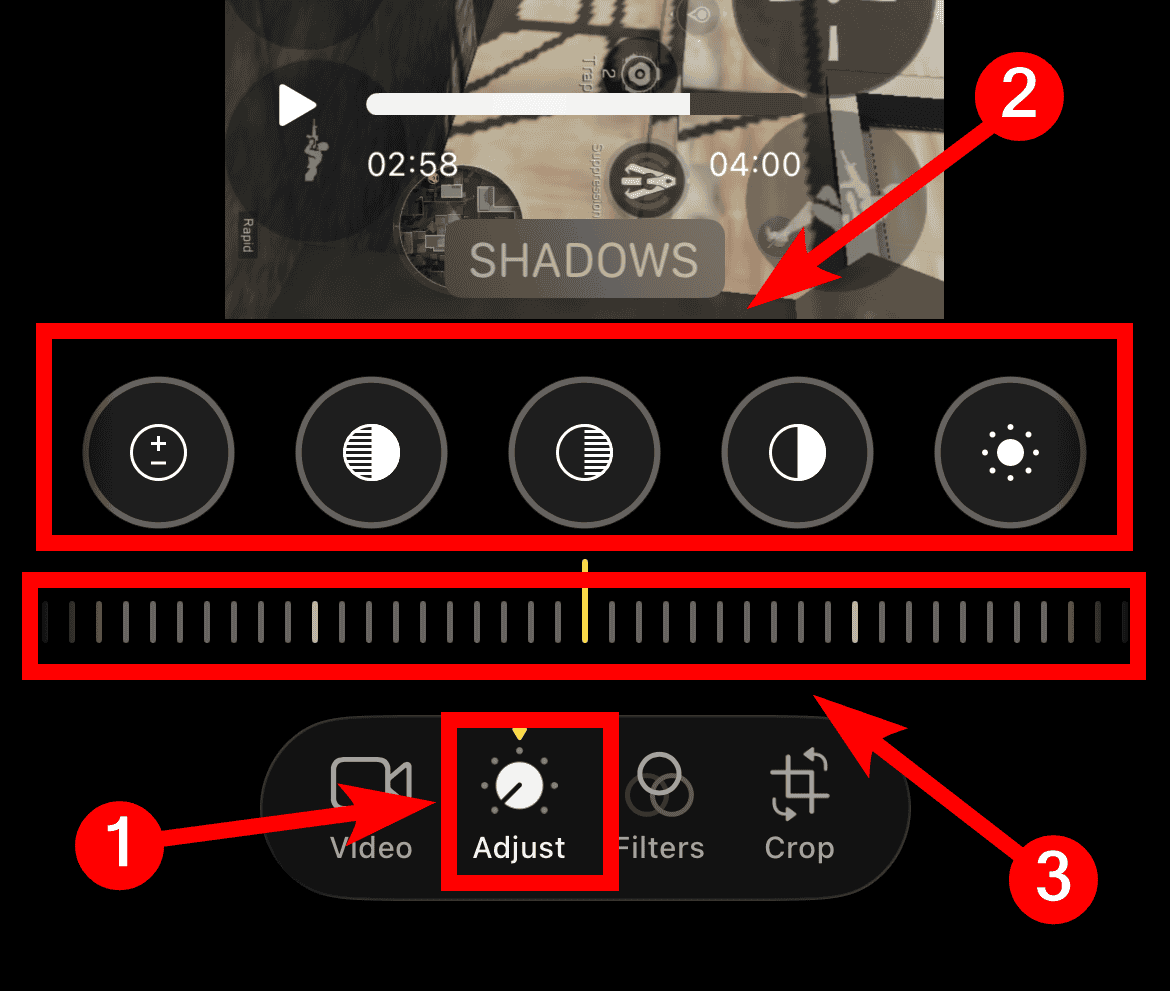
- Tap Done to save your color and light adjustments.

5. Creating Video Loops and Replays
The Live Photos feature allows for unique playback effects. This applies to videos captured as Live Photos. You can easily change the display effect. You can create continuous loops or a short replay. This replay plays backward and forward. It is perfect for short, impactful clips. You can also explore methods to loop video on iPhone with or without an app for any clip.
- In the Photos app, open a Live Photo and swipe up on the screen to reveal the Effects menu.
- Tap Live in the top-right corner and select Loop. This makes the Live Photo continuously repeat playback seamlessly.
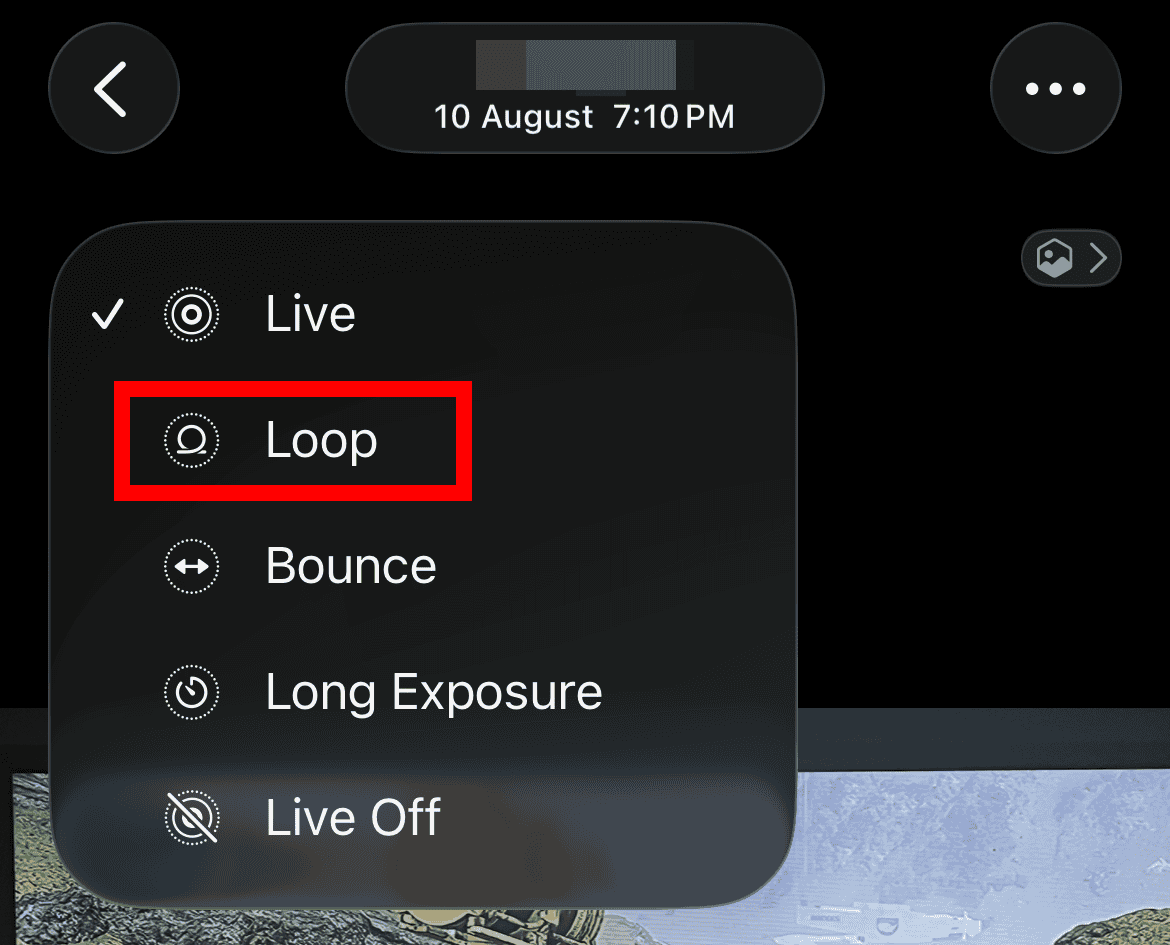
- Alternatively, select Bounce. This plays the Live Photo forward then instantly backward. It creates a boomerang-like effect.
- The new effect saves automatically. You can then share it, providing an engaging visual for social media.

FAQ
The native Photos app on iPhone lacks an option to add background music or soundtracks. You will need a third-party application for merging video with separate audio. Find these apps readily available in the App Store.
Yes, the iPhone fully handles 4K video editing. You work directly within the Photos application. The editor maintains the high resolution throughout adjustments. This preserves the quality of your original capture.
When in the edit screen, tap the three-dot menu icon. It is in the upper right corner. Then select Revert. This option instantly returns the video to its original, unedited state. This works regardless of the number of changes you made.
Essential Skills for iPhone Video Creators
Understanding how to manipulate existing footage is vital. However, capturing the best source material is equally important. Utilize the iPhone’s advanced camera features. This ensures your original recordings are high-quality. Consequently, it minimizes the correction needed later. This includes optimizing settings before recording. For example, learn how to record 4:3 videos on iPhone for a vintage style. The iPhone’s camera and editor integrate seamlessly. This turns it into a pocket sized powerhouse for content creation.


Discussion