
The MacBooks with Apple silicon processors are highly praised for advanced security. They protect against unauthorized software and hardware risks like data loss and theft. Among the notable security innovations is the introduction of startup verification, which validates the authenticity of your MacBook’s system software, ensuring it originates from Apple’s official sources.
Elevating security to an exceptional level, the storage drives in MacBook Pro models are now encrypted using hardware keys. Upon insertion, USB, Thunderbolt, and SD cards necessitate your explicit approval before any interaction can take place between your MacBook and these hardware storage devices.
While software updates and security patches are frequently discussed, the significance of hardware security cannot be overstated. It serves as a wall against an array of threats, encompassing side-channel attacks, timing attacks, and fault triggers aimed at compromising your MacBook’s integrity. It’s worth noting that even USB hardware drives can potentially harbor malicious elements. Let’s delve deeper into the accessory security feature available in macOS Ventura and newer versions of the operating system,.
About the USB Accessory Security Feature in macOS
Here is an explanation of how the USB accessory security feature introduced with macOS Ventura operates. Whenever a USB accessory, Thunderbolt device, or SD card is connected to your MacBook, a pop-up notification will appear. This notification provides you with the option to either grant or deny direct access to files and applications on your MacBook for the connected Thunderbolt accessory or USB device.
The behavior of this feature is determined by your security configuration settings. You have the flexibility to configure your laptop’s security settings to require authorization for each accessory connected to your Mac, thereby prompting you to approve or disapprove its access.
Step-By-Step Guide to Access and Adjust the USB Accessory Security Settings in macOS
A 2008 incident involving an employee who unknowingly inserted an unfamiliar USB drive into a MacBook connected to the U.S. central command network served as a wake-up call for the world of cybersecurity. The concealed malware carried by the USB drive infected multiple U.S. military computers, necessitating a comprehensive reevaluation of cybersecurity protocols within the country.
Such incidents might prompt you to consider modifying the accessory security settings on your own MacBook. Notably, this feature is exclusively applicable to macOS Ventura and newer operating systems with Apple silicon processors.
Time needed: 1 minute
Here’s how to adjust accessory security settings on macOS Ventura and newer versions.
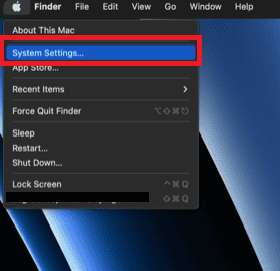
- On your MacBook, click the Apple logo located at the top left corner.
- Select System Settings.

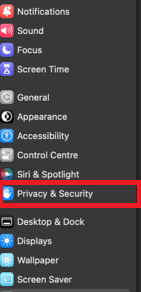
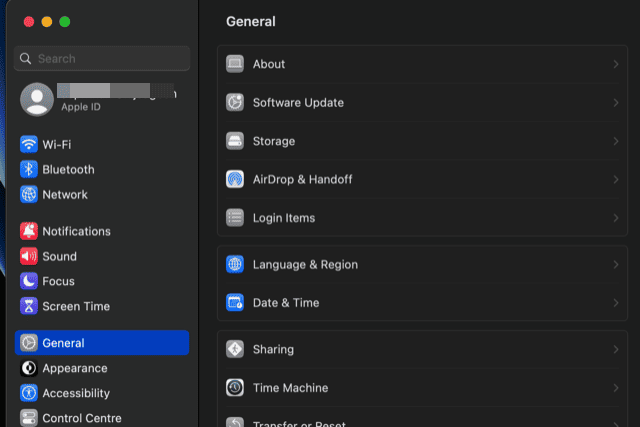
- Scroll down and click Privacy and Security.
- A pop-up menu will appear on the screen near Allow Accessories to Connect, offering you the ability to customize your accessory security settings in four ways. Choose one of the four options.


About the Four Different Ways To Enable Accessory Connections
Here’s a closer look at the four available options designed to give you control over the functionality of this security feature. This feature is only available on macOS Ventura Macs with Apple silicon processors.
- Ask Every Time: This option stands as the most secure among the four. However, for some MacBook owners, it might come across as a tad intrusive, especially when your MacBook is personal. You might question why your MacBook, if not in public access, constantly seeks permission. This setting requests your permission each time you connect a new USB, Thunderbolt, or SD card. Additionally, even previously-approved accessories will trigger a permission request when connected to your MacBook.
- Ask for New Accessories: This default option is available on all Macs with Apple silicon processors. It prompts you selectively, only when you connect a new USB or Thunderbolt accessory to your MacBook for data exchange. This approach ensures the convenience of not needing to approve familiar accessories that have gained prior authorization, striking a balance between security and user-friendliness.
- Automatically When Unlocked: This choice automatically grants approval to any accessory that connects to your Mac, regardless of whether your Mac is familiar with it. However, this automatic approval only becomes active when you haven’t locked your MacBook.
- Always: I would advise against choosing this option due to its lack of safety. It automatically approves both previously authorized and unknown accessories, regardless of your MacBook’s security status.
Each of these options offers a distinct approach to balancing security and convenience, catering to varying preferences.
How To Check for Security Updates in MacOS
- Click the Apple logo located at the top left corner of your home screen.
- Select System Preferences from the list that appears on the screen.
- Click General on the left sidebar.
- Choose Software Update from the list.


Inspect the screen for any available software updates. If the screen indicates that your MacBook is up to date, then you are secure. However, in the case where there are updates available, follow the on-screen instructions to ensure that your Mac is brought up to date.
Tips for Safeguarding Against Security Compromise in macOS
To strengthen the defenses of your Mac and provide a protective barrier against the security risks brought about by USB, USB-C, Thunderbolt, and SD cards, consider the following configuration steps.
- Startup Verification: Enable startup verification on your MacBook to verify the authenticity of your system software during boot-up. This prevents unauthorized changes and shields your software from tampering.
- Storage Drive Encryption: Make the most of enhanced security through hardware-based storage drive encryption. This feature deploys powerful encryption methods, giving an extra layer of protection to your data’s privacy. Here are six Mac encryption software tools to protect your sensitive data.
- Approve External Hardware Access: Adjust your MacBook settings to demand your approval before any interaction with external hardware like USB, Thunderbolt, and SD cards is allowed. Taking this preemptive measure keeps unauthorized access and potential risks at bay.
- Stay up-to-date with Hardware Security: Keep a close eye on hardware security updates rolled out by Apple. These updates tackle newly discovered vulnerabilities, reinforcing your MacBook’s resilience against emerging threats.
- Exercise Caution with Unknown Hardware: Exercise caution when plugging in hardware devices that are unfamiliar or have an uncertain origin. Sticking to trusted brands and sources minimizes the chance of introducing compromised hardware into your system.
- Layer Up with Security Software: Boost your hardware security measures by adding reliable security software to the mix. Look for software that offers real-time scanning, detects threats, and can remove them effectively. Explore different software options that can function as security layers for your MacBook. Here’s a guide on MacBook security.
Conclusion
By following the steps highlighted earlier and utilizing this accessory security feature, you significantly boost the security of your MacBook and reduce the potential risks linked to connecting Thunderbolt accessories and USB accessories. Remember, a comprehensive security approach encompasses both software and hardware considerations. Also, remember that Apple silicon Macs offer more robust protection against potential threats from accessories.
Keep in mind that opting for the “always” option purely for the sake of convenience is not recommended. Sacrificing optimal security for convenience doesn’t truly provide genuine ease. Instead, the default option that exclusively permits access from previously approved accessories offers an optimal balance between convenience and security.


