
Is the Private Browsing Mode not working in Safari? This feature allows you to browse the internet without saving any history or syncing any browsing details with other devices, and it doesn’t even try to save AutoFill information. It is a great way to protect one’s privacy. Here’s how to make it work once again.
Quick Tip:
If you’re using Safari Private Browsing to hide your online activity, you should know that it can’t hide your search history because the DNS cache will store all your online searches. Because of that, we suggest a VPN like ExpressVPN to keep your online activity private with next-level encryption. Thus, your browsing usage will be impenetrable by third parties.
How to Use Private Browsing in Safari on iPhone, iPad, and Mac
Some users aren’t aware of the steps to navigate to the Private Browsing Mode in Safari and think that the feature isn’t available or not working. So, before we get into the fixes, let me run you through the steps to use the Private Browsing Mode in Safari.
Steps to open a Private Browsing Window in Safari on iPhone or iPad.
- Open Safari browser on your iPhone or iPad.
- Tap the Tabs button at the bottom right corner.
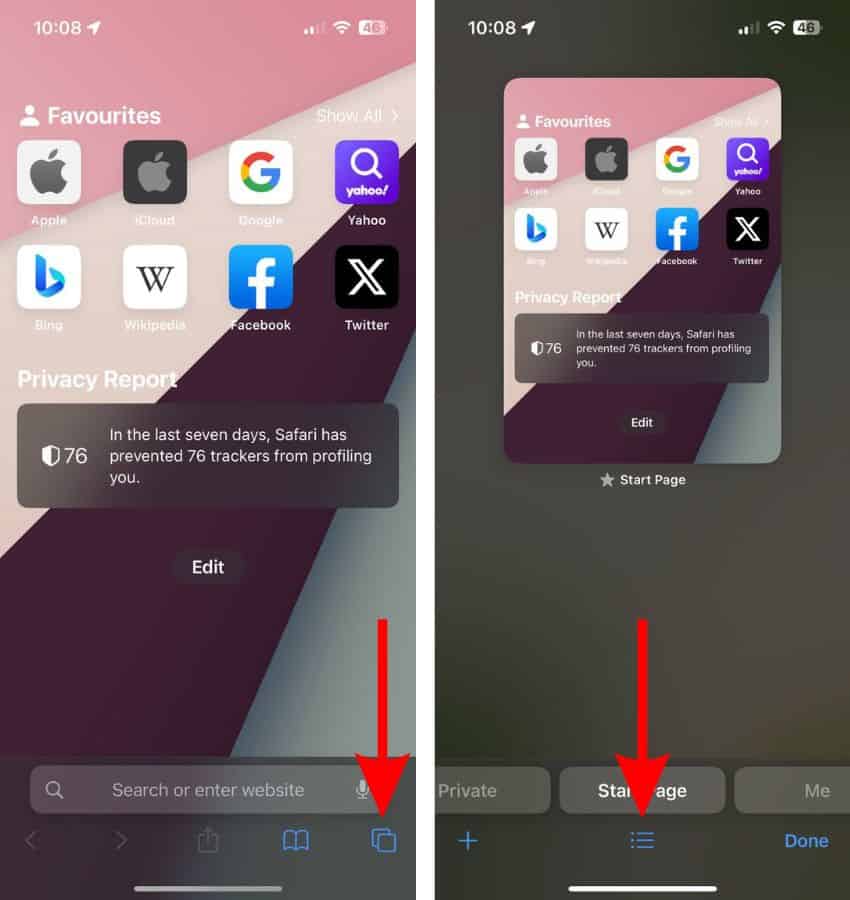
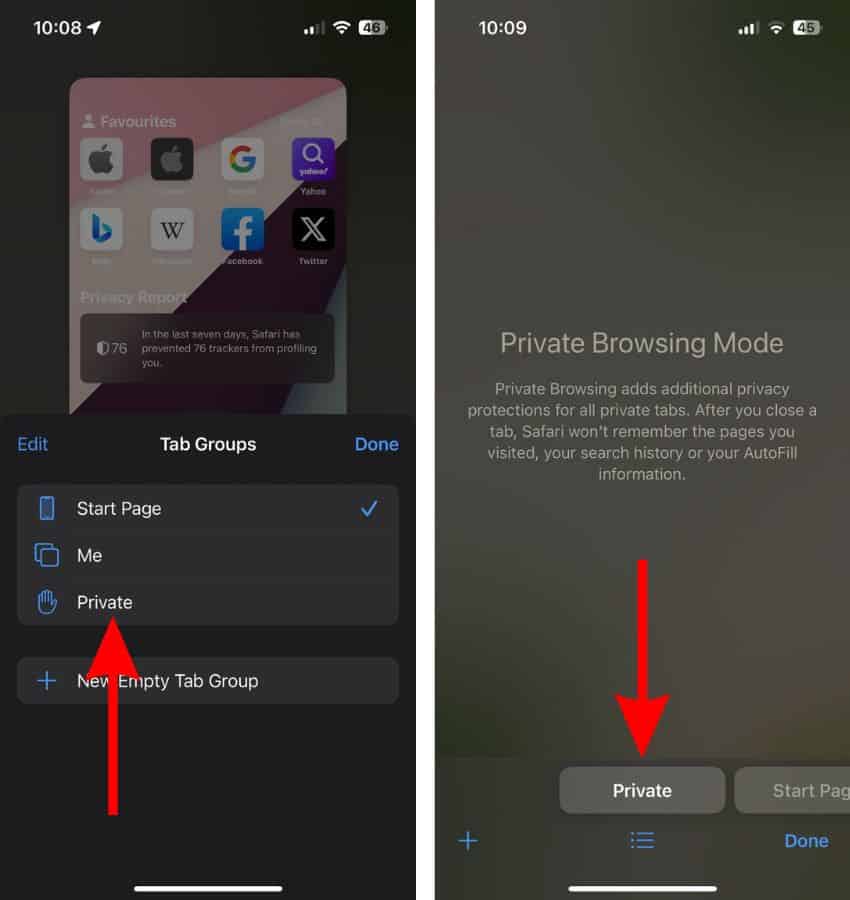
- Now, tap the “Tab Groups” button at the bottom.
- In the Tab Groups list, tap Private to switch to the Private Browsing Mode.
- Here, tap the + icon (Plus) to add tabs and use the Private Browsing Mode. Alternatively, you could also swipe right or tap the Private tab located at the bottom left corner.


Steps to open a Private Browsing Window in Safari on Mac.
- Open Safari on your Mac.
- Click the File option in the menu bar.
- Select the New Private Window option from the list and use Private Browsing Mode in Safari on Mac.
How to Fix Private Browsing Not Working in Safari on iPhone, iPad, Mac
Following the aforementioned steps, we’re certain that you are fully aware of the steps to access the Private Browsing Mode in Safari. But, if you still can’t access Safari even after knowing the steps, it means there’s something wrong.
Therefore, if the Private tab is grayed out or not working at all, here are some of the most effective troubleshooting methods that can help fix the Private Browsing Mode issues in Safari on iPhone, iPad, or Mac.
1. Remove Content Restrictions on Web Content
Enabling Content Restrictions for the Web Content section in the Screen Time Settings leads to the removal of the Private Browsing Mode button from Safari. If you’ve recently made this change, or have accidentally set restrictions for web content, here’s how to change these settings and retrieve the Private Browsing Mode.
Time needed: 2 minutes
Steps to remove Content Restrictions from the Web Content section in Screen Time Settings on iPhone or iPad.
- Open Settings on your iPhone and navigate to the Screen Time option.
- Tap the Content & Privacy Restrictions option and then select the Content Restrictions option on the next page.
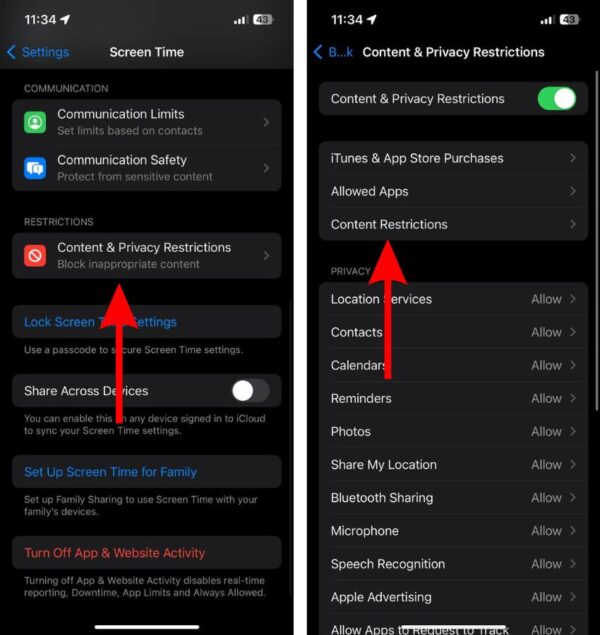
- Tap the Web Content option.
- On the next screen, select the Unrestricted option and the Private Browsing Mode will be made available in Safari on your iPhone and iPad.


Remove Content Restrictions from the Web Content section in Screen Time Settings on Mac
- Click the Apple logo at the top left corner and click the System Settings… option.
- In System Settings, click the Screen Time option in the sidebar and then select the Content & Privacy option under Restrictions.
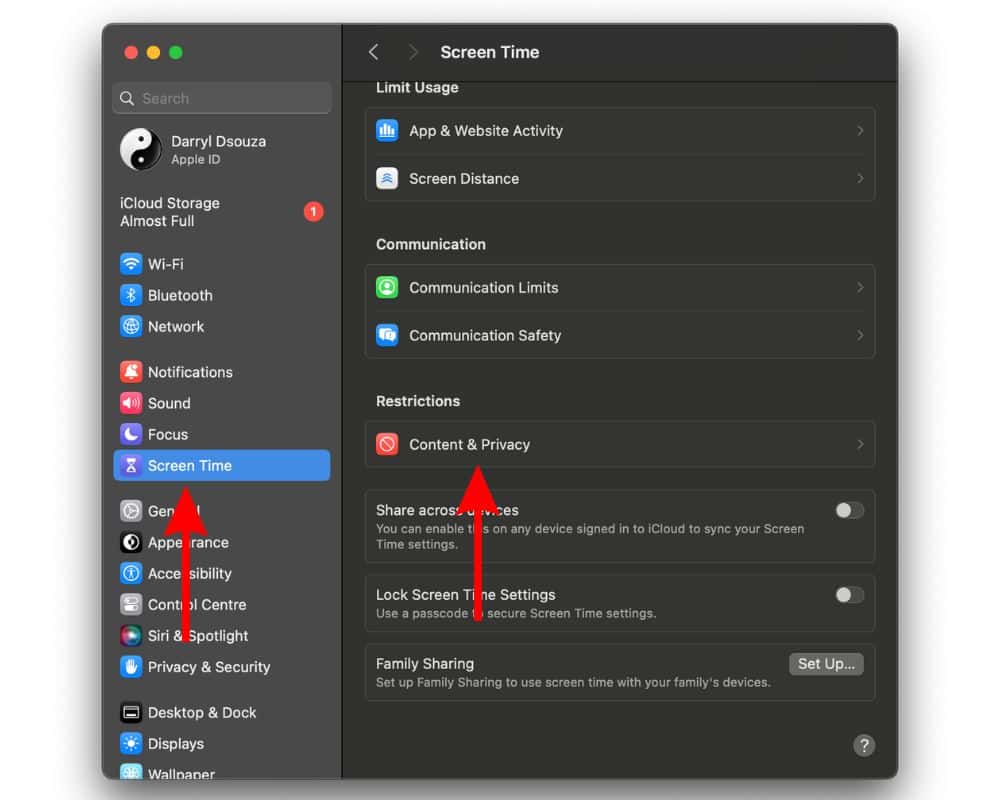
- Click the Content Restrictions option on the next page.

- Now, click the drop-down menu beside the Access to Web Content option.
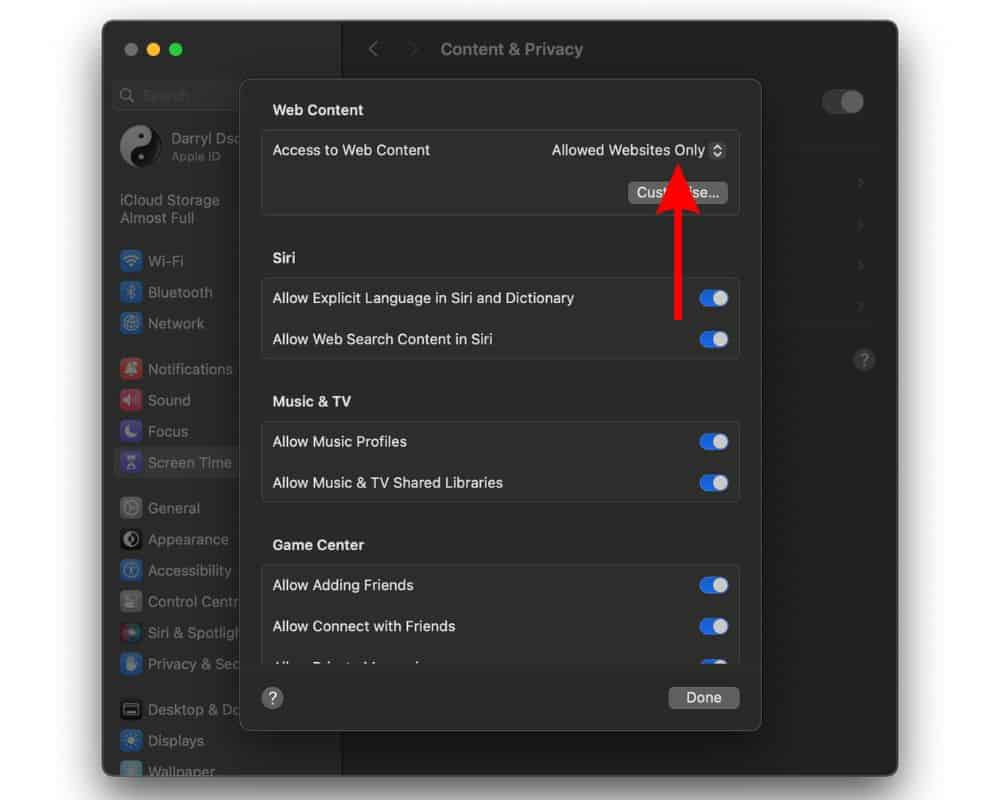
- Select the Unrestricted Access option and then tap the Done button at the bottom to save the changes.
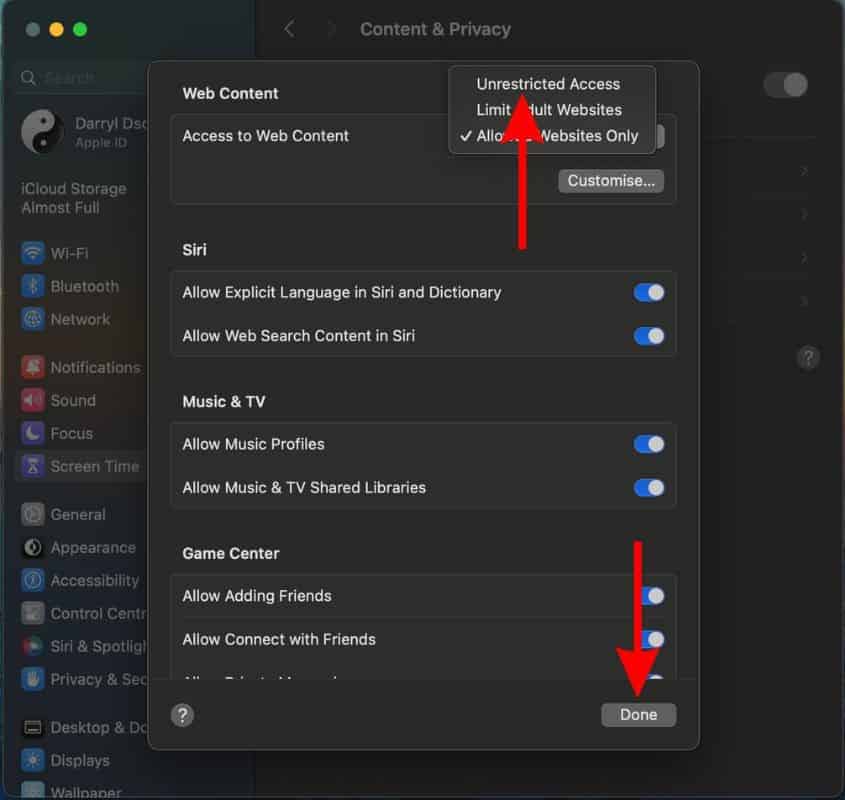
If you’ve knowingly or accidentally selected the Limit Adult Websites or Allowed Websites option, the Private Browsing Mode will not be visible in Safari on iPhone, iPad, or Mac.


2. Update Safari Browser to Fix Private Browsing Not Working in Safari
If removing restrictions didn’t resolve the issue, software bugs in the Safari browser might be the reason why Private Browsing Mode has disappeared from your device. Since Safari is the native browser, you cannot manually update it from the App Store. It receives updates with software updates. Moreover, updating the software can also get rid of other bugs or glitches within the software that might be causing this issue.
Update iOS or iPadOS to the latest version
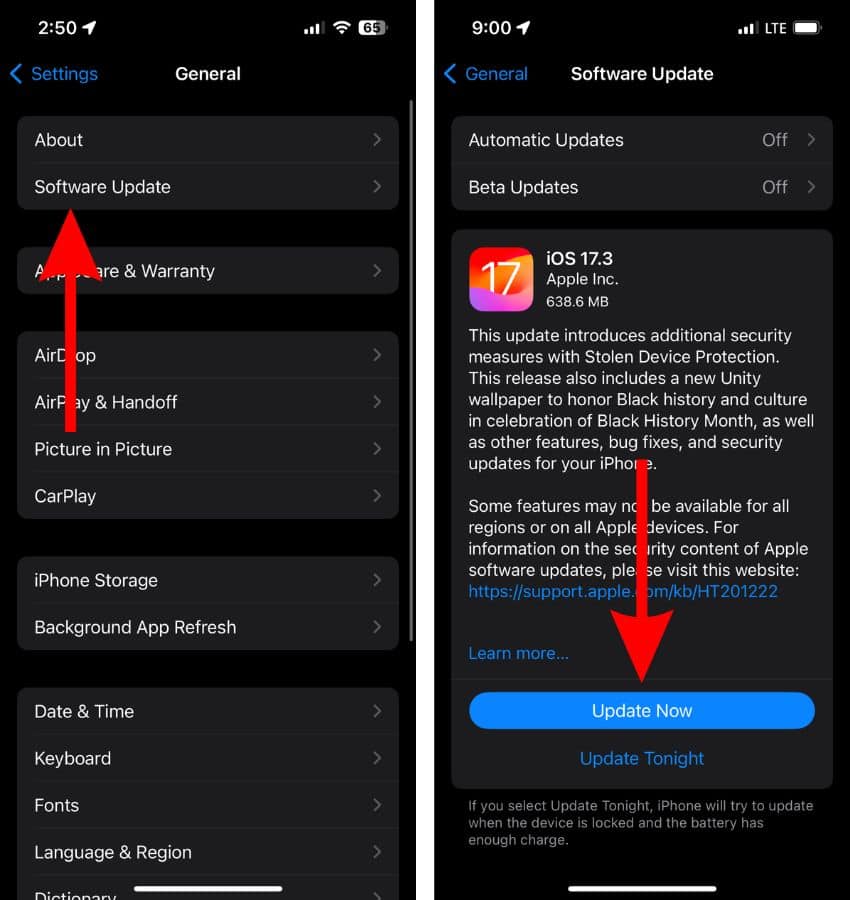
- Open Settings on your iPhone or iPad and head to the General option.
- Select the Software Update option.
- Now, tap the Update Now or Install Now button. Please note that either of these options will only be available when a new version of iOS/iPadOS is available.
- Enter your device’s passcode to continue.

Update macOS to the latest version
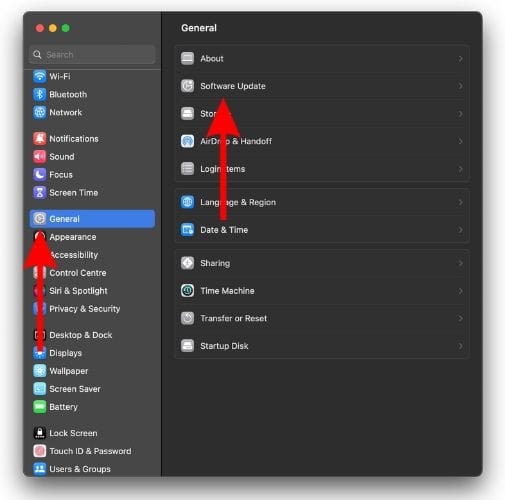
- Click the Apple logo at the top right corner of the menu bar and select the System Settings… option.
- Click the General option in the sidebar and then select the Software Update option located on the right side. Alternatively, if an update is available, you’ll see a Software Update Available notification under your Name/Apple ID at the top of the right sidebar.
- Click the Update Now button located beside the Updates Available menu.

- Then click the Agree button after you’ve read the terms to update macOS to the latest version.
- Enter your Mac’s password and then click the OK button.


3. Restart iPhone, iPad, Mac to fix Private Browsing not working in Safari
Restarting the device helps resolve most temporary software bugs and glitches and you will always find it in troubleshooting guides. If you’ve tried all the steps mentioned above and cannot access your device’s Private Browsing Mode in Safari, a quick restart might fix the issue. Especially because all the services running on your iPhone, iPad, and Mac restart alongside your device.
Moreover, even the settings you’ve just changed will be applied if they haven’t already. So go ahead and restart your iPhone, iPad, or Mac and it might fix the Private Browsing greyed out in Safari issue.
Restart iPhone and iPad without a Home Button
- Press and hold the side button and either volume button until the slide to power off slider appears.
- Drag the slider and wait for a few minutes.
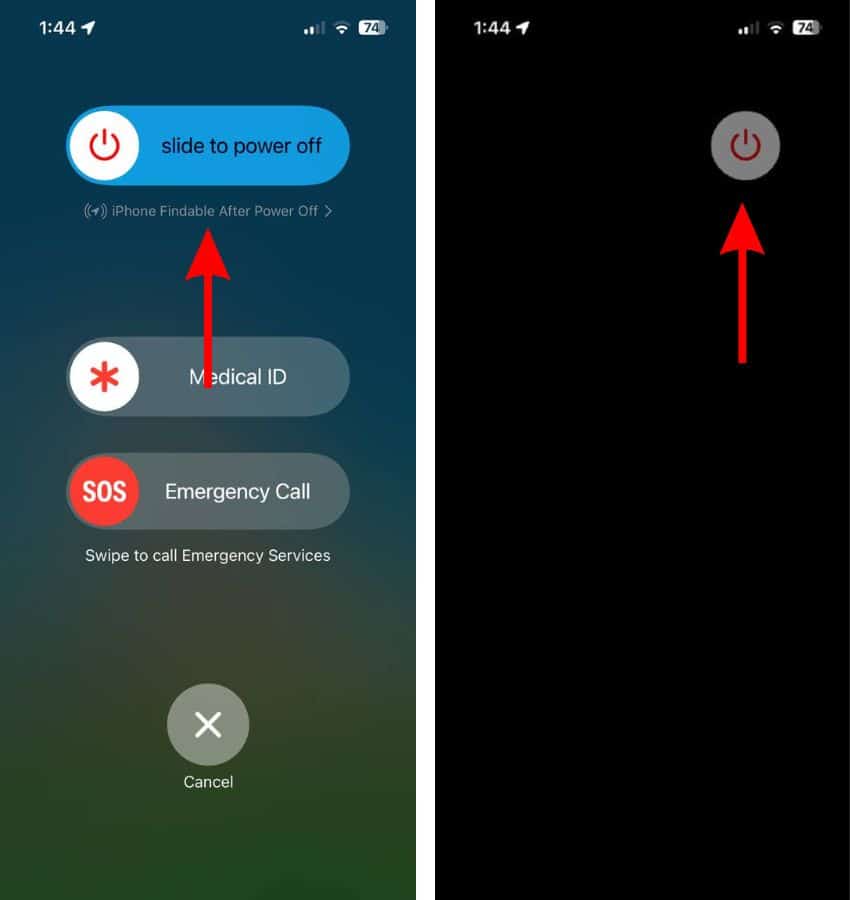
- Now, press and hold the side button until you see the Apple logo.

Restart iPhone and iPad with a Home Button
- Press and hold the side button until the slide to power off slider appears.
- Drag the slider and wait for a few minutes.
- Now, press and hold the side button until you see the Apple logo.
You can even ask Siri to restart your iPhone or iPad if your hands are preoccupied, etc. This is one of my favorite implementations and I use it quite often.
Restart Any Mac
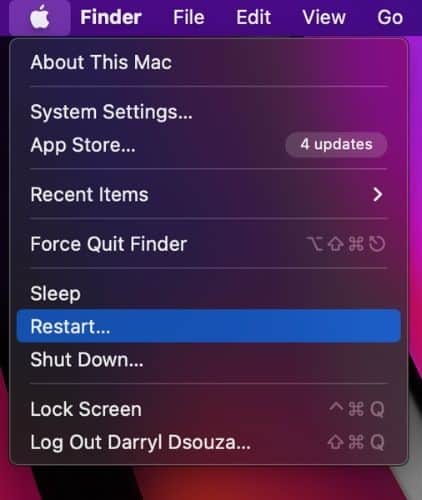
- Click the Apple logo at the top right corner of the menu bar.
- Select the Restart… option.
- Unselect the checkbox to the left of the “Reopen windows when logging back in” option.
- Then, click the Restart button to restart your Mac.

4. Contact Apple Support
The silver lining to every troubleshooting dark cloud is Apple Support. If you followed all of the above mentioned steps but none of them helped, the last option is to contact Apple Support. Alternatively, you could visit any official Apple Store nearby and ask the employees at the Genius Bar to inspect your device and help fix the Browsing Mode not working in Safari.
Does the Private Browsing Mode in Safari Work as Promised?
Apple promises that when you’re browsing the internet using the Private Browsing Mode in Safari it doesn’t save any history. However, there’s a workaround using which you can view your Safari Private Browsing History on Mac. So, if someone wants to view your browsing history, they can. Therefore, we recommend using a VPN alongside the Private Browsing feature to ensure utmost safety.
We hope this article helped fix the Private Browsing Mode not working in Safari on your iPhone or iPad. If you have any other doubts, do let us know in the comments below.


Privacy is paramount when it comes to online activities, and Utopia’s P2P web proxy function provides an exceptional solution for private browsing by encrypting internet traffic and protecting users’ identities.