The iPhone has long been a go-to for mobile photographers. One of its features is Portrait Mode. It creates stunning photos with a blurred background. The iOS 26 portrait mode feature has an elevated iPhone’s camera capability. The new features make capturing and editing portraits more intuitive and creative than ever.
In this guide, we will walk you through everything you need to know about the new and improved iOS 26 portrait mode, from the major interface changes to the new 3D effects.
Table of contents
What’s new in iOS 26 portrait mode?
The iOS 26 update brings significant changes to the Camera and Photos apps, all part of Apple’s new Liquid Glass design. The goal is a cleaner, more streamlined user experience, and this is apparent in Portrait Mode.
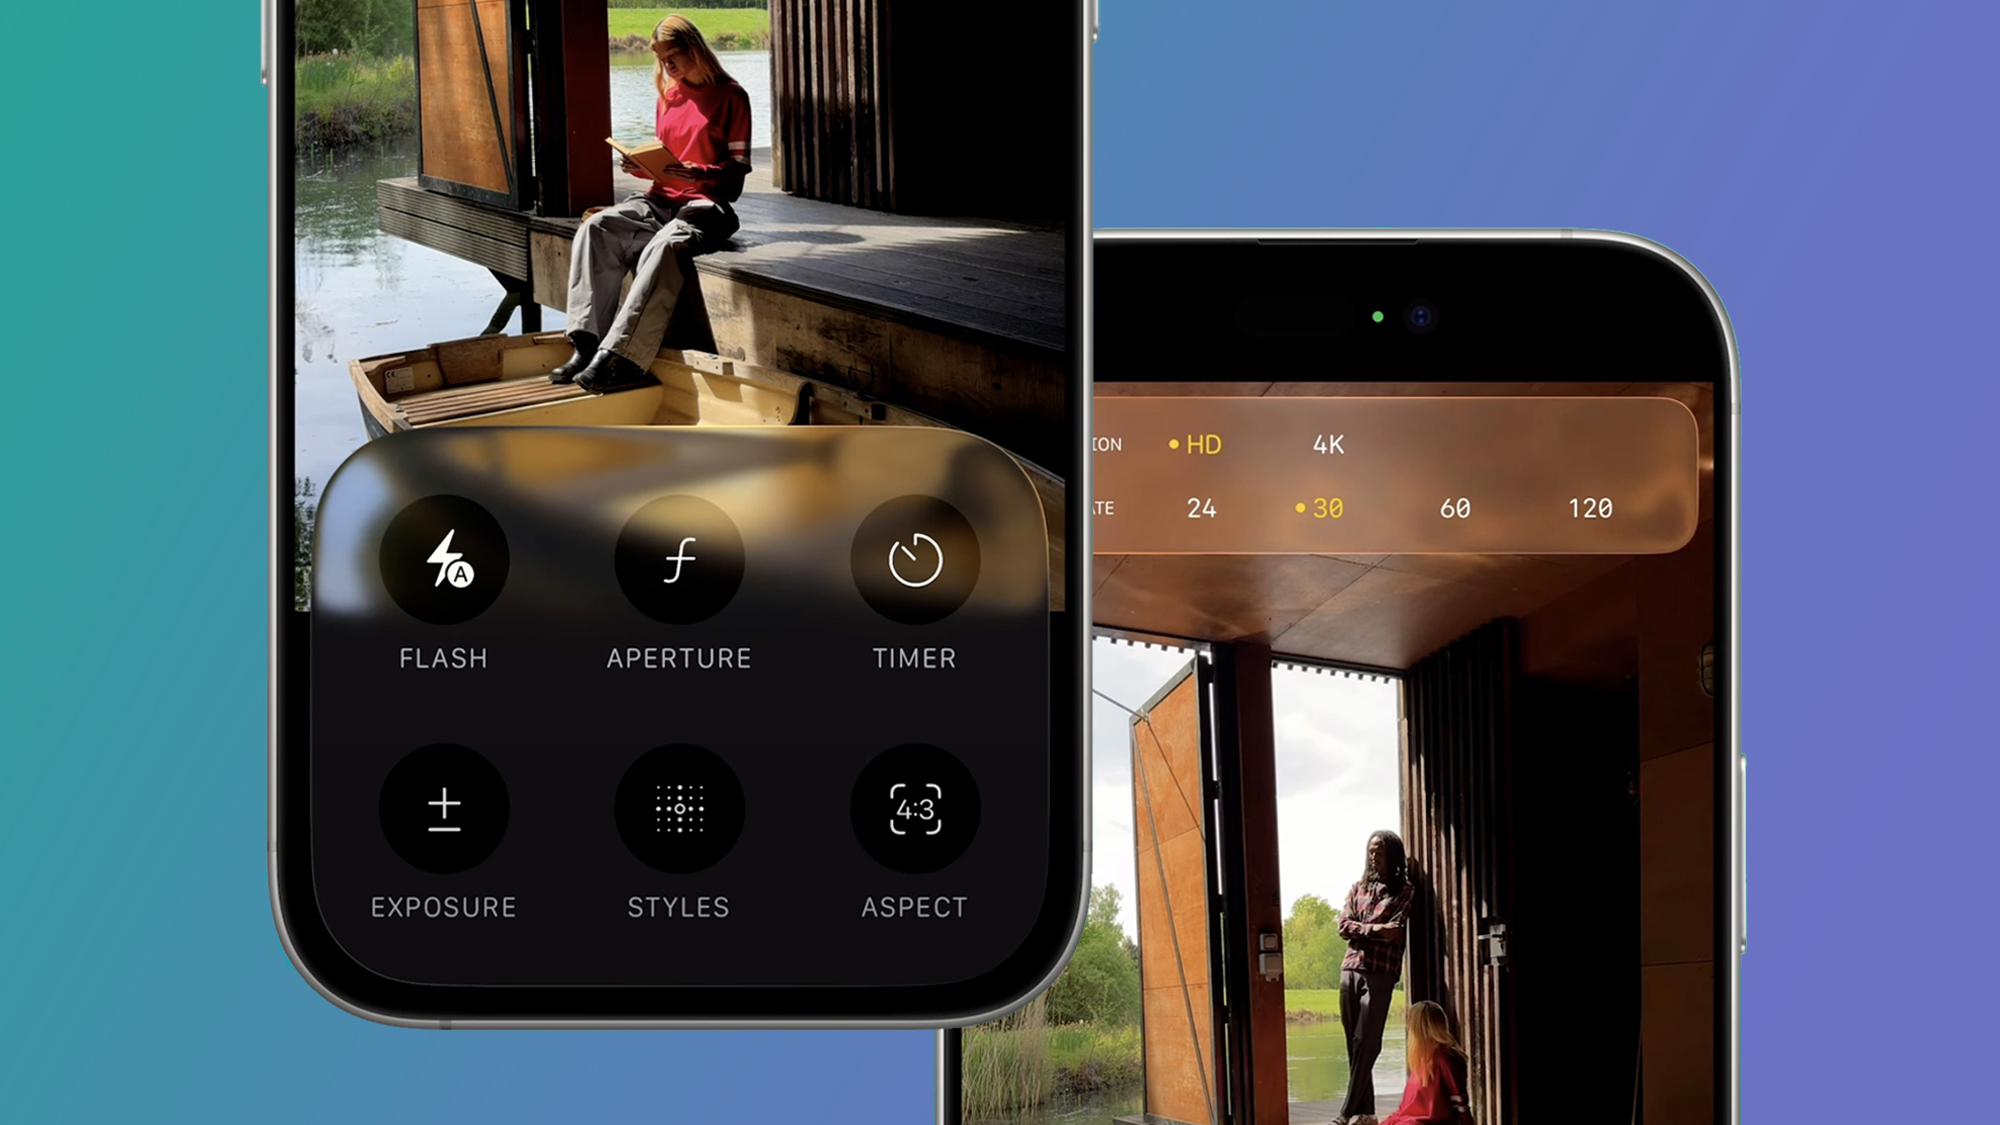
A simplified camera interface

The first thing you’ll notice is the redesigned Camera app. Apple has streamlined the layout to prioritise the two most-used modes: Photo and Video. Portrait Mode is now accessed by swiping left or right on the mode wheel. This reduces clutter and makes it easier to get to the mode you want.
Introducing 3D spatial scenes

A revolutionary new feature in iOS 26 portrait mode is the ability to transform a 2D photo into a dynamic 3D scene. It analyses your photo to separate the subject from the background and create a depth map.
When you move your iPhone, the foreground and background move. This creates a convincing parallax effect. This works not only for new photos but can also apply to many existing photos in your library, even those taken with other cameras.
Other iOS 26 updates
Beyond the headline features, Apple has made other subtle tweaks to enhance the portrait experience:
- Improved Computer Vision: The system’s ability to recognise subjects, from people to pets to objects, is enhanced. This creates a more accurate subject isolation and cleaner background blur.
- New Editing Controls: In the Photos app, you’ll find more granular controls for adjusting depth and lighting. This allows a greater creative freedom.
Taking and editing your portrait photos
Using the new iOS 26 portrait mode is straightforward.
Step 1: Taking a Portrait
- Open the Camera app.
- Select Portrait mode

On iOS 26, you can access the modes (Photo, Portrait, Video, etc.) by swiping left/right.
At first, you may only see the Photo and Video buttons. To get to Portrait, swipe left to right to reveal it..
- Frame your subject
Position a person, pet, or object in view. The camera needs to detect the subject for the depth of field effect to be effective.
Ensure there is some distance between the subject and the background. If you’re too close or too far, the system may issue a warning.
You can also adjust the lighting intensity after capturing the shot.
- Capture the photo
Tap the shutter button. On some models, features like timer, flash, or filters can be set before taking it.
Step 2: Adjusting the photo
The magic of Portrait Mode is that you can edit the effects after the capture.

- Open the photo in the Photos app.
- Tap Edit in the top right corner.
- Tap the Portrait button at the top of the screen to toggle the effect on or off.
- Use the Depth Control slider at the bottom to adjust the intensity of the background blur.
- Tap on the lighting effect icons at the bottom to change the lighting. Use the slider to adjust the intensity of the lighting effect itself. You can choose between Studio Light, Contour Light, Stage Light, etc.
Step 3: Activating 3D spatial scenes
This feature is a game-changer for sharing and viewing your photos.
- Open a Portrait Mode photo in the Photos app.
- Look for a new hexagon icon, often in the top corner of the screen.
- Tap the icon to transform the photo into a Spatial Scene.
- Tilt and move your iPhone to see the 3D parallax effect in action. You can also set these as a Live Wallpaper for your Lock Screen.
Tips
To master iOS 26 portrait mode based on our findings, go beyond the basics.
- Soft Light is Your Friend: The best photos often use soft, natural light from a window or an overcast sky. This lighting minimises harsh shadows and creates a more flattering look. Avoid direct, harsh sunlight unless you want a high-contrast, dramatic photo.
- Distance: Make sure your subject has some space between them and the background. This allows the iPhone’s depth sensors to create a more natural-looking blur. A few feet of separation can make a big difference.
- Simplify the Background: A cluttered background can be distracting. Look for a clean, simple background that won’t compete with your subject. A solid wall, a field of grass, or a distant cityscape can all work.
- Don’t forget to edit: Remember that the photo you take is the starting point. The editing features in the Photos app adjust the blur and the lighting effects. You can also apply Portrait Mode to a regular photo if you have enough depth information. Experimenting with these tools can turn a good photo into a great one.
FAQs
Many features are available on a wide range of devices that support iOS 26. The most advanced capabilities, like the 3D Spatial Scenes, are optimised for newer models, such as the iPhone 15 Pro and later. These devices have the latest Neural Engine. The neural engine is crucial for handling the complex computational photography required.
Yes! This is one of the most powerful features of iOS 26’s Portrait Mode. After you’ve taken a photo, open it in the Photos app, tap Edit, and you’ll see a slider to adjust the depth control (f-stop). You can increase or decrease the blur as you like.
A 3D Spatial Scene is a photo that has a subtle, dynamic perspective shift when you move or tilt your phone. The iPhone uses depth information to make it look like you can “look around” the subject. To see the effect, open a Portrait Mode photo you’ve taken in iOS 26 and tilt your iPhone.
With its simplified interface and the addition of 3D Spatial Scenes, iOS 26 portrait mode represents a major leap forward for mobile photography. It’s no longer just about blurring a background; it’s about creating an immersive, dynamic image that adds a new dimension to your memories. Whether you’re a casual user or a photography enthusiast, these new features make the iPhone’s camera more powerful and fun to use. So, update your device, get out there, and start experimenting with the stunning new ways you can capture the world.


I have a iphone 15 ios 26.4. It seems like the Portrait mode only works in the HEIF 24 resolution and not in the HEIS 48 resolution, correct?
Any way I can adjust to use Portrait modus with HEIS 48 resolution?
Even though I used to use a 35mm camera back in the day and I should know this, I forgot that the f-stop would control the background blur. You didn’t mention that the ‘depth control’ IS the f-stop value until almost the end of this article. Please show this info earlier in the doc to help people who only read the first few paragraphs! Thanks.