
Restoring your iPhone from a backup brings back your apps, messages, settings, and photos, whether you’re setting up a new device or recovering from a reset. Apple makes this process straightforward with iCloud, Finder on Mac, or iTunes on Windows. Here’s the complete guide.
Creating and restoring backups is always done faster and more safely with specialized tools such as Tenorshare iCareFone. With this software you can always be sure your data is safe and you can recover it at any time.
Table of contents
Before you start
- Check your backup type: iCloud, Finder (Mac), or iTunes (Windows).
- Charge your iPhone: Keep at least 50% battery or plug it in.
- Wi-Fi required for iCloud: Restoring from iCloud needs a stable Wi-Fi connection.
- Know your Apple ID & password: You’ll need this to sign back in.
- Erase first if reloading onto an active device: Restoring a backup replaces all current data.
1) Restore from an iCloud backup (wireless, most common)
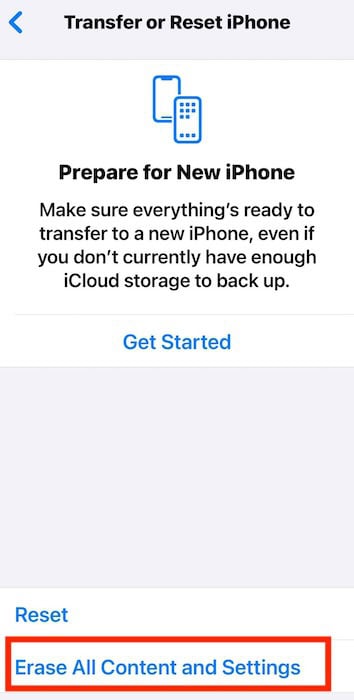
- Erase your iPhone: Settings ▸ General ▸ Transfer or Reset iPhone ▸ Erase All Content and Settings.
- Restart and follow the setup steps until you reach Apps & Data.
- Tap Restore from iCloud Backup.
- Sign in with your Apple ID.
- Choose the backup you want (based on date/size).
- Wait while your apps and data download in the background.

Best for: Most users who want convenience without plugging into a computer.
You might also want to read how to restore your iPhone after a factory reset.
2) Restore from a Mac backup (Finder, macOS Catalina or later)
- Connect your iPhone to your Mac with a Lightning or USB-C cable.
- Open Finder and select your iPhone in the sidebar.
- Click General, then choose Restore iPhone.

- Pick the backup you want (look at the date to confirm).
- Click Restore and wait for your iPhone to finish restarting.

Best for: Users who back up locally and don’t want to depend on Wi-Fi.
3) Restore from a Windows PC backup (iTunes)
- Install the latest version of iTunes.
- Connect your iPhone with a USB cable.
- In iTunes, click the iPhone icon.
- Under Summary, select Restore Backup.
- Pick the correct backup, then click Restore.
- Wait while your iPhone restarts and syncs.
Best for: Windows users who back up to iTunes. For more details, check out our dedicated guide on restoring an iPhone from an iTunes backup.
Tips
- Choose the most recent backup unless you’re specifically trying to roll back further.
- Restoring can take time, especially if you have many apps, photos, or large Messages threads.
- You can still use your iPhone while it downloads apps and photos from iCloud.
- If your backup is encrypted (Mac/iTunes), make sure you know the password.
- Always update to the latest iOS version before restoring for best compatibility.
FAQs
Not from a backup. Restoring replaces your current data. If you want to add data, use iCloud sync or Quick Start instead.
In Settings ▸ [your name] ▸ iCloud ▸ iCloud Backup, you’ll see the last backup date. On Mac/PC, open Finder/iTunes and check backups under device preferences.
No. Restoring loads the entire backup. For selective recovery, you’ll need iCloud Photos or third-party tools.
It depends on Wi-Fi speed and backup size. Leave your iPhone plugged in overnight if needed.
No. Backups are tied to the Apple ID used to create them.
Summary (ordered steps)
- iCloud: Erase iPhone ▸ Apps & Data ▸ Restore from iCloud Backup ▸ choose backup.
- Mac (Finder): Connect iPhone ▸ Finder ▸ Restore Backup.
- Windows (iTunes): Connect iPhone ▸ iTunes ▸ Restore Backup.
- Wait for apps, photos, and data to finish downloading.
Conclusion
Restoring your iPhone from a backup is simple once you know which method you’re using. Whether it’s iCloud, Finder, or iTunes, the key is having a recent backup, a charged phone, and your Apple ID handy. Within minutes, you can have your iPhone set up exactly as it was, apps, settings, and memories intact.


