

Apple’s Final Cut Pro for iPad brings professional-grade video editing to a touchscreen. It combines precision tools, Apple Pencil support, and a streamlined interface designed for mobile creators. Whether you’re editing travel videos, social media reels, or full-length projects, the app makes editing simple, fast, and powerful, right from your iPad.
I’ve been editing videos on my iPad for months now, and I can tell you that Final Cut Pro for iPad has completely changed how I approach mobile video editing. If you are new to the app, in this guide, I’ll walk you through how to use Final Cut Pro for iPad with step-by-step instructions from importing clips to exporting your finished video.
Table of contents
What You’ll Need
To use Final Cut Pro for iPad, you’ll need an iPad with an M1 chip or later and iPadOS 17.6 or newer. The app is available through the App Store as a monthly or annual subscription, which costs $4.99 per month or $49 per year. Apple offers a free one-month trial, so you can test it out before committing.
Don’t miss the best of The Mac Observer
Set us as a preferred source and our Apple reporting ranks higher in your Google Search results and Discover feed — one tap, no account changes.
I recommend using an Apple Pencil and a Magic Keyboard or similar keyboard case, though they’re not required. These accessories make the editing experience much smoother. Finally, make sure you have enough storage space on your iPad since video files can get large quickly.
If you’re using other devices, you can explore how to use Final Cut Pro on a Windows PC for a desktop alternative or companion setup.
Here’s How to Use Final Cut Pro for iPads
1. Installing and Setting Up Final Cut Pro
Let me show you how to get Final Cut Pro up and running on your iPad. Open the App Store and search for “Final Cut Pro.” Tap the download button and wait for the installation to complete. The app is around 1GB, so make sure you’re on a good internet connection.

Once installed, open the app and you’ll see a welcome screen. Tap “Start Free Trial” if you’re new, or “Subscribe” if you’re ready to commit. Sign in with your Apple ID to activate the subscription. Apple will walk you through a brief tutorial that covers the basics, but don’t worry if you skip it. I’ll cover everything in much more detail here.
After the initial setup, you’ll land on the Projects screen. This is your home base where all your video projects will live. Take a moment to explore the interface and get comfortable with where things are located.
2. Understanding the Interface
The Final Cut Pro interface on iPad is split into several key areas that work together. At the top, you’ll find the toolbar with your main editing tools. The middle section shows your viewer, where you’ll watch your footage and preview edits. Below that is the timeline where all your editing happens. On the left side, you’ll see the browser that displays all your media and assets.
When you tap on a clip in the timeline, the inspector appears on the right side, where you’ll make detailed adjustments to video properties, audio levels, effects, and more. You can pinch to zoom in and out of your timeline, swipe to navigate, and use two-finger taps for various functions. These gestures make editing feel natural and intuitive on a touchscreen.

3. Import Media and Create a Project
Tap New Project on the main screen and give it a name. Choose your video resolution (1080p or 4K) and frame rate (24, 30, or 60 fps). After creating your project, tap Import Media to bring in clips from Photos, Files, or external storage.
Final Cut Pro automatically organizes your imported clips in the Media Browser, letting you preview, trim, and drag them into the timeline. This system keeps everything neat, so you don’t lose track of files mid-edit. For larger projects, consider keeping your footage on an SSD for faster performance.
I also want to mention that you can import footage directly from Final Cut Camera, Apple’s companion app for iPhone. If you shoot with Final Cut Camera, your clips automatically sync via iCloud and appear in Final Cut Pro’s media browser. This integration makes the workflow incredibly smooth.
4. Edit Your Clips
This is where the fun begins. Once your clips are on the timeline, you can trim, split, and move them with either your finger or Apple Pencil.
- Trim: Drag the edge of a clip to shorten or extend it. You’ll see live previews as you adjust.
- Split: Use the Pencil to swipe down across a clip to split it into segments.
- Rearrange: Tap and hold any clip, then drag it to a new position on the timeline.
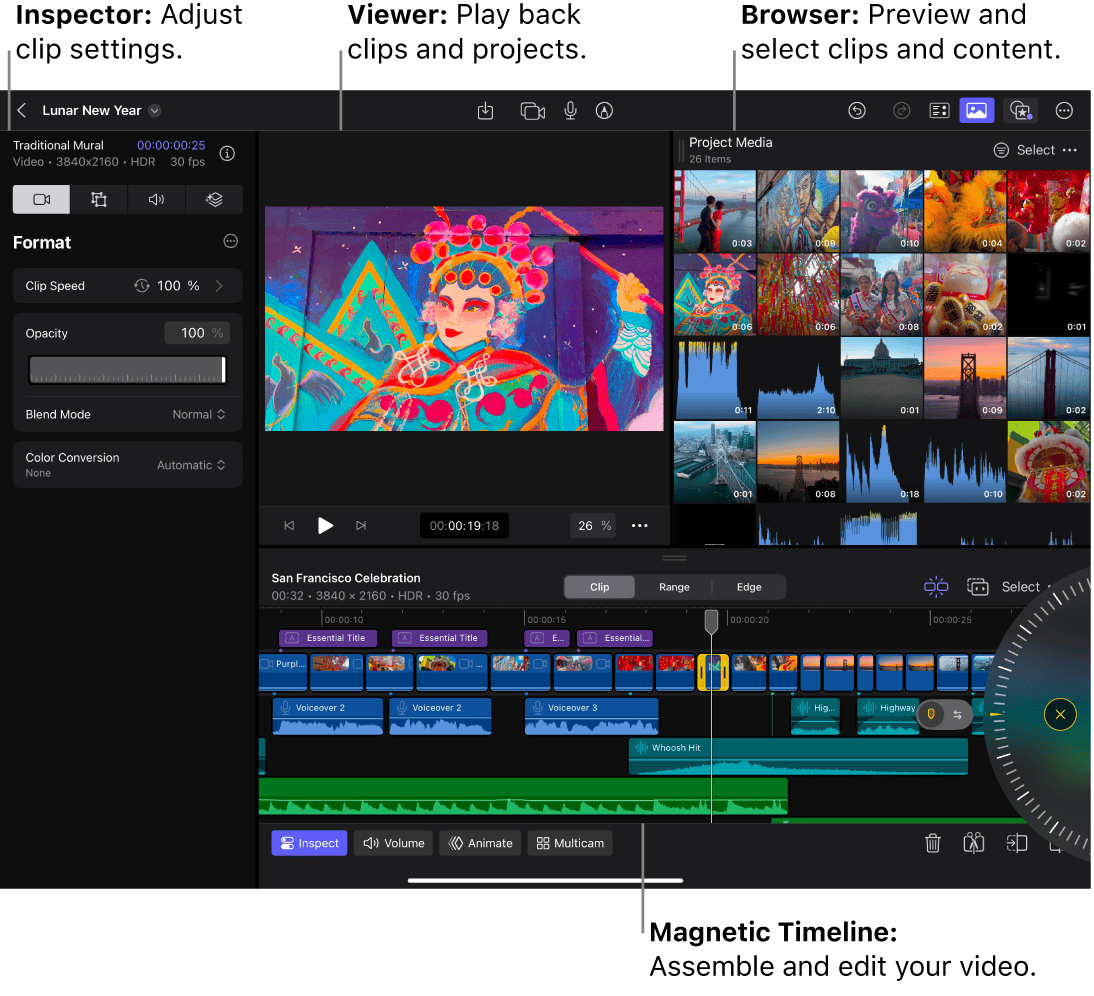

The app also has a magnetic timeline feature, so clips automatically align with transitions or beats in your music. If you’ve used Final Cut on Mac before, this feature feels familiar but even more fluid on touch.
5. Add Transitions, Titles, and Effects
Once your clips are in order, tap the “+” icon and choose Transitions to add smooth scene changes. Common ones like Cross Dissolve or Slide can make your edits feel polished without overdoing it.
Next, add Titles to introduce scenes or credits. You can adjust fonts, size, color, and animations directly from the preview screen. The iPad version even lets you use the Apple Pencil to reposition titles with precision.

Final Cut Pro also includes some iPad-specific effects that take advantage of the device’s processing power. The cinematic mode effect, for example, adds depth-based blur that looks professional and runs smoothly even on longer projects. If you’re curious about other mobile tools, see these top video editing apps for iPhone to compare their flexibility.
6. Record and Edit Audio
Audio plays a huge role in storytelling. Tap the Microphone icon to record a voiceover directly into your project, which is great for narrations or quick edits. You can also import music or ambient sound effects from the Files app or external drives.
Final Cut Pro for iPad includes an Audio Inspector, where you can adjust volume, fade, or apply filters to clean up noise. It also features auto-ducking, which automatically lowers background music when someone is speaking, keeping your mix balanced without manual edits.
7. Adding Titles and Text
Titles and text overlays help you highlight information or add style to your video. Tap the Titles button in the browser to browse options such as basic titles, lower thirds, bumpers, and animated text styles.
Drag a title onto the timeline above your clips, then tap it in the viewer to edit the text. You can change the font, color, size, and alignment in the Inspector. For animation, use the Build In/Out options to control how text appears or fades away.
To reposition or resize text, tap it directly in the viewer and drag or pinch to adjust. It’s quick, intuitive, and ideal for fine-tuning layouts without opening menus.
8. Using Multi-Cam Editing
Multi-cam editing lets you combine and switch between multiple camera angles easily. Select your clips in the browser, tap the three-dot menu, and choose New Multicam Clip. Final Cut Pro automatically syncs the clips using audio or timecode.
Drag the synced clip to your timeline and tap Show Angles to view all camera feeds. As the video plays, tap an angle to cut to it instantly. You can refine cuts later by selecting sections and switching angles manually.

It’s one of the fastest ways to edit interviews, events, or multi-camera projects, no manual syncing required.
9. Export and Share Your Video
Once your project is ready, tap the Share button in the upper-right corner. Choose a format such as H.264, HEVC, or ProRes, depending on where you’ll share it. You can export directly to YouTube, Files, or external drives.

If you’re planning to continue editing later, save your project file as well. This lets you reopen and tweak it later. Export times vary depending on your project length and iPad model. A five-minute 4K video typically takes 3-5 minutes to export on an M2 iPad. You can continue working on other projects while the export happens in the background.
Tips for Getting the Most Out of Final Cut Pro for iPad
Here are a few tips that can make your workflow faster and smoother:
- Use Apple Pencil hover for precise timeline placement.
- Keep large projects on an external SSD for faster performance.
- Use keyboard shortcuts if you have a Magic Keyboard or Bluetooth keyboard.
- Enable Background Rendering for smoother previews.
- Turn on Low Power Mode during exports to prevent overheating.
If you’re using an M3 iPad Air, check out these essential apps that complement video editing and help with productivity.
Final Thoughts
Editing with Final Cut Pro for iPad feels natural once you get used to the touch interface. The app brings desktop-level tools to a portable device, making it perfect for YouTubers, mobile filmmakers, and professionals who travel often.
It’s amazing how much control you get, all from a single screen in the Final Cut Pro app for iPads. The learning curve exists, but it’s not as steep as you might think. Start with basic cuts and transitions, then gradually explore the more advanced features as you get comfortable. Before long, you’ll be creating videos that look like they came from a professional studio.
FAQs
No, but it includes a free one-month trial, after which you can subscribe monthly or yearly.
You’ll need an M1 or newer iPad, such as the iPad Air M1 or iPad Pro M2.
Yes. You can swipe, trim, and select clips with Apple Pencil for more precision.
Yes, you can import and export files directly using USB-C drives or SSDs.
Yes, with Final Cut Project Transfer, you can start editing on iPad and finish on Mac.


Discussion