
For those that love to film, they should know there’s an easy way to use green-screen in iMovie. Just like your favorite Hollywood picture, there’s no need to build practical sets anymore, you can create the world around you using a green-screen! A great video-editing trick, I’m going to take a look at what a green-screen is, and how to properly use one within Apple’s iMovie for Mac.
Of course, for those that may not be aware, iMovie is Apple’s free video editing application. Available for the iPhone, iPad and Mac, it allows users to create the video project of their dreams. In addition to advanced editing features, one of the coolest things iMovie is capable of doing is having a green-screen effect.
Does iMovie Allow Green-Screen?
Thanks to using a green-screen, iMovie users are able to record video in-front of a blue or green backdrop, allowing them to then remove the subject from the video and superimpose them overtop another video. For example, using a green-screen, a user could capture a video of their friends playing music, and then super-impose their friends playing in-front of the Taj Mahal.
Additionally, thanks to iMovie, users are able to play the audio from the green-screen clip simultaneously alongside the audio from the overlay. Users also have the option of lowering or raising the volume of each clip. Furthermore, users are also able to drag the green/blue-screen clip over a solid-color or background clip that is animated.
How Do You Use Green-Screen on iMovie Mac?
When it comes to properly using a green-screen, there’s a couple of things users should know. First, the most important thing is ensuring that you are using the right color green or blue for your screen. Remember, this is going in the background to remove the background from your shot.
Green colors such as “chroma key green” and “digi green” work best. When it comes to green, anything fluorescent works best. Blue is also good, especially for night scenes. Look for “Chroma Blue” or an equivalent. However, there are some arguments over which color works well under certain conditions. Usually green is the way to go, but if you can manage to get both, you can see how each colors works with or against each other.
Of course, if you are using a green-screen, make sure that no one is wearing vibrant green colors. Same goes for using a blue-screen, make sure no one is wearing anything similar to the blue you are using. When it comes to screens, there’s several options. You can either make them yourself or find them online.
How to Use Green-Screen in iMovie on Mac
With that out of the way, using a green-screen effect in iMovie is actually rather simple. You will of course need to ensure that you have your green-screen footage, and a copy of iMovie. Since iMovie is free, this likely will not be an issue.
To use a green- or blue-screen effect in iMovie, simply follow these steps:
Use Green-Screen in iMovie on Mac.
- On your Mac, from the iMovie app, select either a range or clip within your timeline that was shot with a green or blue screen.
Then, drag the clip into your project.
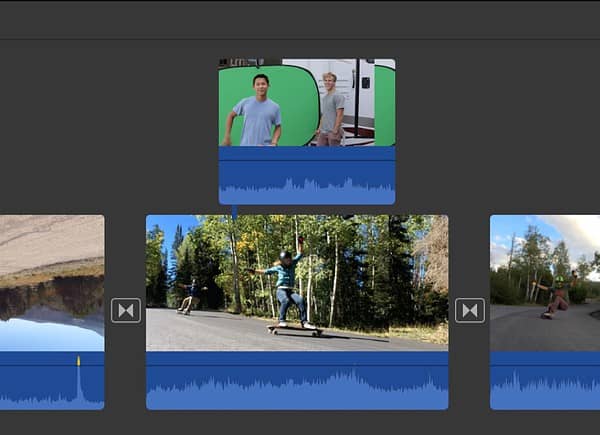
(Photo Credit: Apple.) - When you see the green Add icon, release the mouse button to bring the clip into your project.
- A user is able to view the video overlay controls by hitting the Video Overlay Settings button, should the controls not appear on screen.

(Photo Credit: Apple.) - Then, click the pop-up menu on the left and select Green/Blue screen.
To apply the changes, click the Apply button (checkmark) in the Green/Blue Screen controls.


Concerning Green/Blue Screen options, there’s a couple of things a user should know. Within the viewer, the clip a user shot on a blue or green backdrop will have the color removed. The clip below will then show through the area that was green or blue, creating an image composite.
Users should also know that iMovie will remove the color that is most dominate within a frame that is at the position of the Playhead when a user chooses Green/Blue Screen from the pop-up menu.
Should the frame below the Playhead not represent the rest of the clip, a user may need to reapply the effect after repositioning the Playhead. This involves repositioning the blue- or green-screen by dragging it to a different spot within the clip, or moving it to a different clip altogether. Users can also drag the ends to shorten or lengthen the clip.
How to Adjust Screen Settings
When it comes to adjusting a green- or blue-screen effect, users also have several options.
- Within iMovie, choose your blue- or green-screen clip from the timeline.
- If they do not immediately pop-up, you can find the the Green/Blue Screen controls by clicking the Video Overlay Settings button.
- Users then have the following options:
- Adjust the softness of edges within the superimposed clip: Adjusting the Softness slider will make edges within your clip either more jagged or smooth.

(Photo Credit: Apple.)
- Isolate areas of the green-screen clip: Select the Crop button, and then drag the corners of the frame in-order to isolate a subject from the clip in the foreground.
- Clean up areas of a blue- or green-screen clip: Users can use the Clean-up button (looks like an eraser) to erase areas of the Green/Blue-screen that are showing and should not be. It is also recommended that you adjust softness settings before using the Clean-up button. If you use Softness after using Clean-up, the background clean-up is reset and must be redone.
- Adjust the softness of edges within the superimposed clip: Adjusting the Softness slider will make edges within your clip either more jagged or smooth.
- When you are finished, you can apply changes using the Apply button in Green/Blue Screen controls.

Conclusion
When it comes being able to use a green-screen, more often that not it is a matter of making sure that the physical screen you are using for your backdrop is the right color green or blue. If you are having issues removing the background with a green or blue screen, the problem may be with your screen.
Following these steps, a user should now have a wealth of creative options at their fingertips. Using a green-screen can create a nearly infinite world of possibilities. Following these steps, and ensuring you have the proper green-screen, try and see what you can create in iMovie. Properly utilizing this effect can open-up a wealth of possibilities and options: see what you are capable of creating.


