Today we’re taking a look at how to create a beat in GarageBand. If you’re looking to make a beat, then look no further. As a musician, I primarily use GarageBand for its ability to act as a virtual guitar amplifier, which I will also discuss. However, there are plenty of other things users can do with this Digital Audio Workstation (DAW). Considering this is a free application from Apple, the program itself is incredibly powerful and contains plenty of features and surprises. Let’s take a look.
Before starting, keep in mind that I’m trying to show users the basics of all the instrument options available in GarageBand. Some of these basics may go a bit beyond what you are trying to do in the program. With this knowledge, if you are just trying to get the basic start to creating a beat, I would take a look at the Loop section. However, there’s a bit more to the program than just loops, so I will briefly cover these options as well.
How Do I Make a Beat Track in GarageBand?
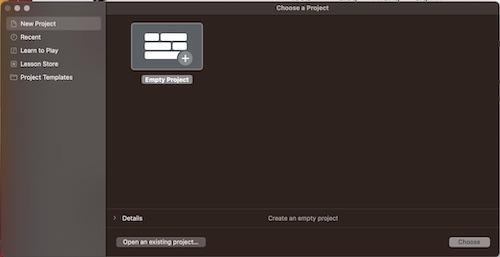
If you want to create a beat or a song in GarageBand, the first thing you’re going to need to do is open a new Project. This is rather easy to do, as the app will always have you open and select a project when you boot it up. Simply click Empty Project and then Choose to begin a new Project.
From here, you’re going to need to choose which instruments you want to add to GarageBand. You will have four options right from the start. Don’t worry, you can always add more sounds and instruments later. However, the four it will have you select from are:
- Software Instrument: This is anything that is MIDI-based, such as a MIDI keyboard or a drum pad. This is particularly useful if you have a keyboard to plug into your Mac. Additionally, you can also use your own Mac keyboard to act as a MIDI keyboard.
- Microphone: This allows you to record using a microphone. You can either plug in one of your own or use the microphone built-in to your device. I would not recommend using a mic that is built-in, as you likely will not get the best sound from it. However, using the built-in microphone can still be good for jotting down ideas.
- Guitar or Bass: This option is for recording a live guitar or bass. I actually discuss this further in a different article.
- Drums: Going with this option allows you to add an artificial drummer into the mix.

How Do You Make a Beat for a Song?
Since we’re just going over the basics, I’m going to suggest starting with loops, as this will allow you to start using GarageBand to make a beat in the quickest way possible. Loops are short snippets of instruments that you can, well, loop over and over again to create a song.
Starting with Loops
No matter which one you clicked on in the last section to start your project, we’re going to take a look at the Loops available first. This is going to be a great way to make a beat in GarageBand if you’re a beginner, as most of the instruments will already be written for you.
Up in the top-right corner is an icon that looks like a loop-de-loop. Click this icon to open your Loop Browser. From here, you will see a wide selection of different sounds and instruments that you can implement into your song. You can also organize them by Instrument, Genre, and Descriptors.

If this is your first time using GarageBand, you will likely need to download the loops you want to use. Ones in a dark grey will need to be downloaded. However, the ones in white will be available right off the rip. Users can also go to Menu Bar and select GarageBand > Sound Library > Download All Available Sounds. Though keep in mind this will take a lot of space (like, Gigabytes of space). You can single-click on a loop to preview it.
Using Loops to Create a Beat in GarageBand
Now that you know where the Loop Browser is located and how it works, we can begin making our first track. Using any of the Loops, drag and drop them into your project. Each Loop will be given its own area within your song so that you can place them exactly where you want them within your project. You can also extend the loop by clicking the top right edge and then dragging it.
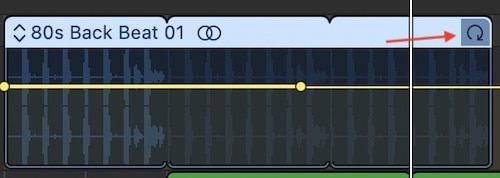
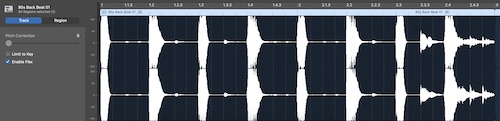
Additionally, whenever you click on the loop itself within your project, you can see the WAV of the Loop just below your track. This is where you can edit it to change what the Loop is playing. However, if this is your first time using GarageBand, I wouldn’t mess with this too much until you have a better handle on the software itself.
It’s absolutely possible to create an entire song using only the loops available in GarageBand. In fact, many artists have created entire careers out of using Loops, but you didn’t hear that from me.
Adding Other Instruments: Looking at MIDI Controllers and Tracks
Now that you know the basics of Loops, you can go ahead and add other instruments into the mix. For example, let’s take a brief look at how to add MIDI-controlled instruments to your track.
If you already have a MIDI keyboard, you simply need to connect it to USB, and your Mac will recognize it automatically. However, I’m going to go through this tutorial using Mac’s built-in keyboard, so that everyone can play.
How to Add a MIDI Instrument or Controller
To add a MIDI instrument to an already existing track, simply go to the Menu Bar and select Track > New Track. You can then add MIDI through the pop-up window we’ve already seen. This will add a keyboard to your Track.
To use your Mac’s keyboard to play notes, you will need to open the Musical Typing Window if it does not open automatically. In the Menu Bar, go to Window > Show Musical Typing to bring up the keyboard. You can also press Command+K.
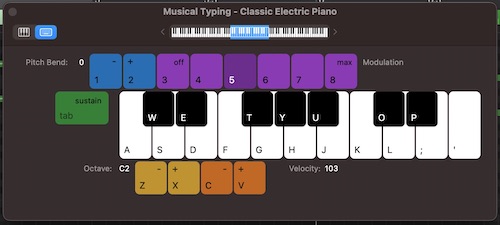
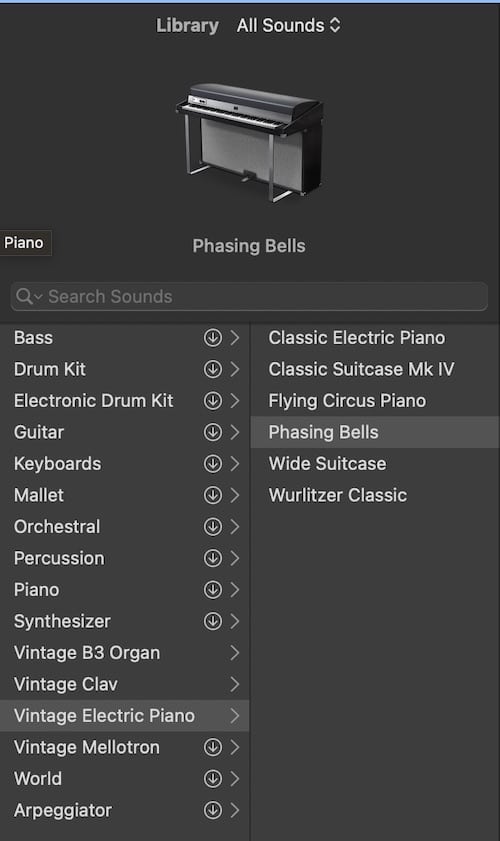
Now that you have a working keyboard, you can change what kind of keyboard you are using in the left-hand window. Again, this may require downloading some additional files, but there are a couple of keyboards available right out of the box. Select the one that sounds best to you.
How to Record a Keyboard MIDI Track
Now, if you want to record your keyboard playing, you can do so with the Record button at the top. This will give you a four-count into the song (or whatever time signature you are using). Make sure the Playhead (the triangle and line within your project) is where you want it to be, and hit the record button at the top, or the R key. You can then begin playing your notes to the Loops. Once you are finished, you can stop recording with the SpaceBar or the R button.
If you need to Loop the midi-track that you created, you will need to click on it within the track itself, and then either hit the L key, or Control-Click and select Loop. This will then allow you to drag the MIDI so that you can loop it.
Since I brought it up, you are able to change the time signature as well as the tempo of the track directly above your workstation. It is sitting smack-dab in the top-middle of the app, and you should see the numbers 110 and 4/4. If you don’t know what these are, I wouldn’t recommend changing them. However, changing the tempo will make the song faster or slower. Time signatures are a beast that’s better left for another day.
How to Edit a Recorded MIDI Track
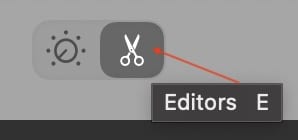
This is also a great time to bring up the difference between Smart Controls and the Editor. I’m going to get into Smart Controls during the Mixing and Mastering phase, but if you do not see what I’m talking about in this section, make sure to hit the E key, or go to these options at the top. GarageBand can only show one option at a time, and it shows them in the same window. You can switch back and forth between the Smart Controls and the Editor using the E and B keys on your keyboard.
Of course, let’s say you were a bit off time with your key hits, or you want to go in and edit the keyboard notes manually. You can do this with the Piano Roll feature. The easiest way to gain access to this feature is by double-clicking the name of the Keyboard within your Track. This will bring up the Piano Roll, showing the exact notes you played within your MIDI track. You can also hit the E key.
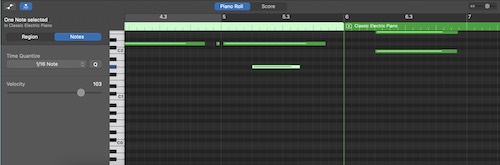
Using the Piano Roll, you can move around the notes you created by dragging and dropping them. You can also elongate or shorten notes the same way that you would your Loops. If you need to add additional notes, simply Control-click within a specific area and select Add Note. You can also delete them using the Delete key. Again, this is great for fine-tuning your keyboard playing.
Adding Physical Instruments to a Beat in GarageBand
When it comes to adding a physical instrument, such as a guitar or bass, I’ve already briefly covered this in another article. You’re going to need some additional hardware to connect a guitar or bass, so keep that in mind.
Another thing that a user may need to realize is that MIDI and Audio tracks are different from one another. MIDI sends information about the notes played directly to GarageBand, whereas simply recording audio is sending the actual sound waves to GarageBand. However, they’re both similar in that you can record, store and edit your recordings directly in the app.
Time needed: 3 minutes
To add guitar (or bass) to GarageBand, follow these steps:
- Connect your instrument to your Mac.
- From the Menu Bar, go to Track > Add New Track. Select the “Connect Guitar or Bass” (Guitar Icon) option from the window.
- Now that you have your guitar or bass connected, you can then choose the amp for it in the window to the left, just like how you chose the keyboard for the MIDI controller.
- You are then able to begin recording with your guitar by pressing the R key.
- Just like with the MIDI controller, you can also make specific adjustments to your guitar. However, this will be editing a WAV file rather than being able to add individual notes. Keep this in mind while you record.
- Your guitar will also appear within the Project window so that you can move it around, or make it into a Loop.
Bringing Ringo on Board: Taking a Look at Drums in GarageBand
Of course, now that we’ve taken a look at how to add loops, guitar, and MIDI to our GarageBand song, we need to take a look at the drums as well. While there are plenty of Loops featuring the drums in GarageBand, users may want something that is more of their style.
You have plenty of options when it comes to adding drums:
- The Virtual Drummer is one option.
- There are the Loops that we’ve already discussed.
- You can also record drums using the MIDI option.
- Users are also able to program their own drums by creating an empty MIDI region within a new track, and then use the Piano Roll editor to create and edit individual notes. This assigns different keystrokes to different instruments of a drum set.
How to Add a Virtual Drummer
Since this is for beginners, let’s go with just using a Virtual Drummer. This will be the fastest way of adding drums to your song.
- From the Menu Bar, go to Track > Add New Track or press Option+Command+N.
- Select the Drummer option.
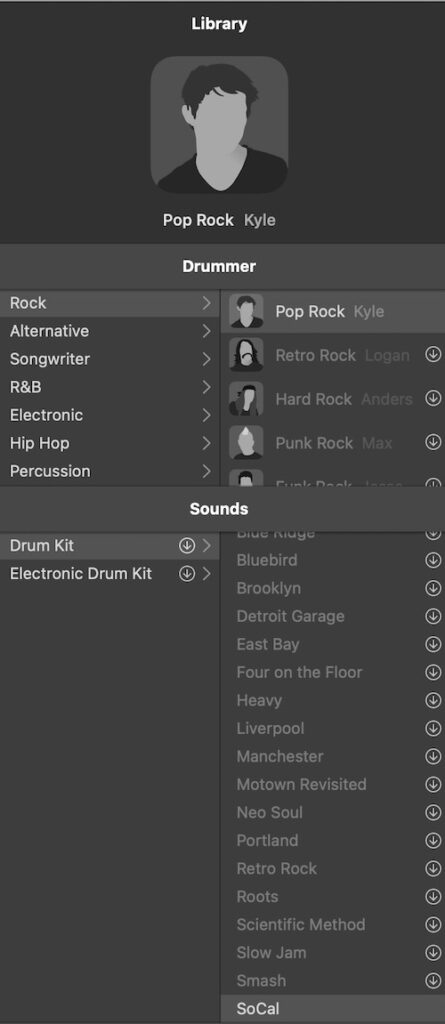
- This will create a new drummer track in your Project, and you will receive a drummer and drum parameters automatically. This will also automatically add settings for style, loudness and what part of the drum kit is seeing use. I will explain this more in-depth in the next session.
If you want to change the style of your drummer, you can do so in the top-left corner of the screen. This will likely involve downloading additional files. You can also change what type of drum set they are using in the Sounds section below the drummer.
Changing Styles of the Virtual Drummer
If you’re happy with these settings, you can also change the type of beat the virtual drummer is playing. Underneath your song, you will see a UI giving you a multitude of options. This includes Beat Presets, Style, Instruments, Fills, and Swing.
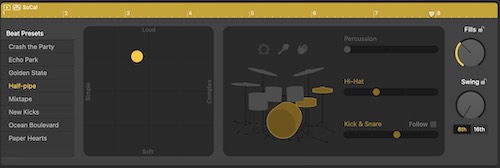
Let me explain each one:
- Beat Presets: This will adjust the beat (what the drums are doing) automatically, and you can select different styles.
- Style: This will change how the drummer plays the beat. I.E., you can adjust how soft or how loudly they are playing. You can also change if you want them to play it simple (like Charlie Watts) or Complex (like Buddy Rich). To change this, move the yellow dot in an X-Y pattern.
- Instruments: You can also adjust what instruments the drummer is playing, such as percussion, Hi-Hat or Kick & Snare. Adjust these sliders to taste.
- You can also adjust the Fills the drummer will play, while also adjusting how much the drummer ‘swings’. Adjust these knobs accordingly.
Adding Vocals to a Beat in GarageBand
When it comes to GarageBand, you have a wealth of options: even this is just scratching the surface! However, we will still need to take a look at adding vocals as well.
- If you want to add a vocal track, simply create a new Track once again through the Menu Bar by going to Track > Add New Track.
- This time, select the Microphone icon.
- You will get a new track within your project, and you can either record vocals using a microphone or add vocal loops using Apple Vocal Loops. Adding Loops is the same as in the steps mentioned above. Remember that the R button starts and stops recording.
Mixing and Mastering Your Beat in GarageBand
Now that we have our song ready to go, it’s time for mixing and mastering. This helps add balance between the individual tracks in your song. Just like creating your own song or beat, mixing and mastering features no right or wrong way of going about things: it all depends on how it sounds to your ears.
However, let’s note the difference between mixing and mastering:
- Mixing involves balancing the volume and panning of individual tracks within your project. This also includes potentially adding effects, such as reverb or delay.
- Mastering, on the other hand, involves bringing individual tracks together and applying things such as Equalization (EQ), Compression, and Limiting to an overall mix.
Adjusting the Volume of Each Track in GarageBand
So, one of the first things you might want to do after creating all of these tracks is adjust the volume of each track accordingly. You can also pan a track during this time, which changes where it will appear in your speakers. Accordingly, there’s a slider next to the time signature and tempo options that allows you to change the master volume of the track.
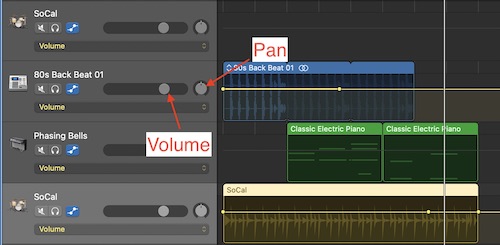
If you want to adjust the volume and pan of a track, follow these steps:
- Select the track’s header region within your project.
- You can slide the volume button to the left or to the right. You can also change what this slider adjusts through the drop-down menu.
- You can pan the track by rotating the control left or right. This will pan the track either left or right.
Adjusting the volume is going to be helpful in getting everything ‘level’ within the track. Panning can just be a way of adding an additional element to your song (Think the guitar in Pink Floyd’s Interstellar Overdrive).
Adding Additional Effects to a Track or Beat
Of course, now that you have your tracks created, you can also add in any effects that you would like. Simply click on any of your tracks within your project, and then click the Knob icon in the top-left corner. You can also hit the B key to bring up these controls. This will allow you to add plug-ins.
With this setting on, go to the bottom of the screen and adjust whatever you see fit. You can add echo, change EQ, adjust modulation, and more. You are also able to do this for each individual track. For the entire project, select Master rather than Track.

Adding Fade and Cross-Fade
One more thing we also need to look at is the fade and crossfades options. This is great for either removing small noises from an individual track or fading the overall beat in or out.
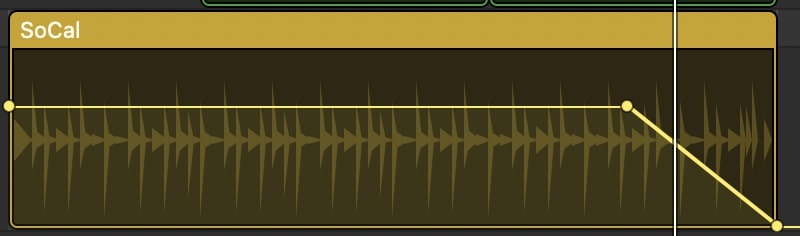
To fade a song in or out, you simply need to create volume points within each track. They should show up automatically whenever you click on an individual track, but you can also bring them up by pressing the A key.
From here, follow these steps:
- Double-click on an area within your song to create a new volume point.
- Double-click on the beginning or end of your track, depending on if you want to fade it in or out.
- Lower the second volume point all the way down so that it is silent.
- This will create a fade-in or fade-out effect. Remember that you can also drag the volume points to the location they need to be. This can be helpful for fine-tuning.
Sharing Your GarageBand Beat with the World
And there we go! We’ve created a beat in GarageBand using all of the available instruments! While it may seem like a lot, that’s because it is. In fact, there are a lot of options we have yet to discuss, but this will give you the basics of creating a beat in GarageBand. If you wish for a simpler alternative, you can give it a try to FL Studio. It’s an app recommended by lots of music producers because it’s intuitive and provides a vast amount of features. Plus, you can try it for free and find out if it actually fits your needs.
Now that you’ve created a beat, you may be ready to share it with the world. Fortunately, we here at TMO got you covered, as there’s a variety of ways you can share your beat. Using the app, there are ways you can easily share your project, either with friends or through the internet. Of course, you’re also able to save projects as an MP3, or even set your project as a ringtone for your iPhone.
There’s a lot that can be done with GarageBand, especially for a free DAW that comes with most Apple devices. When it comes to making beats, remember that the Undo button is going to be one of your closest friends. Outside of this, however, the only thing limiting you is your own imagination. Now that know the basics, you’re free to truly explore and see what you are able to develop and create. See what kinds of beats you are able to make in GarageBand, and even feel free to send me your work when you’re done.