For those that switch from Android to iPhone, there’s a number of different ways a user can transfer their contacts. While moving from an iPhone to another iPhone (or Android to Android) is typically a seamless process, moving from Android to iPhone can be slightly more of a process. However, for those looking to transfer your contacts, it can be rather simple. I’m going to take a look at several different options a user has for transferring their contacts.
When it comes to moving your contacts from Android to iPhone, the process can be rather simple. However, one thing thing you may want to consider is whether or not your contacts are associated with your Gmail account. If you set up your Android phone and used it normally, then it is highly likely that the majority of your contacts are attached to your Google account (you need to disable a setting to have them not associate). With that in mind, the first two suggestions are for those with their Contacts within a Google account, and the second two options will help those who do not.
Don’t miss the best of The Mac Observer
Set us as a preferred source and our Apple reporting ranks higher in your Google Search results and Discover feed — one tap, no account changes.
Transfer Android Contacts to iPhone Via a Google Account
One of the easiest ways to transfer your Android contacts to an iPhone is by signing into a Google account on your Apple device. What makes this option great is that it can work with a brand new iPhone as well as one that has already undergone a setup. Essentially, all you need to do is add a Google account to your iPhone.
Simply perform the following steps:
- From your iPhone, go to Settings.
- Scroll down and select Mail and then Accounts.

- Select Add Account.
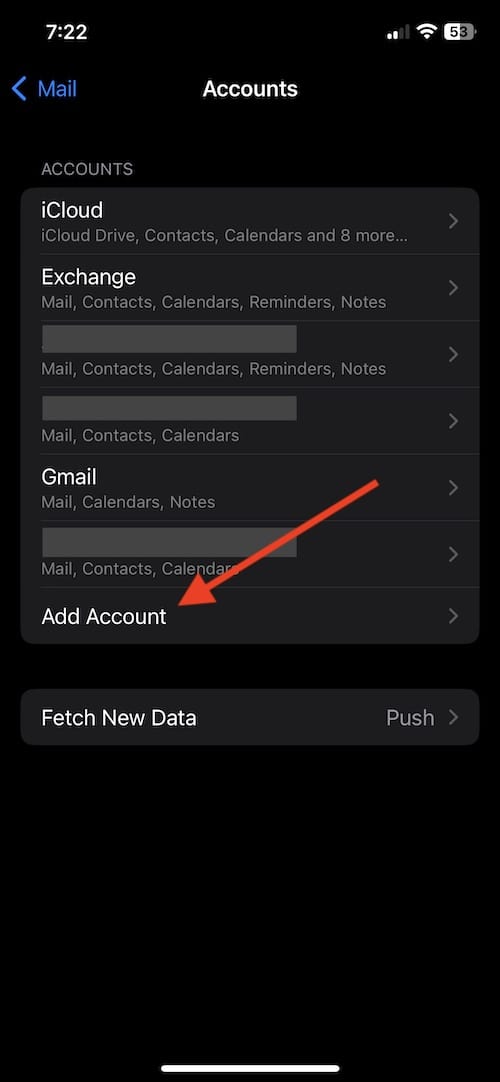
- Select Google.

- Continue to follow the prompts, including providing your account name and password. At the end, your contacts will import to your phone.
Transfer Contacts Using Move to iOS
Another way you can import your contacts from Android to iPhone is through the Move to iOS app. Available from Apple, it is the company’s way of helping Android users move to a new iPhone. Using this app, you can not only important your contacts, but other important information, including photos, email and calendars.
To transfer contacts using this method, follow these steps. Note that your iPhone cannot be already set up to use this method.
- First, you will need to install the Move to iOS app on your Android device.
- From your iPhone, continue through the setup process until you reach the App & Data screen.
- On your iPhone, select Move Data from Android.
- You can now open the Move to iOS app on your Android device.
- You will then select Continue on both of your devices. Within Move to iOS, agree to the terms and conditions, and then select Next.
- Your iPhone will receive a code. Enter this code into Move to iOS.
- Move from iOS will then take your through completing the process.
Create a VCF File to Transfer Contacts
There’s also a way to transfer your contacts by creating a VCF file. Going this route is a great option for Android users that have contacts that are not tied to a Google account. This can also be helpful if you are looking to only transfer a couple of select contacts.
- From the Android phone, go to the Contacts app.
- Tap the three dots locate at the top-right of the screen and select Share.
- Select the contacts you would like to transfer, or select All to select all of them.
- When you have made your choice, tap Share.
- For those that only selected one contact, make sure to select VCF file. For those that selected multiple contacts, your only choice will be VCF. You can then send the file either through email or a text message.
- From here, you can open the VCF file on your iPhone, and choose which contacts you want to transfer.
Transfer Contacts Via Your SIM Card
The last option is to transfer your contacts by swapping the SIM card. While this is a useful option for those that need to transfer contacts not attached to a Google account, it is the least practical out of all of the solutions. However, the only reason this is least convenient option is that it entails swapping the SIM cards out of devices. Fortunately, if you are moving to a new iPhone, a SIM card ejector tool comes with your new Apple device.
To transfer your contacts using this method, follow these steps:
Time needed: 5 minutes
Transfer contacts from Android to iPhone via SIM card.
- Go to the Contacts app on your Android phone.
- Tap the three horizontal lines.
- Select Manage contacts.
- From the Manage contacts page, select Import/Export contacts.
- Select Export.
- You will then choose where you want to export your contacts, select your SIM card.
- From here, you can either move all of your contacts be selecting All, or chose your contacts manually.
- You will then select Export, and possibly confirm your selection.
- Once this is complete, you will then remove the SIM card from the Android phone and move it to the iPhone.
- Now, from your iPhone, go to the Settings app.
- Select Contacts.
- Choose Import SIM Contacts.
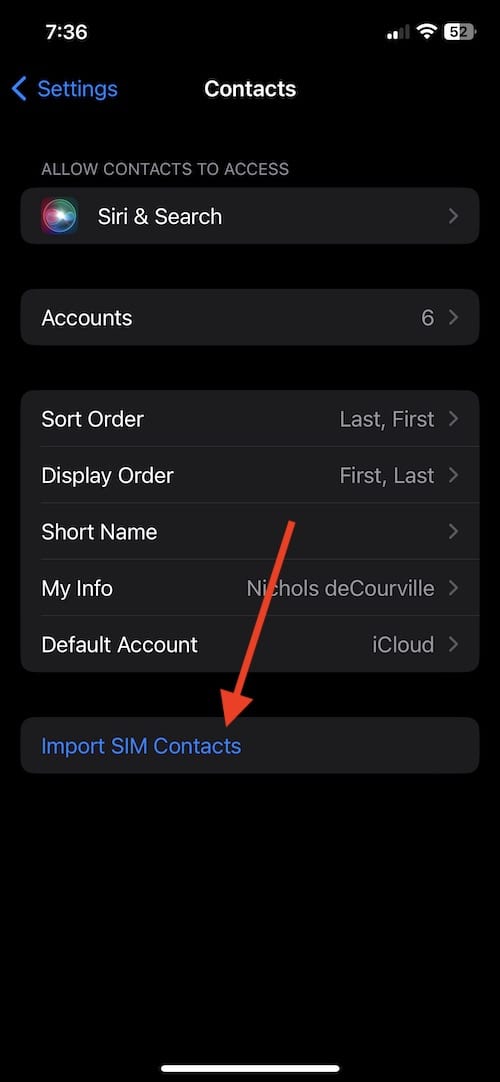
- You will then choose which account will store the contacts.
Making the Switch
While the first two options are likely the easiest, they may not be the easiest if your contacts are not attached to your Google account. However, as mentioned, if you used your device normally, your contacts are likely attached to your Google account. However, if you find that you are missing some contacts after trying the first two options, remember that the second two options allow you to manually select which contacts get transferred. Having the best of both worlds might be the best to ensure that all of your contacts see transfer.
Moving from Android to iPhone isn’t always easy, though, it may usually be a great decision (you’re reading an Apple website, after all). Personally, I know this can be an issue from the time I moved to Android all those years ago. While making the switch can be something of a headache, once you are done, you can fully immerse yourself in the world of iPhone.


Discussion