How to Do HDR Photography on Your iPhone, and Why You Should

HDR. You see it as an option on your iPhone’s Camera app screen. You’re told that it will make you a "better" photographer, that your pictures will be more compelling, that you should always have HDR enabled. "Just set-it-and-forget-it," they say. But what is HDR? Why is it so important that you use it? What's all the fuss about? More importantly, how do you use HDR, and when do you use it? 

First, a little background. After all, to best utilize any technology, at the very least, you should understand the basics of it.

HDR stands for High Dynamic Range.

Great. So now what? Well, at least you’re now equipped to answer correctly when asked to identify this acronym next time you are a contestant on Jeopardy. However, in relation to your photography, you need to understand what High Dynamic Range means.

An illustration showing the light-sensitive components of the human eye.

The Cone and Rod photoreceptor cells in the retina contribute to our remarkable vision, especially in low light.

First, consider the typical human eyes. They are truly wondrous. Healthy eyes have special receptors that allow us to distinguish objects remarkably well in darkness, and to see the smallest pinpoint light source far into the distance. As photographers, what is more pertinent, is that in daylight, our eyes are capable of seeing sharp details in both the brightest and darkest parts of the scene before us. They are able to distinguish between many subtle variations from total white to total black. This is the Dynamic Range we speak of. More specifically, it's the ratio of light to dark. Our eyes are naturally capable of discerning a high dynamic range of tonalities.

Film and digital camera sensors, on the other hand, suffer from low dynamic range, relative to our eyes. They are far less capable of distinguishing details, both in the deepest shadows and in the lightest highlights present in a scene. As the technology evolves, sensors as well as associated camera electronics and software, work hard at ameliorating this deficiency. However, it will be some time - if ever - before the digital acuity of our camera sensors rival our own superlative eyesight.

Two men playing a board game next to the Leaning Tower of Pisa

In high contrast scenes, a digital sensor picks up mid tones well, but details are lost
in extreme light and dark areas. HDR can help. (Photo enhanced for effect)

Oftentimes, when we review our images after a shoot, we come away disappointed. Why is that?

For example, a person reviewing photos after returning from a trip to Italy might say, "That's odd. When I was taking this photo of the Leaning Tower of Pisa, I was able to clearly see some goofy tourists cavorting on the grass in the tower's shadow. I can't make them out in the picture now. That shadowy area is almost black. Not only that, the bright puffy clouds were so clearly delineated when looking at them. In this photo, the sky is bright and washed out. I can't even see those interesting outlines of the clouds. Everything else looks OK; the activity on the sunny grassy areas and the tower itself with all its detail. What the heck is going on here? Is my iPhone camera broken?"

No, it's not broken. You have encountered the dynamic range limitations of the camera's sensor that I mentioned previously. At the “normal” exposure settings, it simply cannot capture details both in the brightest and darkest parts of the scene.

Enter HDR Photography

HDR is a technique that addresses highly contrasty scenes such as the one described in the Pisa scenario above. With HDR, we can mitigate the disappointment which results when capturing an image of a beautiful sunny day with bright white puffy clouds and deep shadows. Again, disappointment happens because the sensor is not capable of fully recording the wide range of tonalities in the scene - the same ones our eyes can see perfectly. 

Generically, the HDR technique consists of taking several identical shots in quick succession, but with the exposure settings (which dictate the amount of light hitting the sensor) shifted from shot to shot. One or more images are underexposed, resulting in better visible detail in the scenery's highlights. One or more shots are overexposed, resulting in details coming into view in the shadows. All light meters measure for perfect results in the mid tones of a scene, so those areas are not affected in the normally exposed image. With the help of specialized software, all the shots are analyzed, balanced and blended into one final HDR image. 

The result is often a more natural photo that resembles more what we recall our own eyes were seeing at the time the picture was taken. In the final HDR photo, we now clearly see a wider range of tonalities. We can see more detail both in the highlights and in the shadows. In general, an HDR image can look better overall.

Traditionally, with DSLR cameras, HDR photography is a bit more involved, both with respect to the camera gear, the shooting process, and the “post-processing” later in photo editing software on a personal computer. But working this way can definitely produce spectacular results, especially when done right.

The Camera App on two iPhone screens

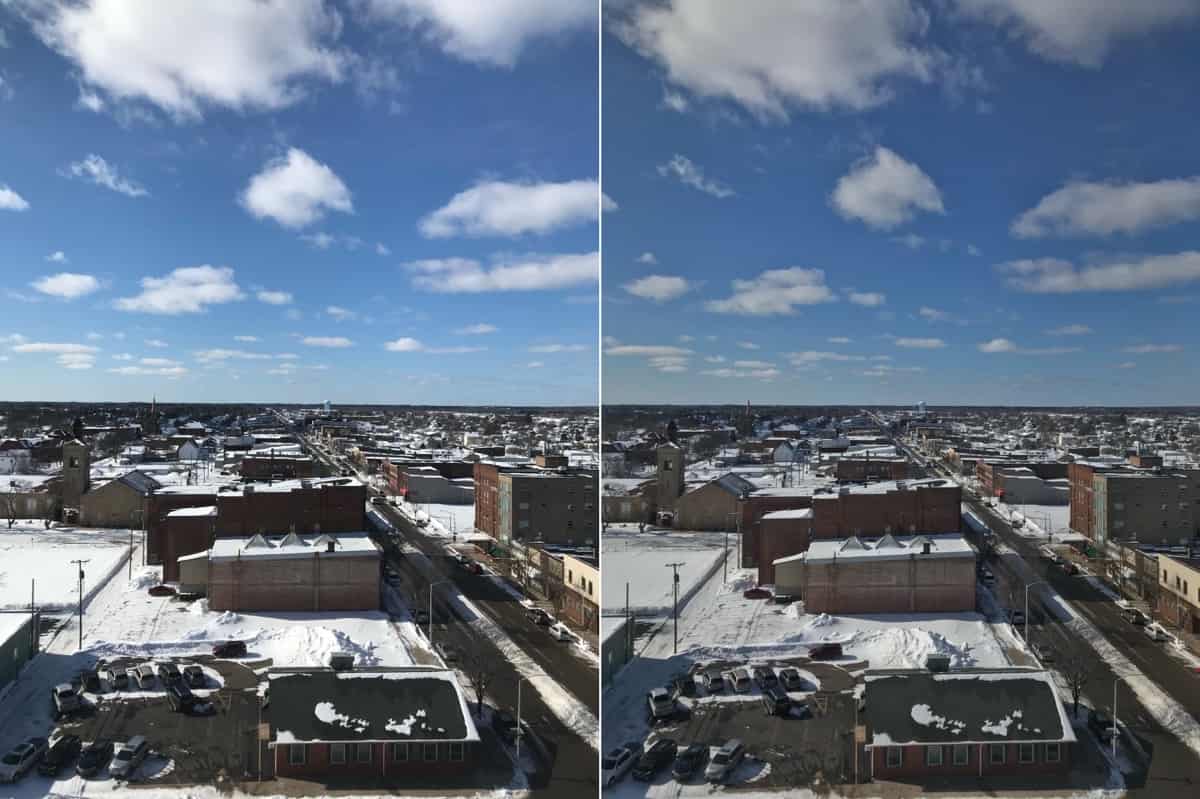
Here’s the before and after when shooting HDR. The normal exposure is on the left.

Here’s how this all works on iPhone. Once the HDR feature is enabled, the iPhone camera will shoot three pictures practically simultaneously. One is the "normally" exposed image, one is underexposed, and one is overexposed. The Camera app software, with assistance from the iPhone's powerful processor, then analyzes and blends the photos in such a way as to produce the balanced, wider (high) dynamic range image. Shadows lighten, revealing detail there; highlights darken, allowing details to emerge there. Mid-tones are generally untouched, as they appear perfectly exposed, showing good detail. The HDR-processed image is then saved to the Camera Roll. The over- and under-exposed versions are discarded. The normally exposed version may also be saved to the Camera Roll, but that is optional and discussed below.

Let’s look at how to enable HDR on your iPhone. First, HDR was introduced to iPhone photography way back in 2010 with the release of iOS 4.1. Some significant changes were introduced with the recent iOS 7.1 release.

HDR is available for use on all rear-facing iSight cameras, as well as for those perfect selfies using the front-facing FaceTime camera on iPhone 5s.

The top toolbar of the Camera app.

The center button depicts the HDR Mode currently enabled. Tapping on it allows you to choose modes.

Enabling HDR is straightforward. Launch your camera app. For iOS versions earlier than 7.1, you will find a simple ON/OFF switch. Under iOS 7.1, if you are in Photo or Square photo modes, you will see an HDR button in the toolbar at the top if shooting vertical, or on one of two sides if shooting horizontal. That button also indicates the HDR mode the camera is currently configured to - HDR OFF, HDR ON, or HDR AUTO. To switch modes, simply tap on the text/button, then tap on the HDR mode you wish to set iPhone’s camera to.

Are you not seeing the HDR Auto Mode? Remember, this mode is available on iPhone 5s only and iOS 7.1. With this mode selected, iPhone 5s will use HDR when it’s most effective. That is, when there is a sufficient amount of contrast in a scenery to warrant the use of HDR techniques - all in an effort to give you a more even, realistic image.

Always remember that for best results whenever you are shooting with an iPhone - especially when in HDR mode - keep both iPhone and the subject as still as possible. Also, flash is disabled when HDR ON is enabled. With HDR AUTO enabled, flash can be set to AUTO (or OFF).

The Photos & Camera Settings panel.

Scroll all the way to the bottom of the Photos & Camera Settings panel to get to the HDR setting.

There is an important setting for HDR that is found by going to Settings > Photos and Camera. If you scroll all the way to the bottom you will see the HDR section. Here, you can have iPhone keep the normally exposed photo along with the final HDR version, as I alluded to earlier. I find this to be a valuable feature, and I keep it enabled. It helps me compare the two images side-by-side so that I - not my iPhone - can determine which image is a keeper.

An image playback in the Camera Roll.

In Camera Roll, all HDR photos are now clearly identified.

There’s another related new feature introduced in iOS 7.1. HDR versions of photos in the Camera Roll are now marked with “HDR” in the corner of the image (seen only when playing back the photos on the iPhone). Needless to say, this is a welcome feature since there are often imperceptible differences between the normal exposure and the HDR version when viewing them on the small iPhone screen.

Why not give HDR on your iPhone a try. By all means, when you’re shooting a very contrasty scene outdoors, keep HDR enabled. If you’re new to HDR, I suggest that for a while, you keep it set to ON or AUTO (for iPhone 5s). In any event, make sure you have the Keep Normal Photo enabled in Settings. After having accumulated a number of these HDR pairs, transfer them to your computer and examine at them closely and at full size. If you’re familiar with histograms, see how they differ, and learn how HDR photography works for you.