
Learning how to screenshot on an iPad is something almost every user needs at some point. Capturing exactly what’s on your screen can help save important information, share moments, or keep handy references.
In this guide, we’ll break down the simplest methods so you can screenshot on your iPad quickly and effortlessly.
Table of contents
How do I take a screenshot on my iPad without a Home Button?
- When you are on the screen that you want to take an image of, simply press the Top button and Volume Up or Volume Down button at the same time.
- Then, quickly release both buttons.

If done correctly, you will see your screen briefly flash white, and if your sound is on, you will hear the sound of a camera shutter. You will then see your screenshot appear in the bottom-left corner of your screen.
- Clicking on the thumbnail allows you to either share the image, edit it, or simply save it to your device. You can also make quick annotations to the image.
- You can also swipe on the image thumbnail to delete it.

How do I take screenshots on an iPad with a Home button?
If you’re rocking a first-generation iPad Pro or an iPad with a Home button, then there’s also an easy way to take a screenshot.
- Press the Top button and Home button simultaneously and then release them.

You can now edit, annotate, or share the screenshot captured on the iPad!
How to screenshot using gestures on iPad?
If you’re running a recent version of iPadOS, such as iPadOS 16, you can take screenshots using Swipe gestures. Besides, you can turn an entire webpage into a PDF.
Of course, before you can implement this, you will need to ensure that the feature is on.
From your iPad, follow these steps:
Time needed: 2 minutes
How to enable and use taking screenshots with Gestures.
-
Open Settings.
-
Select Multitasking & Gestures.
-
Turn on Swipe Finger From Corner. This will allow you to use either your finger or an Apple Pencil to generate screen grabs.
-
Then, select either Bottom Left Corner or Bottom Right Corner, and ensure that you selected Screenshot for one of these corners.
-
From here, you can now take screen grabs using Gestures. From the screen you want to take an image of, either use your finger or an Apple Pencil to swipe from the bottom left or right of your screen.
-
Then, drag the corner of your screen to the center and let go.
-
Make any markups or edits that you need to and tap on Done.

You can now capture screenshots with Apple Pencil.
How to screen record on your iPad?
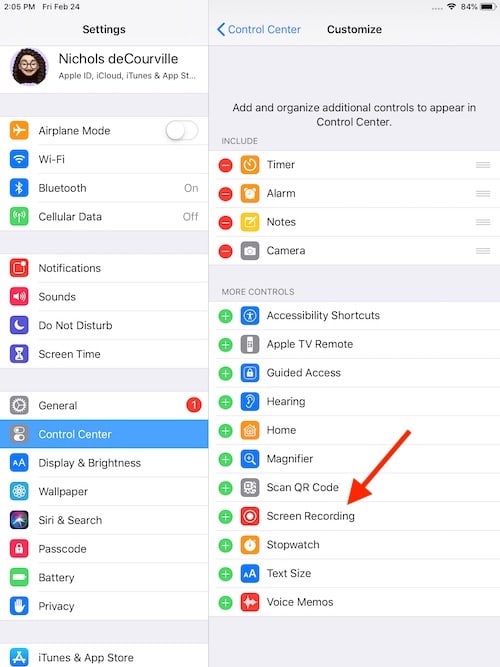
- First, ensure that you have Screen Recording enabled.
- Go to Settings > Control Center and ensure that Screen Recording is in the Include section. If it is not, press the green plus button next to Screen Recording.
- Then, open your Control Center by swiping down from the left corner of your screen. Select the Record button. You will receive a three-second countdown before your device begins recording.
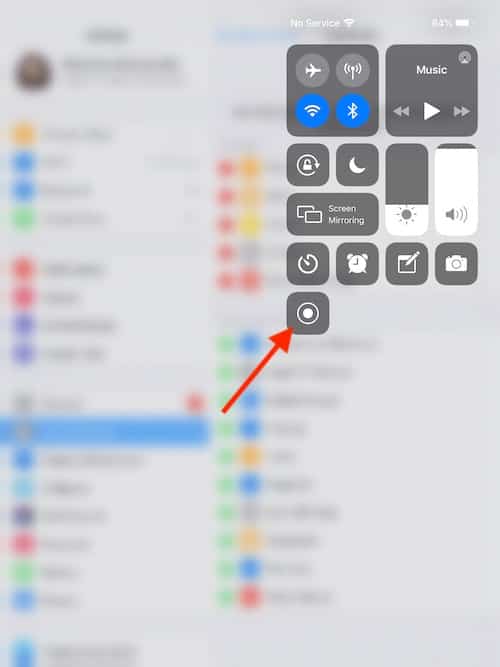
- To stop recording, tap the red Status Bar at the top of your screen and select Stop.


To find out more, check our dedicated guide about screenshots and screen recording on iPad.
Where can I find captured screenshots on iPad?
If you are looking for your screenshots, you can find them in the Photos app. Go to Photos > Albums > Screenshots. This will conveniently show you all of your screenshots, and you can edit them from there.
Tips to take screenshots on iPad
- Enable corner swipes in Settings to take screenshots with a finger or Apple Pencil.
- Tap the thumbnail after taking a screenshot to add notes, drawings, or highlights.
- Capture entire web pages as PDFs if your iPad supports the feature.
- Turn on AssistiveTouch to take screenshots with a single tap without pressing physical buttons.
- For dynamic content, use the Screen Recording feature to capture videos instead of static screenshots.
Frequently Asked Questions
Yes. Enable AssistiveTouch in Settings > Accessibility > Touch > AssistiveTouch. You can then take a screenshot from the on-screen menu.
After taking a regular screenshot, tap the thumbnail and select Full Page. This will save the page as a PDF.
All screenshots are stored in the Photos app. You can find them under Photos > Albums > Screenshots.
Yes. Tap the screenshot thumbnail to add annotations, crop, or share before saving.
Summary
- iPads without a Home button: press Top + Volume Up.
- iPads with a Home button: press Top + Home.
- Use Gestures or AssistiveTouch for easier screenshots.
- Tap the screenshot thumbnail to edit, share, or save.
- Capture entire pages with Full Page screenshots.
- Screen Recording is great for dynamic content.
- Find all screenshots in Photos > Albums > Screenshots.
Conclusion
Knowing how to screenshot on iPad makes it easy to save, share, and annotate important content. Whether you prefer buttons, gestures, or AssistiveTouch, Apple provides multiple ways to capture your screen.
With the ability to take full-page screenshots, annotate images, and even record your screen, you’ll never miss a moment or detail on your iPad.
Before you leave, learn how to seamlessly capture screenshots on iPhone!


