
Private Browsing on Safari is similar to the incognito mode on Chrome browser. The stealth mode lets you browse the internet without worrying about the trial. The Private Mode helps evade marketers who keep track of your browsing history. Apple has introduced a slew of new features on iOS 17. One such feature lets you lock Private Browsing on Safari using a Face ID.
Why Do You Need a Face ID for Private Browsing on Your iPhone?
Previously anyone with access to your unlocked iPhone could access Private Browsing tabs. Although Safari doesn’t maintain a history in Private Mode, the person can still access open tabs. Apple has finally added a way to stop this from happening. Starting with iOS 17, you can lock Private Browsing with Face ID.
The lock prevents others from accessing your private tabs. Furthermore, Safari will ask for Face ID authentication whenever you move from regular to private tabs. If the authentication fails twice, then your iPhone will automatically get locked. You have to unlock the device using a Passcode.
Let us learn how to enable and use Face ID lock to protect private browsing tabs. Before proceeding, note that the feature is only available on iOS 17 and above. Currently, iOS 17 is available as a developer preview. Typically previews often have glitches and bugs. We don’t recommend installing iOS 17 (yet) on your primary device. And for those who are ok with the beta, here’s how to install iOS 17 developer preview on an iPhone.
How to Add Face ID lock for Safari Private Browsing on iOS 17
You must enable Face ID for Private Browsing by heading to settings. Before that, make sure your iPhone is running iOS 17 and above.
Time needed: 2 minutes
Here’s how to enable Face ID for Safari-
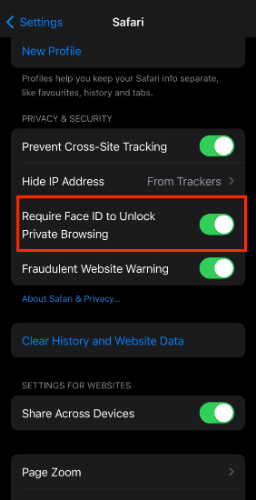
- Open Settings.
- Scroll down and select Safari.

- On the Safari settings menu, you will get multiple options. From that, enable Require Face ID to Unlock Private Browsing.


Thats it. Henceforth Private browsing on Safari will require Face ID authentication.
How to Use Face ID to Unlock Safari Private Browsing
You have enabled the feature. Now it is time to give it a go. Open Safari Private tab and use Face ID. Tap the tab icon on the bottom right. Now all the active tabs will be visible. Switch to Private Mode. Once again, Safari will ask you to unlock with Face ID.

For further reading, you might want to check out how to make Face ID work with sunglasses.
New Safari Features on iOS 17
Apart from Face ID for Private Browsing, Apple has also added other features. Starting with iOS 17, Safari gets Advanced Tracking and Fingerprinting Protection. In other words, marketing companies will no longer be able to create and identify a user based on their browsing patterns. Enhanced Extension Control is yet another new feature. It automatically turns off extensions that have access to the website. When needed, they can be turned on in Safari Settings. Managed to install iOS 17 Developer Preview? Share your experience in comments below.


